Accessing files remotely can be beneficial as a permanent solution or during development phases. The Barracuda App Server provides a Network File Server, known as the Web File Server, and a Network File Client, referred to as NetIO. Together, they enable one Barracuda App Server to serve files to another.
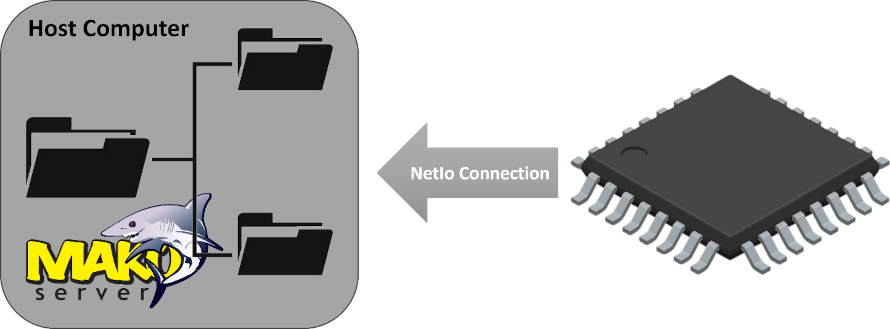
The Web File Server and NetIO are programmable, allowing for the creation of instances using C and Lua code. This tutorial will show how to activate these components using two development environments that offer a no-code option for configuring and setting up a client/server file system. Here, the Mako Server will function as the Network File Server, while the Xedge IDE will serve as the Network File Client. The Mako Server will operate on your host operating system, such as Windows or Linux, and the NetIO will be activated through the Xedge IDE, which can run on an embedded device or as an application on another Mako Server instance. For more information, refer to the Xedge IDE documentation.
Begin by downloading and installing the Mako Server for your host operating system. Familiarize yourself with starting the server using the command line.
Next, create a directory specifically for this tutorial on your file system, for example, C:\Users\[username]\tutorial on Windows or /home/[username]/tutorial on Linux.
Within this directory, create a new file named mako.conf and insert the following configuration:
1 2 3 4 5 6 7 | fileserver={ fsname="fs", ioname="home", path="/", lockdir=".LOCK", noauth=true} |
The above configuration details are available in the Web File Server section of the Mako Server documentation.
Then, launch the Mako Server in this directory. You should see an output similar to:
Loading c:\Users\[username]\tutorial\mako.conf
Mounting /c/Users/[username]/tutorial/mako.zip
Server listening on IPv6 port 80
Server listening on IPv4 port 80
Loading certificate MakoServer
SharkSSL server listening on IPv6 port 443
SharkSSL server listening on IPv4 port 443
Creating file server at /fs/ -> c:\Users\[username]\tutorial\ ok
Warning: unprotected file server.
This output indicates that the Mako Server has successfully integrated a Web File Server instance into the virtual file system at "/fs/". Confirm this by navigating to http://localhost/fs/. You should see the content of the "tutorial" directory in your browser. In the above example, the server listens on port 80. If the server is not listening on port 80, include the port number in the URL e.g. http://localhost:9357/fs/
Note: The following code was developed and tested using the ESP32 version of Xedge, called Xedge32. Consider reading the tutorial Your First Xedge32 Project before proceeding, as this tutorial includes introductory information, including a video, on using the Xedge IDE.
Before using the Xedge IDE, find the IP address of your host computer and replace the URL http://localhost/fs/ with a URL similar to http://192.168.1.100/fs/ and make sure you can navigate to this URL.
In the "tutorial" directory, create a new subdirectory and call it "MyLib." Use the Web File Server and navigate to this directory, e.g., to http://192.168.1.100/fs/MyLib/. Copy this URL.
In the Xedge IDE, right-click the "net" file system in the left pane tree view and select a new app.
In the name field, enter "MyLib". In the URL field, paste the Web File Server URL, click the Running button, and click Save.
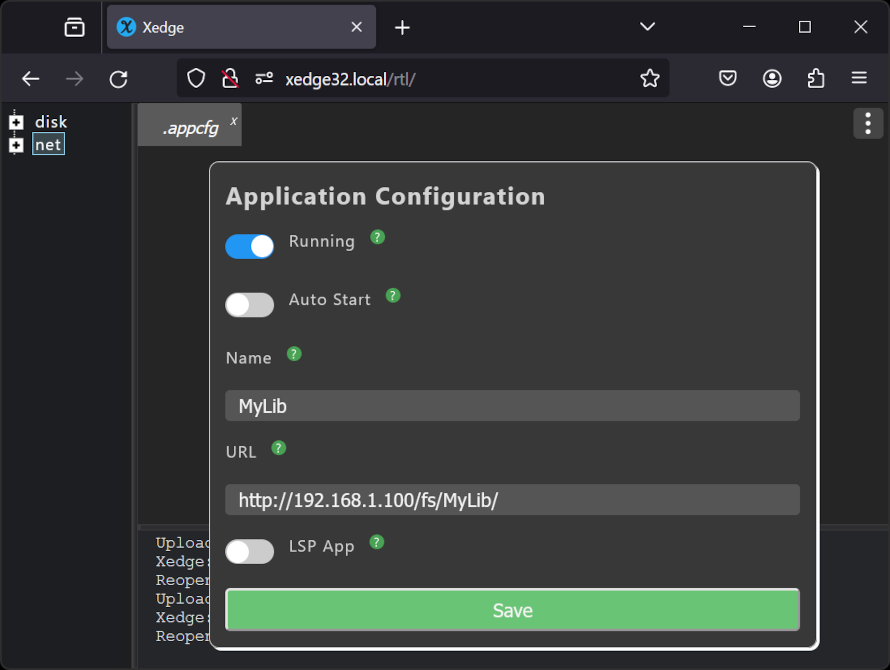
Figure 1: The Xedge new Application Configuration wizard: adding a new NetIO-powered app.
You can now use the NetIO-enabled app like any other Xedge-managed app. In the following figure, we have created "test.xlua" using Xedge IDE. This file is saved to the MyApp directory on the host computer. You can edit files directly on your host computer using any editor, but note that new files are not visible in the Xedge IDE unless you click the browser's refresh button.
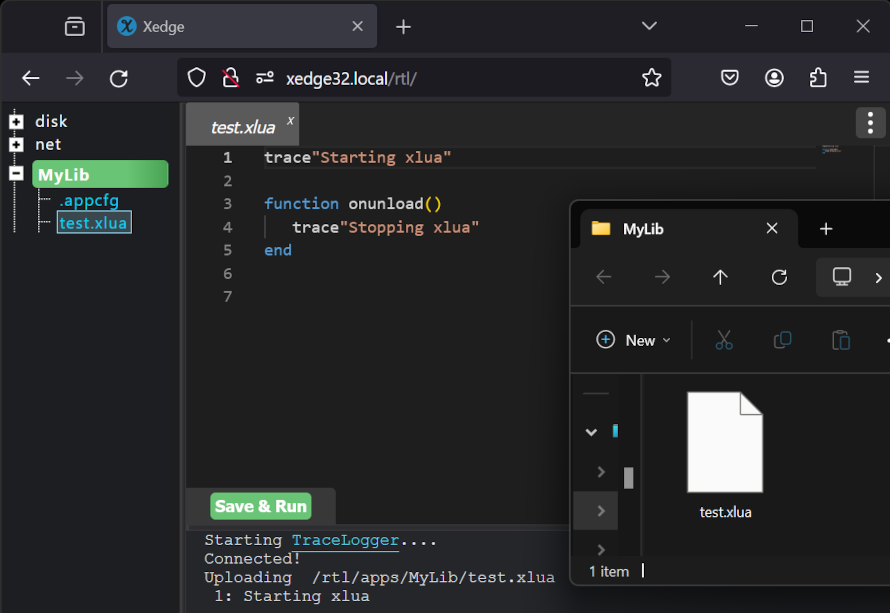
Figure 2: A test file created using Xedge IDE and saved to the host computer's file system using NetIO.
NetIO proves invaluable when developing large-scale programs, such as extensive Lua modules. This section guides you through creating a Lua module using the Xedge IDE and NetIO.
Begin by creating a .preload script in the MyLib directory. Copy and paste the following Lua code into the .preload script:
1 2 3 4 5 | xedge.createloader(io)function onunload() package.loaded["MyModule"]=nilend |
For the moment, proceed with this file as is. We will delve into its mechanics later.
Next, create a subdirectory named .lua. Create a file named MyModule.xlua within this directory and copy the Lua code below into MyModule.xlua:
1 2 3 4 | trace "Loading MyModule"return { version=1} |
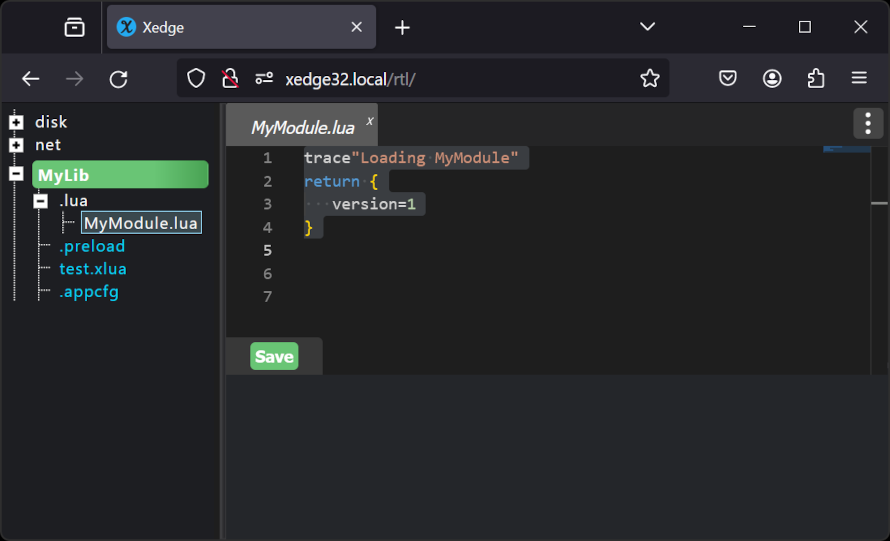
Figure 3: The Lua Module MyModule created in the .lua sub-directory.
Now, restart the MyLib app via the Xedge IDE to execute the new .preload script (click .appcfg and toggle run button).
In the test.xlua file, insert the following code:
1 | trace(require"MyModule".version) |
This script will load the module and print the version number. Additionally, you should see the message "Loading MyModule" in the output, which originates from the print statement in MyModule.lua. It's worth noting that the only requirement for a Lua module is to return a Lua table. Refer to the Lua modules documentation for more details on module creation.
The xedge.createloader() function is an Xedge-specific feature that allows the MyLib application to act as a Lua module loader. It injects special code enabling the "require" function to locate modules within the .lua subdirectory. For comprehensive details, consult the xedge.createloader() documentation.
The onunload() function is executed when the application is terminated through the Xedge IDE. This function removes MyModule from Lua's package.loaded table, ensuring that upon application restart, the module is reloaded and not cached. This behavior is crucial during module development, allowing for the iterative testing of the module without the need to reboot the entire device.
A NetIO instance can be created programmatically using the following code snippet:
1 2 3 4 | local nio = ba.mkio(ba.openio"net", "http://192.168.1.100/fs/MyLib/")for name in nio:files("/") do print(name)end |
You can copy this code and execute it within the Xedge IDE. However, ensure you modify the URL to match your configuration before running the script.


Navigate the world of embedded web servers and IoT effortlessly with our comprehensive tutorials. But if time isn't on your side or you need a deeper dive, don't fret! Our seasoned experts are just a call away, ready to assist with all your networking, security, and device management needs. Whether you're a DIY enthusiast or seeking expert support, we're here to champion your vision.