Figure 1: Applications and individual files managed by Xedge
Xedge is a Lua-based application environment built on the Barracuda App Server. It lets you create, run, update, and deploy Lua and LSP applications on an embedded device without rebuilding the full firmware for every application change.
This page explains how to use Xedge. For the product overview, benefits, and design philosophy, see the online Xedge product page. For standalone firmware build and porting instructions, see Building Xedge Standalone with BAS.
| Goal | Section |
|---|---|
| Choose the correct Xedge package | The Two Xedge Versions |
| Try the IDE and create an application | Using Xedge |
Understand .preload, .xlua, and LSP applications | Xedge Application Details and Lua Environments |
| Use AI agents to build and debug Xedge apps | AI-Assisted Development with LSP-Claw |
| Use WebDAV or an external editor | The Xedge Virtual File System |
| Configure email, certificates, and authentication | Configuration |
| Look up Lua APIs exposed by Xedge | Xedge API |
| Prepare a product based on Xedge standalone | Creating a COTS Product |
Video: How to use the Xedge IDE
The video shows the basic IDE workflow: create a web application, open files, keep files pinned in the editor, and start or stop applications. It uses the Xedge IDE integrated into the online Lua tutorial. You can try the same environment by opening the Online Lua tutorial: Xedge.
With Xedge, you can manage multiple Lua applications and LSP web applications on the same device. Running applications are shown in green in the left pane. The net file system is a network file system and must be initialized before use. See Using the NetIO for setup details.
| Version | Use It When | Primary Setup Document |
|---|---|---|
| Xedge for Mako Server | You are running on Windows, Linux, macOS, or another high-level operating system. | Mako Server: Xedge IDE |
| Xedge standalone | You are integrating Xedge into RTOS firmware or another deeply embedded target. | Building Xedge Standalone with BAS |
| Xedge32 | You want a ready-to-run ESP32 reference build with hardware-oriented Lua APIs. | Xedge32 documentation |
When using the Mako Server, Xedge is typically loaded as follows:
mako -l::xedge.zip
Download a pre-assembled Xedge.zip for the Mako Server.
See Mako Server: Xedge IDE for setup instructions and integration details when running the IDE with Mako Server. If you want immediate hands-on experience, try the online Lua tutorial, which includes a Mako Server-powered, fully functional Xedge IDE ready to use directly in your browser.
When running standalone on an embedded device, the Xedge Lua application and web UI are integrated into the firmware along with the Xedge C startup code. Use this page after Xedge is running. For firmware build and porting instructions, see Building Xedge Standalone with BAS.
We also offer an advanced ready-to-run Xedge reference version known as Xedge32:
Xedge stores configuration data, including passwords and other sensitive settings, in an encrypted JSON-encoded database file named xcfg.bin. The protection model differs slightly between the standalone firmware version and the Mako Server version.
In the standalone version of Xedge, where the server-side application is embedded as a ZIP file within the firmware, the encryption key is securely embedded and safeguarded against extraction attempts. However, to ensure that the Trusted Platform Module (TPM) protects the database effectively, you need to configure specific settings in the C code. For detailed instructions, see the Standalone Xedge Version and Security Settings section.
The Xedge Mako Server version uses a per-device secret, allowing the database to be decrypted only on the same machine where it was created. Copying the xcfg.bin file to another machine will not compromise the data since decryption is not possible elsewhere. To enhance the security of the Xedge Mako Server version and strengthen database protection, follow the guidelines on the Xedge GitHub page.
Xedge uses the Monaco Editor when it has access to the Internet and falls back to a basic notepad-like editor when it cannot download the Monaco Editor from the unpkg.com Content Delivery Network (CDN). The Monaco Editor is a powerful, feature-rich code editor; the core of Visual Studio Code (VS Code), for example, is based on this editor. Due to its relatively large size, Xedge does not embed the editor as part of its own package. If you see the message "cannot load the Monaco Editor," it means your browser cannot access the Internet or the unpkg.com CDN.
When Xedge starts, the left pane shows the file systems registered by the platform-specific C code. The available file systems vary by target. A disk-enabled target may show a persistent disk file system, while a development setup may also show a network file system such as net.
The usual workflow is:
.preload, .xlua, LSP, or other application files as needed.You can also register a deployed Lua application packaged as a ZIP file. ZIP-based applications are read-only in the IDE and are typically used for deployment or OTA-style updates. For more information, see Xedge Application Deployment: From Installation to Creation.
The tutorial Your First Xedge32 Project is useful even if you are not using ESP32 because it shows the Xedge IDE workflow in a concrete device-oriented project.
If you use AI agents for Xedge development, consider using LSP-Claw. LSP-Claw is an MCP server that runs inside Mako Server or Xedge and gives the AI agent a controlled lab application where it can inspect files, create Lua and LSP applications, start or restart the lab, and read trace output instead of editing arbitrary local files.
For Xedge standalone and RTOS targets, install LSP-Claw as an Xedge application. The MCP endpoint is then typically available at http://device-address/lsp-claw/mcp.lsp. See the LSP-Claw GitHub repository for setup instructions, AI agent configuration examples, and starter prompts.
Begin by expanding a file system. Navigate to the destination directory or create a new one using the Context Menu. You can open the Context Menu by right-clicking on a resource or long-pressing using a tablet or phone. Select "New App" in the Context Menu to open the Application Configuration dialog. After creating an application, the left pane tree view refreshes, and your new app appears in the tree view.
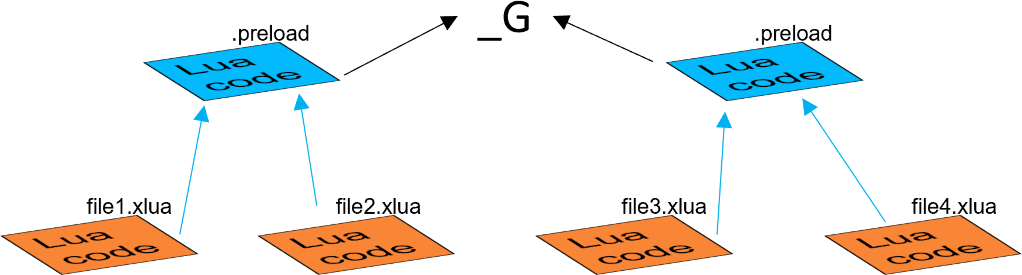
An Xedge application is either a directory or a ZIP file managed by Xedge. The application can contain startup code, long-running Lua programs, and optional web pages. Xedge starts the application by loading its special files in a defined way:
| File Type | Purpose |
|---|---|
.preload | Optional startup script for the application. It is loaded first and can define functions, variables, and modules used by the application's .xlua files. |
*.xlua | Independent Lua programs that start when the application starts and stop when the application stops. They are typically used for IoT logic, protocol clients, background tasks, and hardware control. |
*.lsp | Lua Server Pages used by LSP-enabled applications to build web interfaces. |
If you're new to Lua, start with our online Lua Scope Tutorial, which offers a clear and practical introduction to how Lua environments work. The Mako Server uses the same
.preloadscript concept; the tutorial Lua Environments and the.preloadScript is a good follow-up resource.
An application can include web pages when it is LSP enabled. Enable LSP in the Application Configuration dialog when the application must serve a browser-based UI or other dynamic web content.
Every .preload file and .xlua file in an Xedge application runs in its own Lua environment, so they operate separately from each other. However, .xlua files inherit elements from the .preload file, which means functions, variables, and libraries defined in the .preload file can be used by the .xlua files. Each .preload file also inherits from the global environment. Think of these environments as a stack of individual sheets, where each sheet represents an environment. The global environment is at the top, the .preload file environment is in the middle, and the .xlua file environments are at the bottom. This relationship is illustrated in figure 1.
Figure 1: Applications and individual files managed by Xedge
The .xlua files are the cornerstones of the Lua REPL. Each running .xlua file should be considered as an independent program. Saving this file terminates any previous version, and the new version is loaded and executed. By separating Lua into individual programs, developers can work on one program while having separate programs run independently, enabling development in a running system.
An .xlua file is typically used for non-visual programs that interact with hardware resources, run protocol clients such as MQTT, or maintain background logic. Use LSP for browser-facing web applications.
Web Applications:
If you want to design web applications in Xedge, use the 'LSP' (Lua Server Pages) feature. This requires enabling 'LSP' for your application, which you can do through the application configuration dialog.
An 'LSP-enabled' application contains files with the .lsp extension. Usually, there will be a file called 'index.lsp' in the root directory of the application, which serves as the entry point for your web application.
While .lsp pages can access the environment established by the .preload file, they do not inherit any elements from it, unlike .xlua files. To better understand how .lsp pages operate and interact with the rest of the application, see the Command Environment section.
Xedge is designed to quickly tear down and recreate Lua programs, enabling fast testing and development. The Lua language includes a garbage collector that eventually collects (destroys) non-referenced Lua code. When a program restarts, the old version is dereferenced and replaced with a new one. However, when working with hardware resources, relying on the garbage collector may not be practical since there may be only one resource or a very limited set of resources. Hardware resources should generally be released immediately in a REPL. For this reason, Xedge includes logic that can automatically shut down resources when a program is renewed.
For optimal results, hardware resources should not be declared using the Lua keyword "local" when using the REPL. If you do, ensure that you use the unload handler to release the resource. The unload handler is executed when the program is shut down (or replaced with a new version).
ESP32 example 1, not using the local keyword:
pin18 = esp32.gpio(18,"OUT")
ESP32 example 2, using the "local" keyword:
local pin18 = esp32.gpio(18,"OUT")

function onunload()
   pin18:close()
end
These considerations apply to any resource, not just hardware resources, when using the REPL.
The Xedge UI is a Single Page Application (SPA) that works through a virtualized file system exposed by the server-side Xedge application. You can access the same file system outside the IDE by opening http://device-address/rtl/apps/.
Figure 2 shows the Web File Manager and Windows File Explorer mapped as a WebDAV drive. When you use the Web File Manager or WebDAV, you work directly with the files behind the Xedge applications. Saving an .xlua file through an external editor, for example, triggers the same server-side reload logic as saving the file in the IDE.
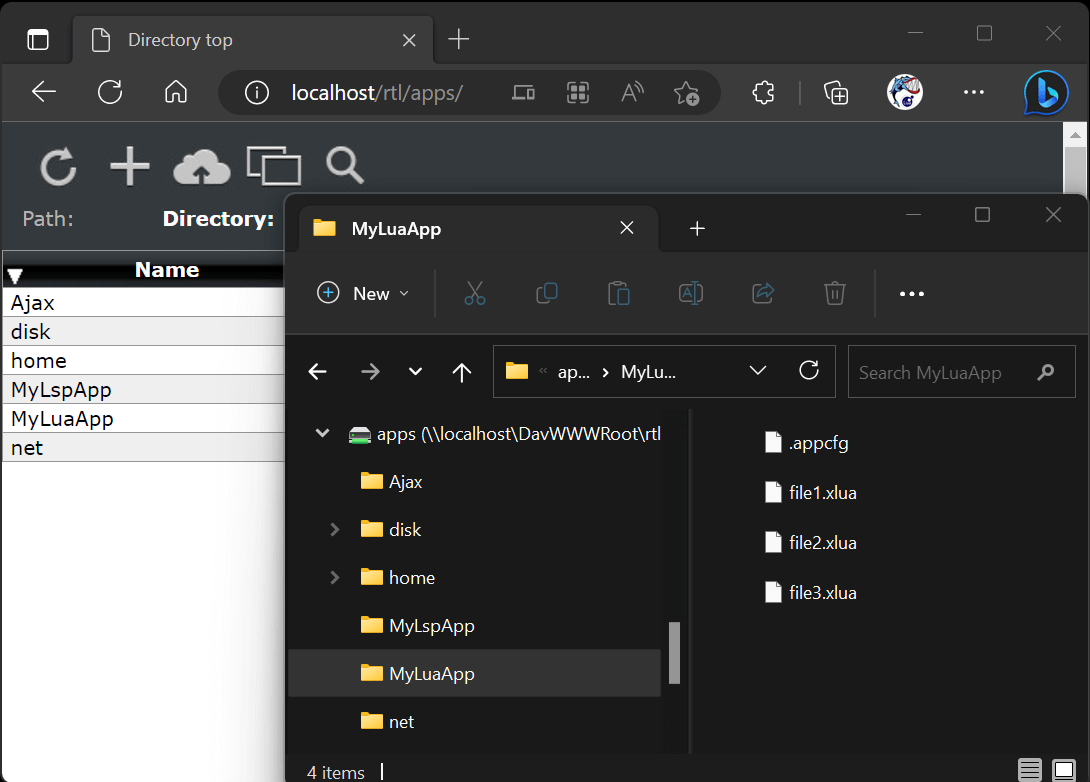
Figure 2: Accessing the Xedge virtual file system.
Check the WebDAV product page if you are new to WebDAV.
You can access the configuration menu by clicking the three dots located in the top-right corner of the interface.
By enabling the SMTP settings, Xedge can send important information by email. One notable feature is reporting Lua exceptions. If one of your Lua programs crashes, a detailed message is sent to your email address. SMTP settings also enable the xedge.elog() function, allowing you to send messages by email. Unless it is an emergency message with the flush attribute set, messages are accumulated and sent in bulk when either the maximum size or time limit is reached. Note that email messaging is automatically disabled when the Xedge browser UI is connected to an Xedge device.
See the tutorial How to Send Emails with the Xedge IDE for a step-by-step guide to configuring the SMTP settings.
The automatic X.509 certificate management powered by SharkTrustX addresses the challenges outlined in the tutorial Why You Need Automatic Certificate Management by offering simple configuration options and programmer-friendly APIs for automating X.509 certificate management.
Xedge simplifies installing and updating X.509 certificates, making it an easy-to-use solution for private network (LAN) deployments. This feature ensures that your browser remains warning-free when you access your Xedge device using an HTTPS address.
As shown in the slideshow video, activating the Automatic Certificate Management Environment (ACME) feature is straightforward. Enter a valid email address and choose a name for your device. Your email address is sent to the Let's Encrypt Certificate Authority, while the device name you select becomes part of your fully qualified domain name in the format [name-selected].x.realtimelogic.com.
Xedge might recommend a unique name based on its configuration. For example, a name like '4358f4' could be automatically generated from the lower 3 bytes of the MAC address. You can choose any name, but already-used names will result in an error message.
Note that activating the automatic certificate management feature may take up to 3 minutes to become fully operational.
🚫 Warning - Do Not Use the Included Key in Production
The key embedded in the tokengen.c file is intended only for easy testing of SharkTrustX features with the x.realtimelogic.com domain. For deployment, you must run your own SharkTrustX service with a securely generated key.
Elliptic Curve Cryptography Keys & soft Trusted Platform Module
When ACME is enabled through the user interface, it uses an integrated soft Trusted Platform Module (TPM). This module generates Elliptic Curve Cryptography (ECC) keys, which are never stored in plaintext. Instead, key attributes such as the ECC curve type are saved in a key file on disk. These attributes allow Xedge to regenerate the keys at each startup. For more detail, see the TPM section in Xedge's C code documentation.
Advanced Configuration with Lua
ACME can be configured programmatically for deployments that require Lua-based configuration or when the UI has been disabled. The ACME user interface interacts with two Lua modules: acme/bot and acme/dns. Both Lua modules are integral to the Mako Server and included in Xedge.
The following example shows how to set the required settings programmatically for a server deployed within a private network. The values can be hard-coded, or you can ask the user to enter them.
local ad=require"acme/dns"
if not ad.active() then
    -- This section will only execute one time
    -- email and subdomain name come from a user or are hardcoded:
    local email,subdom="info@realtimelogic.com", "xyz"
    -- If hardcoded, subdomain is typically derived from MAC address
    local options={revcon=true,acceptterms=true}
    ad.auto(email,subdom,options)
    -- Persistently store the revcon state (required if enabled)
    xedge.revcon(options.revcon)
else -- if previously activated
    -- Xedge reactivation is automatic, including revcon state.
end
Domain Name and Professional Use
The x.realtimelogic.com domain is a SharkTrustX test portal suitable for testing and home use. For professional applications, setting up a dedicated portal is recommended. For more information, see the SharkTrustX product page.
ACME and SharkTrustX References:
The Reverse Connection feature, included in the Let's Encrypt plugin, allows remote access to your Xedge through the SharkTrustX demo portal. This feature requires Automatic Certificate Management to be activated. You can enable or disable the remote connection at any time without clicking the save button after toggling the Reverse Connection switch. See SharkTrustX for details.
Xedge supports both local user accounts and Single Sign-On (SSO). To open the Authentication Settings, click the three dots, followed by clicking Authentication.
Note that installing an authenticator complicates the use of the Web File Manager and the WebDAV server. When an authenticator is installed, you must first log in to Xedge at the URL http://device-address/rtl/. After that, you can navigate to http://device-address/rtl/apps/. To use WebDAV, log in using your browser, navigate to the Web File Manager, and click the Session URL button, which generates a unique URL with an included token. Use this URL when mapping the WebDAV drive.
You can create multiple local users. To add a new user, input the desired username and password. To remove an existing user, enter the username and leave the password field empty.
SSO is a user authentication process that enables users to access multiple applications with just one set of login credentials.
If you are new to SSO, be sure to check out the Single Sign-On tutorial. It provides an introduction to using SSO with Xedge.
Xedge supports Microsoft Entra ID Single-Sign-On (SSO), a feature that simplifies user access to multiple applications using a single set of credentials. To set up users, they must be part of the organization's Entra ID tenant, with appropriate roles and permissions assigned to access the desired applications. Configuring SSO involves registering the applications, defining user access, and managing authentication settings in the Entra ID portal.
Entra ID offers a free tier with basic features that can support smaller-scale use, such as for personal or family purposes. To get started, you need to sign up for a free Microsoft Azure account and create an Entra ID tenant. Then, you can invite your friends as users in your tenant and configure access to applications using Entra ID and SSO.
After signing up for Entra ID, create the required SSO settings as follows:
http(s)://name/rtl/login/. For example, if you are setting this up for testing purposes, enter the URLs http://localhost/rtl/login/ and https://localhost/rtl/login/.Actions to take when the client secret expires:
The client secret can be set to a maximum of two years. When a user attempts to authenticate and the client secret has expired, an HTML form is presented to the user. This form asks the user to enter a new client ID secret value. To continue logging in, a user with access to the Azure portal must create a new secret value and enter it in the Xedge form.
After completing these instructions, you can grant individual users within the organization access to the application by following these steps:
Xedge extends the API provided by the Barracuda App Server with a few additional APIs. The Xedge ESP32 reference example Xedge32 also extends Xedge with a wealth of ready-to-use hardware (GPIO) APIs.
The global xedge object includes many functions and objects. All of them should be considered private, except for the ones listed below.
Initializes a Lua code loader to enable the dynamic loading of Lua modules from within the application, specifically from a ".lua" subdirectory at the application's root directory. This function extends Lua's package loading mechanism by adding a custom loader to the package.cpath array, where Lua stores its module loaders. See Lua modules for details.
To load Lua script modules from within your application, add the following line at the beginning of your application's .preload script:
xedge.createloader(io) -- io is the application's pre-defined IO interface
The loader works regardless of the application's deployment state, supporting both deployed (ZIP) and non-deployed (directory) formats.
Note: Once a module is loaded using the require function, it remains in memory for the duration of the application's runtime. Restarting the application does not reload the module if its code has been modified. The following approach can be used to reload a module manually:
package.loaded["moduleName"] = nil
Replace "moduleName" with the actual name of your module. This command clears the previously loaded module, allowing "require" to reload it on the next invocation.
The functions elog and eflush are enabled if the SMTP settings have been configured. Function elog either appends to the internal message queue or flushes the queue after 30 seconds if the option table includes the attribute flush set to true. Function eflush sets flush to true and immediately flushes the message queue by sending an email.
The option table op may include:
Note: When a browser is connected to the Xedge IDE, calling xedge.elog() has the same effect as calling xedge.log(). In other words, no email is sent or buffered, so calling xedge.eflush() has no effect.
Xedge.event() serves as a messaging distribution handler. To subscribe to events, install a callback function. To remove the callback, call the function with the same parameters and set the third argument to true.
To trigger an event, invoke the global function _XedgeEvent(event, ...). The first parameter must specify the event name. The _XedgeEvent() function is primarily designed to be called from C code and provides an efficient way to transmit events to Lua code. For more details, consult the standalone Xedge build guide. See also Xedge32 for information on how the C code generates events for the ESP32.
Note: The Xedge event mechanism uses an instance of the EventEmitter, and function _XedgeEvent() sets the retain flag on all events received.
Internally, Xedge creates an event when Lua code crashes, allowing you to implement logic that reboots the system if any script fails during runtime. The following example shows how to design an event function that restarts the system after a runtime failure.
local function errEvent(emsg)
   -- arg1 is the error message, but it is already in the log buffer if SMTP is enabled
   xedge.eflush{subject="The code crashed"} -- Flush email with error message immediately
   ba.thread.run(function()
      ba.sleep(5000) -- Give SMTP time to send error message
      -- Call a Lua binding that reboots the system; the following works for ESP32
      esp32.execute"restart"
   end)
end

xedge.event("error",errEvent) -- Subscribe
Calculates and returns the MD5 HA1 digest. The realm defaults to 'Xedge' if not set.
Send a message to the trace buffer, using priority 5, with the following prepended: 'Xedge:'.
The virtual file system used by Xedge provides the same API as the Barracuda App Server's IO Interface.
Send email messages using the SMTP client library. The options argument is the same as the options argument used by the function mail:send(options); however, no instance needs to be created and no options need to be set when calling xedge.sendmail() if you have configured the Xedge SMTP settings. Calling xedge.sendmail() with an empty options table sends a test email to the email address configured in the Xedge SMTP settings. You typically call this function with the following options: to, subject, txtbody or htmlbody. The optional callback is called when the email has been sent or sending it failed. The callback receives two arguments (ok, err).
Persistently store the SharkTrust reverse connection feature. This setting is typically used in combination with programmatically setting the ACME settings.
Enables or disables the Xedge Integrated Development Environment (IDE), including the Xedge 404 handler and the TraceLogger. By default, the IDE and its associated components are enabled. This function lets you programmatically insert and remove the IDE from the Virtual File System. The function is typically used in deployed applications to remove the IDE and related components, which are usually not included in the final product. See Creating a COTS Product and Security Considerations for additional information.
In the following app management functions, the name argument is either the name of the application as shown in the Xedge IDE or the path (URL) to the app, e.g., disk/test/myapp.zip.
Returns the configuration table if the ZIP file includes a .config script. The optional .config script is explained in the tutorial Mastering Xedge Application Deployment.
This function upgrades a deployed application packaged as a ZIP file. To use this function, replace the existing ZIP file with the new ZIP file before calling it. The function stops the existing application if it is running and restarts the app using the latest ZIP file if the app is running. You can set forcestart to true to force the application to start. Setting this argument to true saves the auto-start and running state in the xedge.conf file and ensures the app auto-starts at reboot.
This function also executes the upgrade function before starting the new app if the ZIP file includes a .config script and the table returned by .config includes the upgrade function, as explained in the Mastering Xedge Application Deployment tutorial. All other table fields are ignored.
Stop the application if it is running. Set the second argument to true if you want the app state to be saved in xedge.conf.
Start the application if it is not running. Set the second argument to true if you want the app state to be saved in xedge.conf.
Dynamically add, start, stop, or remove an app at runtime. This function is useful for mounting apps from any Lua IO interface, including the GitHub IO.
Returns true on success and false, err if a script fails to start or stop.
Equivalent to configuring an app through the Xedge UI when LSP is enabled.
-- Create a GitHub-backed IO (example module name: GitHubIo.lua)
local ghio = require("GitHubIo").create{
  owner  = "your-org-or-user",
  repo   = "your-repo",
  token  = "github_pat_xxxxx",
  log=true
}

-- Start (or restart) an LSP app at /demo/ sourced from the GitHub repo
xedge.auxapp("ghio", ghio, {
  dirname    = "demo",      -- URL path: /demo/
  domainname = nil,         -- any host (default)
  priority   = 100,         -- higher wins when overlapping
  running    = true         -- explicit (default)
})
xedge.auxapp("ghio", ghio, { running = false })
xedge.auxapp("ghio", ghio, { remove = true })
This example shows how to mount and run an app directly from a NetIO network file system. The approach is similar to the one described in the Xedge tutorial Using the NetIO on an Embedded Device, but is implemented programmatically.
The code connects to a remote file system through HTTP, creates an IO object, and installs it as an auxiliary app with xedge.auxapp(). When the app is unloaded, it is cleanly stopped by setting running=false. To run this code, create a regular app using the Xedge IDE. A good name for this app would be Bootstrap. Create a .preload script, copy the code below, and paste it into the .preload script.
local appio=ba.mkio(ba.openio"net","http://192.168.1.100/development/luaapps/app1")
if appio then
   trace"install"
   xedge.auxapp("nettst", appio)
end

function onunload()
   xedge.auxapp("nettst", appio,{running=false})
end
http://localhost/rtl/apps/%24ghio/, where localhost is the domain name or IP address of the Xedge server and ghio is the name you set for the IO. If you bind the same GitHub IO to a WebDAV server, you can browse and edit the repo as a versioned network filesystem, enabling you to use an external editor instead of the web-based Xedge editor.A variable extracted from C code and presented as seconds since January 1, 1970.
This section explains the simplest productization path for Xedge standalone: keep the stock Xedge firmware and IDE, package your Lua application as one or more ZIP files, and ship those files with the Xedge configuration file. This approach is useful when you want a production system without modifying the Xedge firmware image.
For advanced release builds, including embedding applications directly in firmware or removing unused Xedge resources, see Creating a Release Build in the standalone build guide.
When using Xedge as-is, assemble a multipart system with three parts: the Xedge firmware, at least one application ZIP file, and the Xedge configuration file. To prepare these files:
http://device-address/rtl/apps/.
You should now have the Xedge configuration file and one or more application ZIP files. To prepare another device, make sure it is powered on and running the Xedge firmware, then upload the files:
http://ip-addr/rtl/apps/disk/ to upload your application ZIP files and configuration file.
Note: When creating a product with Xedge as-is, restrict access to the Xedge IDE unless the product is intended to expose the IDE to end users.
If you want to prevent your customers from writing their own custom Lua applications, you can either prevent access to the UI by adding SSO authentication or remove the web-based Xedge UI completely from your application at startup. The following sections describe both methods:
-- The following code removes the Xedge user interface and the Xedge
-- 404 handler. A new 404 handler is installed, redirecting all
-- requests to another server.
if "zip" == io:resourcetype() then
   trace"Detecting deployed mode: removing Xedge UI!"
   -- Remove the Xedge UI's directory object and all sub-directories
   xedge.ui(false)
end
Add this code to your application's .preload script. See function xedge.ui() for more information.
If you do not need a web server, you can close all server connections. A BAS-powered server has at least two connections but up to four on some platforms. The following generic code should work on all platforms.
for _,con in ipairs{ba.lcon,ba.slcon,ba.lcon6,ba.slcon6} do
   con:close()
end