The Minnow Server is a WebSocket server designed for small microcontrollers as an HTTP(S) GET/POST replacement. Using a WebSocket server is the only viable option for small resource-constrained microcontrollers if TLS is required.
While this tutorial may appear as a blog post at first glance, it is so much more than that. What you're about to delve into is a comprehensive guide, akin to a complete book, that will walk you through the intricacies of creating single-page applications using the Minnow Server. The Minnow Server is a WebSocket server tailored for small microcontrollers, offering a viable alternative to HTTP(S) GET/POST, especially when TLS is required. This guide will not only introduce you to the concept of single-page applications but also provide insights into WebSockets, their advantages, and how they can be effectively used for device management.
In this article, we will look into the type of web application that works best with a WebSocket server and how to create this application efficiently. A WebSocket connection is persistent and works best with web applications that do not refresh, and one type of web application that works great with the Minnow Server is a so-called single-page application.
Note: Refer to the The Ready To Use Minnow Server Reference Example section if you're specifically interested in mastering the SPA user interface.
A single-page application (SPA) is a web application (website) that re-renders its content in response to navigation actions (e.g. clicking a submit button) without making a request to the server to fetch new HTML. In practice, a SPA interacts with the user by dynamically rewriting the (current) page using JavaScript rather than loading an entire new page from a server.
An SPA has much in common with a standard desktop application in that the application is loaded and remains running until the user closes the application. This differs from standard web applications, where pages are typically reloaded from the server into the browser for each action performed by the user.
In a nutshell, WebSockets are a thin transport layer built on top of a device’s TCP/IP stack. The intent is to provide what is essentially an as-close-to-raw-as-possible TCP communication layer to web application developers. From a developer's perspective, a WebSocket connection is the same as a TCP connection but with an added packet length. TCP/IP is stream-based based and WebSockets add a basic frame protocol on top of TCP; thus, WebSockets are packet-based. A WebSocket connection starts as an HTTP request sent from the client to the server. If the server agrees, the HTTP connection is converted to a WebSocket connection. This works for both HTTP and HTTPS connections. For example, an HTTPS connection is converted to a secure WebSocket connection.
The Minnow Server is primarily designed for small microcontroller-based applications such as the ARM Cortex-M4 with no external memory. Resource usage becomes critical when working with small microcontrollers both in terms of memory usage and CPU.
A minified and gzip compressed SPA can easily be stored in the internal flash memory and loaded on demand "as is" by a browser without being deflated in the device. A SPA consumes substantially less flash memory storage space than traditional web applications when proper compression techniques are applied. We will go into details about SPA minifying and compression techniques later in this article.
By using proper design techniques, a WebSocket connection consumes much less CPU resources than a traditional web application. The CPU differences may not be so much for HTTP, but the CPU load will substantially increase when using secure connections, and a secure WebSocket connection consumes very little resources compared to HTTPS.
Secure WebSockets (YES), HTTPS (NO)
HTTPS connections are problematic for small devices. Modern browsers may attempt to pre-allocate as many as 12 TLS connections before sending the first GET request. A small WebServer may be designed to handle one connection at a time, and this works with nonsecure HTTP connections but not with HTTPS connections. The reason it does not work with secure connections is that each SSL connection requires its own time-consuming TLS handshake (asymmetric encryption) before it moves up to the HTTP layer. This means that the connections opened by the browser must complete a full TLS handshake, even if they are not used. In particular, some browsers make the handshake very time-consuming since they open many connections (pre-allocate TLS connections) without waiting for at least one to complete the handshake so subsequent connections can use TLS session resumption.

Figure 1: Chrome is one of the browsers consuming most resources from the server.
The asymmetric encryption used by the TLS handshake is very CPU intensive. A small device can manage one TLS handshake in a reasonable amount of time, but not 12. A device is at the mercy of the browser and has no way of telling the browser that it cannot cope with that many connections. A solution would be to move to HTTP/2, but the HTTP/2 protocol has its own issues and complexities, making it unsuitable for small devices.
By using WebSockets as the main communication link between the browser and the server, we gain control over the number of connections created. An SPA application only needs one WebSocket connection, thus greatly limiting the resource usage in the device, even when security is required.
The best way to think about how to create a SPA is to compare the development process to creating a desktop application or a phone application that is designed to communicate with a device using TCP. Typically, different developers are in charge of the desktop app and the device's firmware, and this is also the best way to design an SPA. The two developer teams, however, would need to agree on the communication API between the browser and server and vice versa. In other words, they would need to specify the type of messages sent over the WebSocket connection.
If your company does not have web developers with SPA experience, you may contact us. We work with many consulting companies that have extensive SPA experience. You may also read online articles if you prefer to do the work yourself. A good starting point is the Wikipedia SPA article.
Many JavaScript frameworks are touted as simplifying the SPA development process. A wide range of frameworks are available, such as AngularJS, Ember.js, Knockout.js, Meteor.js, ExtJS, Vue.js, and React. Note that these frameworks have a huge baggage and can consume a substantial amount of flash storage space. We recommend JQuery for simpler SPAs and less baggage, but JQuery includes many features, such as AJAX, that are not needed by a WebSocket-based SPA. However, if storage space matters, Cash is an absurdly small jQuery alternative that may be the best option.
Web development has dramatically shifted from simple static sites to intricate "Single Page Apps". With new JavaScript frameworks emerging constantly and the complexities of modern dependencies, web development can be daunting. Unless you're fully committed to mastering these frameworks, consider partnering with an expert SPA developer. Their expertise ensures efficient use of the latest technologies and best practices in this rapidly changing field.
Once you have established a WebSocket connection, you can transmit data in either direction. WebSockets provide us with a method for sending binary messages and text messages. Binary messages are great for data that is binary in nature. For example, uploading new firmware can be sent as binary frames from the browser to the server.
You can also use binary messages to send a C struct's content directly to the browser. This creates more work for the web developer but makes it easy for the firmware developer.
A web developer would prefer sending JSON, and it is not too difficult to use JSON in C code. JSON messages should be sent as WebSocket text messages.
Whether you are using binary WebSocket messages, JSON over WebSocket text messages, or both, you need to design logic that enables you to differentiate the different message types. A simple way to do this is to include a message type in the data sent to the peer. When using binary frames, the message type should be the first byte or word in the message. When sending JSON, simply set a message type in the JSON object. The following example illustrates how to send 'msgtype' 'SetMotorSpeed', using JavaScript, from the browser to the device:
1 2 3 4 5 6 | var msg = { msgtype: "SetMotorSpeed", speed: 50};// Send the msg object as a JSON-formatted string.exampleWebSocket.send(JSON.stringify(msg)); |
Figure2: Example JSON message sent to server
JavaScript in the SPA can easily differentiate the different message types received from the server by creating a switch statement with all message types specified in the message specification document you should have created. In JavaScript, this is super easy since strings can be part of a JavaScript switch statement. However, C code requires a bit more logic since switch statements in C code cannot deal with strings.
You can use the above information for designing real-time messages that can be sent in either direction. These messages are asynchronous in nature, and no response data is provided to the sender unless you make this part of the design.
Web Developers are used to using AJAX when sending messages to the server. AJAX is a type of Remote Procedure Call (RPC), in which the sender gets a response from the peer. This type of construction is useful for actions applied in the browser and propagated to the server. For example, performing an action may require a return of OK or error. In these circumstances, AJAX is very convenient to use for the Web Developer.
AJAX request/response messages can easily be multiplexed on the same WebSocket connection. AJAX requires creating a small JavaScript library to maintain the request/response pair. The AJAX server-side code is virtually no different from handling the other asynchronous JSON messages received from the client.
Our tutorial AJAX over WebSockets explains how to create the JavaScript client library. The server code in this tutorial is designed in Lua and not C, but as we mentioned above, the server-side C code for handling AJAX is almost identical to the server-side code for managing asynchronous JSON messages.
You may use any JSON C library including our open source JSON C library.
There should be no need for authenticating the user when downloading the SPA application into the browser. The authentication must be initiated as soon as the WebSocket connection is established.
A WebSocket connection initially starts as HTTP, but the HTTP request/response pair does not follow standard HTTP since the response initiates the conversion to a WebSocket connection. For this reason, authenticating the user should not be performed using the HTTP mechanisms "basic" or "digest".
Since a WebSocket connection is persistent, state information may be preserved in the device. Initially, the device should only allow the message type "authentication". The device should close the WebSocket connection if any other message type is received from the browser. The message type "authentication" should be sent as explained in Figure 2, where msgtype must be "authentication".
The message type "authentication" should be sent from the browser to the device when the user enters his/her credentials in the SPA user interface. The credentials should never be sent in cleartext, including when using a secure TLS connection. The reason for sending hashed credentials when using a secure connection is to safeguard devices with self-signed certificates. A self-signed certificate renders the TLS connection useless and makes the connection no more secure than a nonencrypted connection. Certificate management is difficult for end users, so make sure to check out SharkTrust, which automates the certificate management for embedded web server.
Sending credentials in cleartext can be eavesdropped on if the server is not using SSL or if the browser does not trust the X.509 certificate. For this reason, we recommend sending the credentials as a hash to the device.
Our recommendation is to HMAC the credentials in the client using SHA-256 and by using a seed value initially sent by the server.
As soon as the WebSocket connection is established, the server generates a random seed string (the key) and sends this to the client (browser). The seed key generated by the server and sent to the client is known as a cryptographic nonce.
The client sends the following to the server as soon as the user enters his credentials:
1 2 3 4 5 6 7 8 9 | var sha = new jsSHA("SHA-256", "TEXT");sha.setHMACKey(key, "TEXT"); // key is seed value received from serversha.update("my-password"); var msg = { msgtype: "authentication", username: username, //username from input element hexdigest: sha.getHMAC("HEX")};exampleSocket.send(JSON.stringify(msg)); |
Figure 3: Hash-based encryption protects the user's credentials when sending over the wire
The JavaScript code above is using the jsSHA JavaScript library, specifically, the code in sha256.js.
When using SharkSSL on the server side, the password can be verified as follows:
1 2 3 4 5 6 7 8 9 10 11 12 13 14 | U32 localDigest[32]; /* SHA256 is 32 bytes (256/8) */U32 browserDigest[32];sharkssl_HMAC(SHARKSSL_HASHID_SHA256, password, /* The password stored on the server in clear text */ strlen(password), key, /* The key initially sent to the client */ strlen(key), localDigest); /* set localDigest *//* json.hexdigest is the JSON message and digest received from the client. Convert this 64 byte hex value to 32 byte binary and store in browserDigest.*/if(memcmp(localDigest, browserDigest, 32) == 0) { /* Password matches */} |
Figure 4: Server compares the hash received from the browser with locally computed hash
In Figure 4, we illustrate how to compute the password hash from the cleartext password and how to compare the two generated hashes. See function sharkssl_HMAC for details.
All Web Applications, including SPAs, are loaded on demand when accessed by a browser. First, the HTML page is loaded, and then all resources used by the main HTML file, such as JavaScript files, are loaded into the browser. A SPA starts executing the JavaScript code as soon as all resources are loaded. At that point, the SPA is active.
One of the first steps JavaScript code executes in a SPA is opening a WebSocket connection to the device. The following JavaScript code illustrates how one can open a connection during development.
1 2 | // Create a new WebSocket.var socket = new WebSocket('ws://192.168.1.100'); // Device IP address |
Figure 5: Creating a WebSocket connection in the browser using JavaScript
Notice that we have hardcoded the WebSocket URL and used the address 'ws://192.168.1.100'.
Using a hard-coded address is particularly useful during development since it enables us to keep the SPA application on the host computer during development. The SPA application's HTML file can be dropped directly into the browser from the local file system. A simple refresh in the browser re-loads any resource that may have been modified.
The IP address in our example indicates that the device is on the same private network as the SPA; however, the device does not need to be in the same location as the web developer. The firmware developer can simply make the server available on the Internet from his location by setting up port forwarding in his (or the company) router. That way, an SPA developer can develop the web application from any location.
In this section, we delve into the specifics of deploying a Single-Page Application (SPA) tailored for the Minnow Server. Deploying a SPA goes beyond mere development; it involves packaging and integrating it seamlessly with the server firmware. This guide will walk you through the steps to ensure your SPA is ready for deployment and optimized for the Minnow Server environment. Additionally, for those interested in exploring a simpler option, we also offer an alternative tutorial that demonstrates how to run the SPA reference example using the Barracuda App Server.
The SPA can be deployed (integrated into the device) as soon as the SPA has been developed and tested. A SPA does not need to be stored on the device, but many device solutions require that the device's web application be activated by using a browser and by simply navigating to the device's IP address.
The Minnow Server also includes a basic HTTP server, which lets the application store the SPA resources on the device. The resources are then initially loaded from the device using HTTP(S). Once all resources are loaded, the JavaScript code activates and establishes the WebSocket connection with the device.
A device initially runs into the issue illustrated in Figure 1 above when using a secure connection and storing all resources on the device. We have found a way to mitigate this problem by assembling all resources into one file. We have created an online service called the HTML Resource Amalgamator that takes all resources, including images, CSS, and JavaScript files, and embeds all resources inside the main HTML file.
The online service also minifies the HTML and CSS by removing unneeded whitespaces. The service lets you optionally minify all JavaScript code by using Google's closure compiler. In most cases, you want also to enable JavaScript minification.
Note that images are embedded inside the HTML file using b64 encoding. A recommendation is to limit the use of images in the SPA application.
A browser will automatically attempt to load the favicon, and to prevent an extra HTTP request, the favicon should also be embedded. For this reason, the following construction must be in the HTML file:
1 | <link rel="icon" href="favicon.ico" type="image/x-icon" /> |
You can also use PNG for the favicon.
The SPA developer should initially test amalgamating the SPA resources using the hard-coded WebSocket URL as explained above and download the amalgamated HTML file to his local computer. If this code works in the browser, move to the next step and change the hard-coded WebSocket URL to point to the "origin server".
A WebSocket URL cannot be relative and must have an absolute path. The following JavaScript function can be used to translate the HTTP(S) URL to a WebSocket WS(S) URL dynamically:
1 2 3 4 5 6 7 8 9 10 11 12 13 14 15 16 17 18 19 20 21 | const httpToWs = function() { const l = window.location; let wsURL = ''; // Start by working out if the calling URL was secure or not. if (l.protocol === 'https:') { wsURL = wsURL.concat('wss://'); } else { wsURL = wsURL.concat('ws://'); } // Concatenate the hostname onto the URL. wsURL = wsURL.concat(l.hostname); // Now process any non-standard port numbers. if (l.port !== 80 && l.port !== 443 && l.port.length !== 0) { wsURL = wsURL.concat(':' + l.port); } // Now add in anything left in the way of a path part of the URL. wsURL = wsURL.concat(l.pathname); // Return the WebSocket URL we have created. return(wsURL);};var socket = new WebSocket(httpToWs()); |
Figure 6: Converting an HTTP(S) URL to WS(S) WebSocket URL
When the SPA developer has made the above changes, it's time to run the code through the amalgamation process again; however, this time, also check the Gzip option.
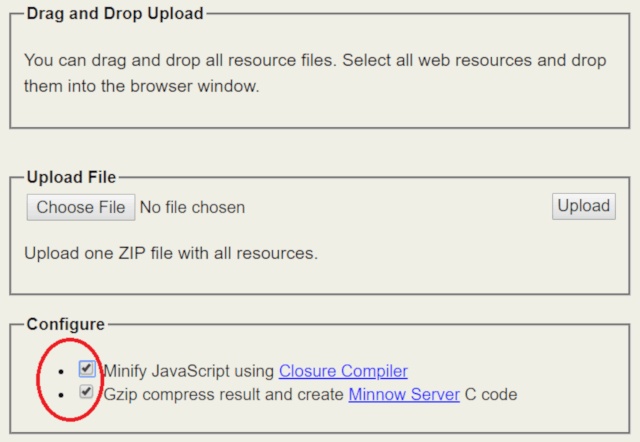
Figure 7: Selecting minify and gzip compression in the online HTML resource amalgamator service.
The Gzip compression greatly improves the flash storage space required by the SPA application. The SPA is not only Gzip compressed but also converted to C code that plugs directly into the Minnow Server. The firmware developer then includes the generated C file in the build (makefile) and adds the following initialization to the Minnow Server's server-side application:
1 2 | extern int fetchPage(void* hndl, MST* mst, U8* path);wph.fetchPage=fetchPage; // Use the auto-generated function to fetch SPA |
Figure 8: Set the page loader in the Minnow Server app to the auto-generated code
The online resource amalgamator service lets the developer either drag and drop all SPA resource files onto the online web interface or upload a ZIP file with the SPA resource files. The drag and drop is convenient during testing. However, the firmware developer may want to automate the SPA build process as part of the firmware build process. To automate the build process, use a zip compression tool as part of the build process and create a ZIP file with all SPA resource files. This ZIP file can then be uploaded to the online service as follows:
Figure 9: Automating the SPA build process
The output file (file downloaded from service) is in the above example 'index.c' and must be compiled as part of the firmware build process. Note that the online service returns HTTP error code 503 if the service detects an error in any of the uploaded resources. A makefile can detect the HTTP error when running curl since curl then returns an error code (non-zero value).
The ready-to-use Minnow Server reference example can be used as a template for designing your own SPA example and can save you months of development. The example incorporates several design patterns that we believe are the best approach to web-enable a device.
The reference example can be built for most microcontroller solutions. The following tutorial goes over how the user interface works and why it was designed that way.
You may follow along this tutorial with your own locally running Minnow Server reference example. If you have git, make, and gcc installed on your host computer, you may download, compile, and run the example as follows:
You may simply copy the above and paste it into a command window. If you are using Windows, use the Windows 10 Linux subsystem or download the git packages manually and compile using the included Visual C++ project. See the Minnow Server GitHub page for additional details on building the server.
Notice that the make command "make packwww" takes some time to complete as it is communicating with the HTML Resource Amalgamator Service. We explained how to use this service in section How to Deploy a Ready to use SPA above.
When the minnow server runs, use your browser and navigate to http://localhost:#, where # is the port number the server is listening on. Note that we use an http:// connection and not https:// for this example.
The Single Page Application reference example includes several web pages, but unlike a traditional web application, no page is loaded when clicking a link in the navigation menu. Instead, all pages reside in one HTML file, and JavaScript is used to hide and show DIV elements (the pages) when navigating the menu.
We also have several modal dialog boxes. The first modal dialog box is shown as soon as the SPA has been loaded into the browser.
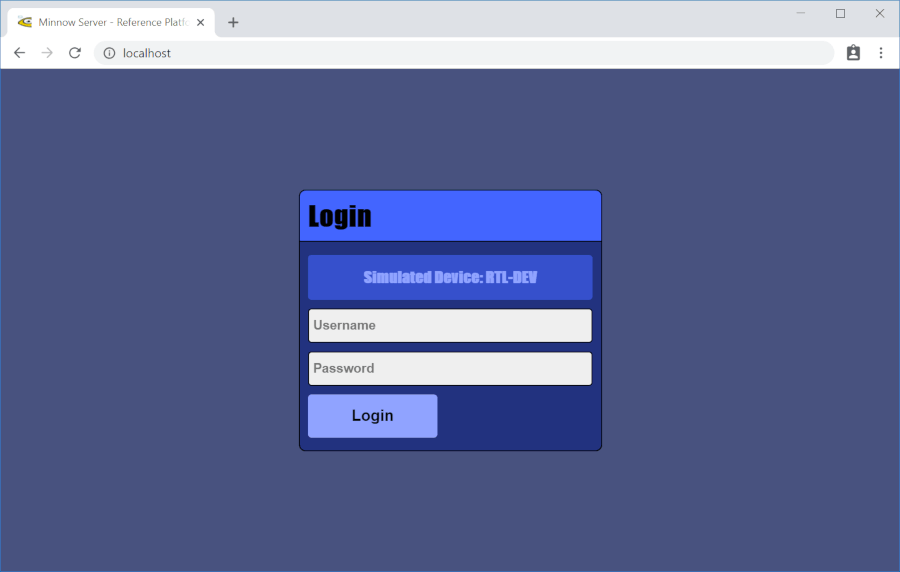
Figure 10: The modal login dialog
The authentication logic is implemented as explained in section How to Authenticate the User above. The hardcoded default credentials are user "root" and password "password." A recommendation is to set up a device production environment that can provide unique default credentials for each produced device and to also force the user to set new credentials at the first login.
The following page is presented as soon as you are authenticated:
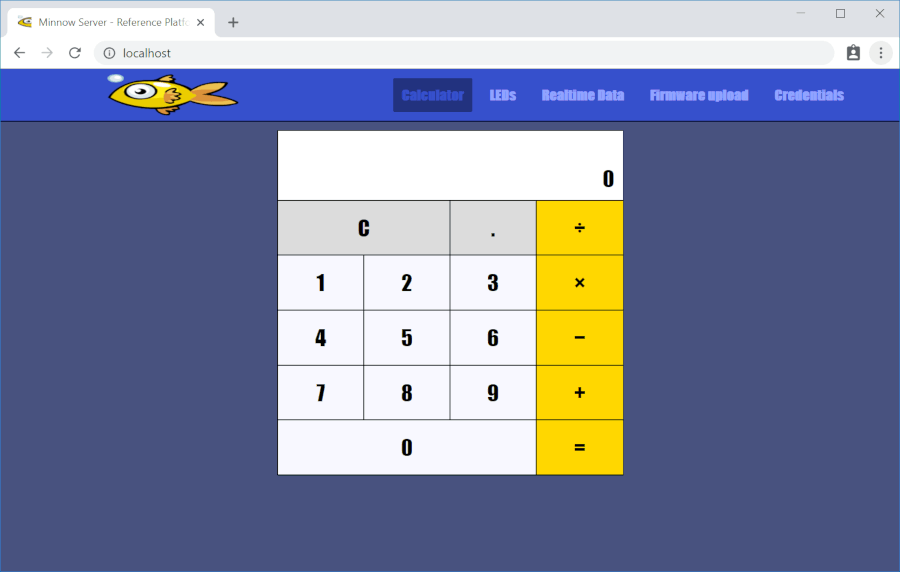
Figure 11: AJAX powered calculator
You probably wonder why we have a calculator in a device management reference design. We previously published an article on how to run AJAX over WebSockets, and the included example provided math AJAX services. However, the AJAX math backend services were not designed for the Minnow Server and C code. We wanted to include the AJAX math services in this design because...
WebSockets vs. AJAX
WebSockets can handle multiple bidirectional messages between the browser and the server. There is no correlation between the messages sent in either direction. It is up to the application to interpret and manage these messages. However, using a request/response design pattern in web applications is often useful, where a JavaScript callback is called when the response is returned from the server. Many web developers are accustomed to AJAX and the calculator shows how to use AJAX in JavaScript and in C code. The math operations are performed on the server side, and each math operation request sent to the server is followed by a math response sent to the browser. The result is displayed in the calculator when the response returns. AJAX also includes a success/error (try/catch) concept. Try dividing a number by zero and see what happens.
So now, you see why we wanted to include AJAX. We recommend reading our Mako Server article AJAX over WebSockets , so you get the full picture on how AJAX over the WebSocket protocol works. Note that the reference example's AJAX over WebSockets JavaScript library provides a Promise API.
Being able to run AJAX over web sockets is great, but you may often want to push real-time data from the device to the browser. Clicking the "Realtime Data" tab in the menu presents the thermostat page.
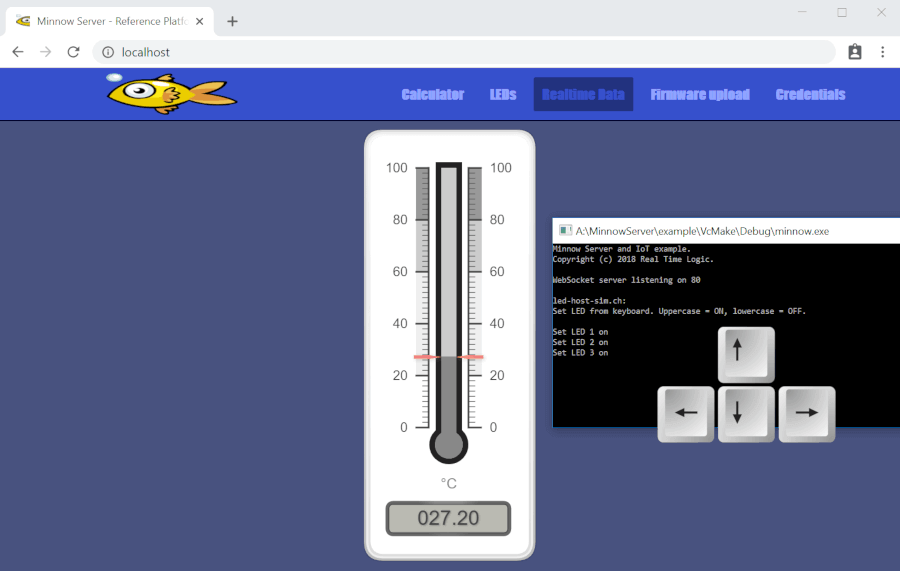
Figure 12: Device to browser real-time data
Although the LED page shows how to send real-time data from the server to the browser, the thermostat was included as an additional real-time event example.
You may push asynchronous data from the server to the browser by clicking the up and down keyboard arrow keys.
Houston, we have a problem
We used a freely available gauge widget library for the thermometer layout. You may send real-time data from the server to the browser by keeping the up or down arrow key pressed. The keyboard events are sent in real-time to the browser, which in turn updates the thermometer widget. However, the irony is that the thermometer widget cannot handle large amounts of incoming data. The lesson learned from this is that not all free widget libraries can handle large amounts of data.
As the following figure shows, the LED page lets you control LEDs in the device.
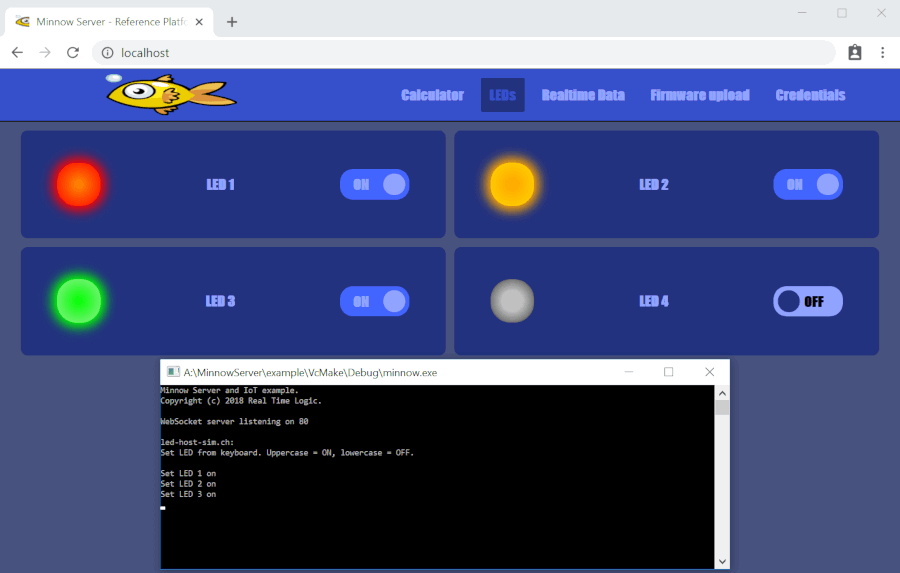
Figure 13: LED device management page
Most devices include LEDs; thus, the server LED logic can easily be ported to most devices. Clicking an LED button sends a real-time event to the server, which sets the LED. The server then sends an updated LED message back to the browser.
It's all real-time and asynchronous...
In Figure 13, we run the server in a Windows console window and do not have any real LEDs to control. Instead, the LED state is printed to the console. You may also set the LED state in the console (on the server side) by using the keyboard letters B to E. The server will then send a real-time push event to the browser.
The GitHub documentation explains how to connect the C code to real LEDs in a device. The following video shows how to build the server for the ESP8266 microcontroller and control LEDs connected to the ESP8266 via a breadboard.
The firmware upload page shows how to create an HTML 5 drag-and-drop upload page and how to send the uploaded file to the server via the WebSocket connection.
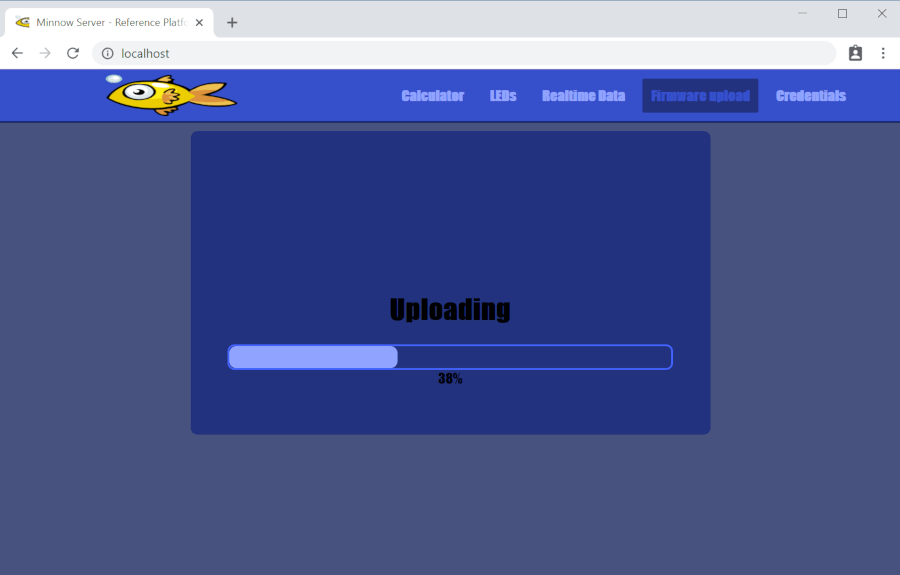
Figure 14: Drag and drop firmware upload
All messages sent via the WebSocket connection are sent as JSON text messages except for the upload, which is sent as binary data. Modern JavaScript can easily manage binary data, and the WebSocket protocol supports both binary and text frames.
The Set New Credentials page shows how to change the hard-coded root/password credentials we mentioned above.
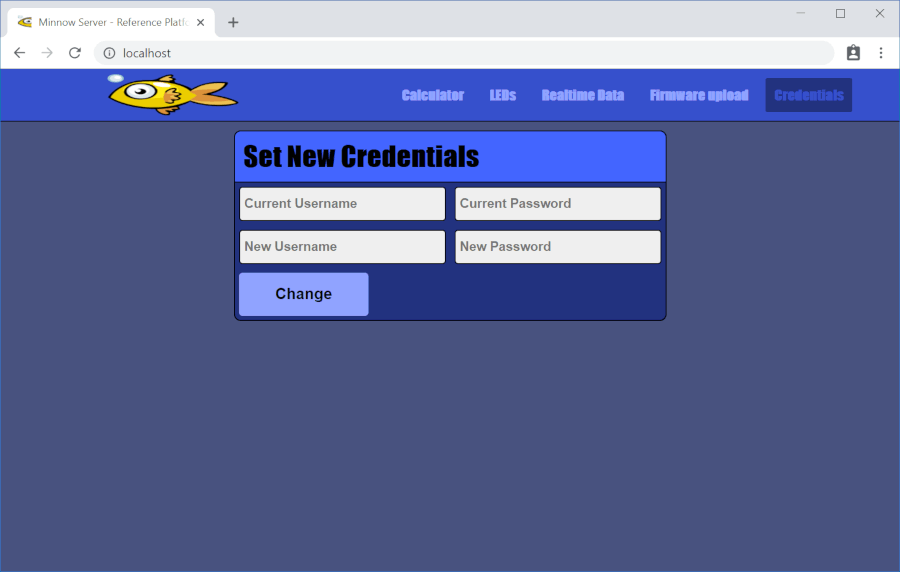
Figure 15: Set new credentials
The credentials page lets the user update his/her credentials. Unlike the secure login page, setting new credentials is unsafe unless TLS is used. It is impossible to protect the credentials from being eavesdropped without using TLS. The good thing is that the Minnow Server can be TLS enabled. You may not think you need TLS on a local network, but you may be surprised to learn how easy it is to get into a private network and intercept all web server communication .


Unlock the potential of embedded web servers and IoT with our curated tutorials. They're your DIY toolkit for success. But if you're racing against the clock or need a deeper perspective, our expert consulting services are your ace in the hole. With Real Time Logic, you're never alone on your DIY journey. Let's collaborate and make magic happen!