Get ahead of the game by learning about the SSL/TLS protocol and secure IoT communication with the SharkSSL ESP32 IDE. Not only does it provide you with a wealth of knowledge on these topics, but it also comes with a variety of C source code example programs, including the Barracuda App Server, that you can use as a starting point for your own projects. With the help of SharkSSL ESP32 IDE, you'll quickly become an expert in using TLS for secure communication on FreeRTOS powered devices. Don't wait any longer, start your IoT development journey now with this user-friendly IDE.
The SharkSSL ESP32 C source code IDE provides an easy-to-use C development environment for compiling SharkSSL IoT C code examples and for uploading the compiled examples to an ESP32. The IDE provides a complete development environment with no other tools required!
Figure (video) 1: VirtualBox running the virtual machine and connected browser running the IDE
You won't want to miss the above video! It's packed with helpful information on how to install and use SharkSSL IDE, including how to compile and upload firmware. Click the following button to download the 2.6 Gigabytes IDE and make sure to watch the above video while downloading the file.
Note: the download is 2.6 Gigabytes.
The SharkSSL FreeRTOS/lwIP ESP32 IDE is designed to run in a virtual machine (VM). The download is provided as an OVA file, which is compatible with any virtualization engine that can load the Open Virtualization Format. The VM has been tested in VmWare and VirtualBox.
The virtual machine runs Linux and comes pre-installed with all necessary tools including the web-based SharkSSL IDE, so you can get started right away without any prior Linux experience. However, if you are an advanced user, you also have the option to use the Linux command line and work directly with the official ESP-IDF and SharkSSL build tools. The web-based development tool makes it easy for any developer to edit, compile, and upload code to an ESP32 via a USB connection. No matter your skill level, SharkSSL ESP32 IDE has something to offer you.
The IDE includes an easy-to-use web based graphical user interface for working with the following repositories:
Install the Silabs Device Drivers. The device drivers will help your computer recognize the ESP32 as a USB Device. Install VirtualBox if you do not have one of VmWare or VirtualBox already installed.
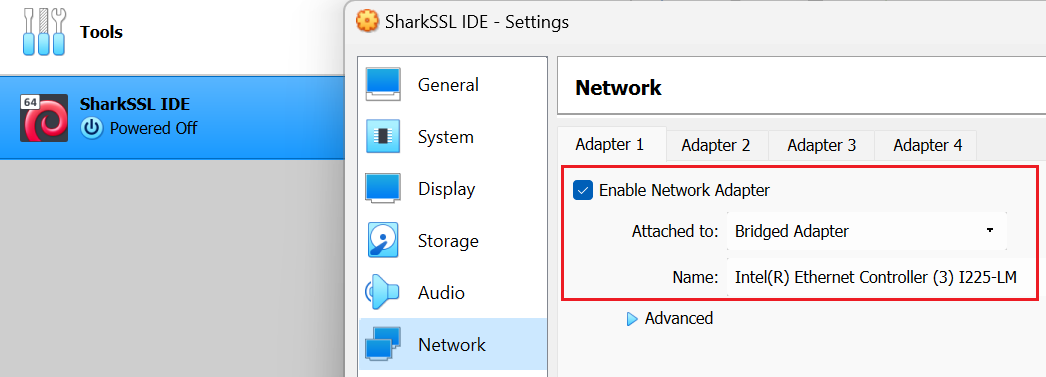
Figure 2: Selecting the Bridge Adapter adapter in VirtualBox
The SharkSSL is loaded by navigating to the IP address printed in the VM's console window.
You will initially be prompted to enter your Wi-Fi configuration settings. The settings will be used when compiling the ESP32 specific Wi-Fi configuration code.
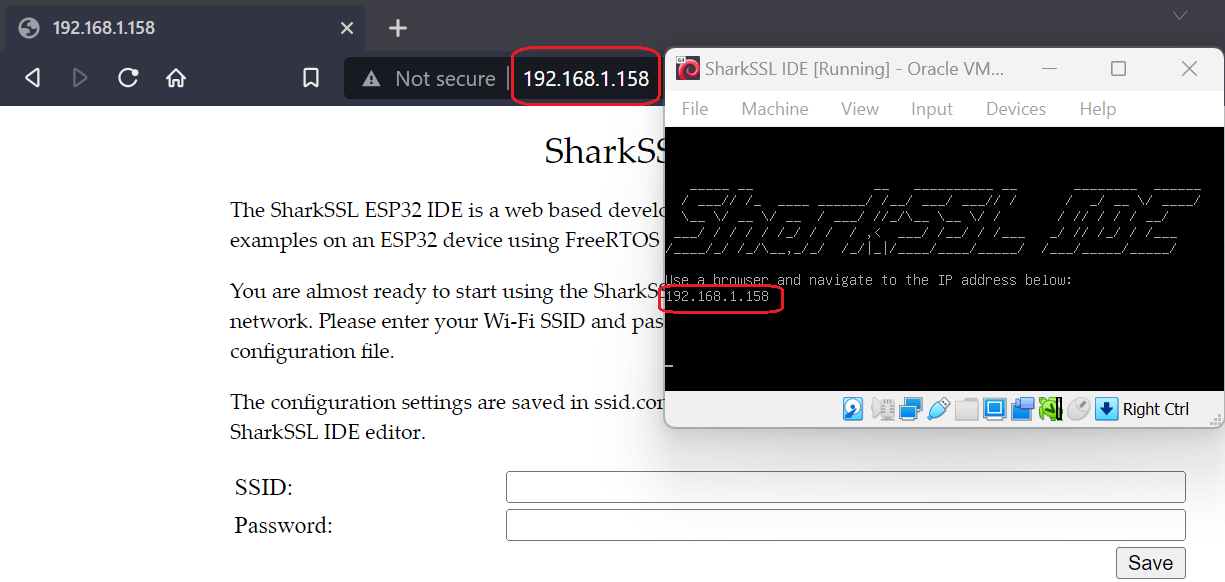
Figure 3: VirtualBox VM, with browser directed to VM's IP address
After entering the WiFi credentials, read the presented help file before building your first example. However, before building any of the included examples, you may consider upgrading the software.
To upload a compiled example, connect an ESP32 using USB and make sure the Virtual Machine has ownership of the ESP32 USB device. The following screenshot shows how to take ownership using VirtualBox. VmWare provides similar configuration options.
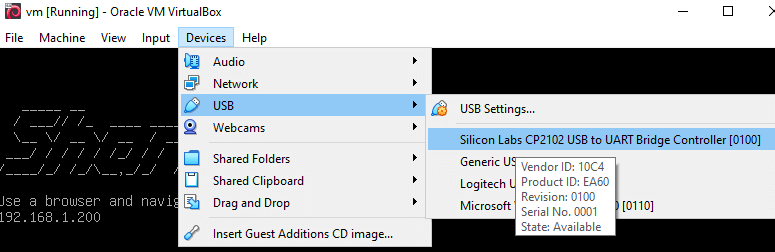
Figure 4a: How to take ownership using VirtualBox

Figure 4b: How to take ownership using VmWare
VmWare remembers the "take ownership" configuration automatically, but not VirtualBox. You must repeat the above each time you unplug and plug the USB back in when using VirtualBox. However, VirtualBox lets you permanently recognize the USB device by right clicking on the VM and by selecting Settings -> USB. Permanently add the USB device by clicking the second add button as shown in the screenshot below:
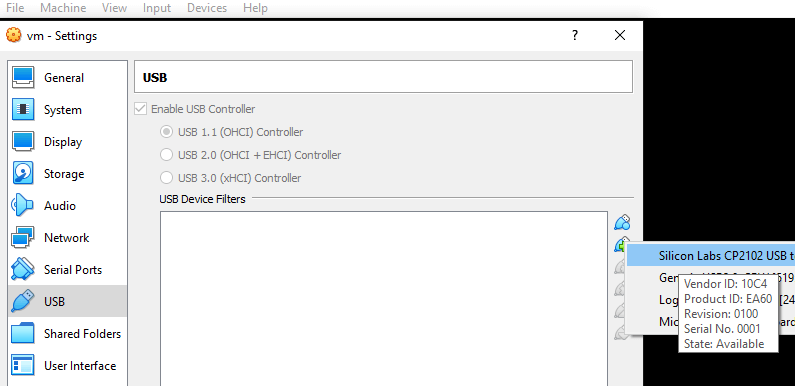
Figure 5: Permanently storing the "take ownership" configuration in VirtualBox
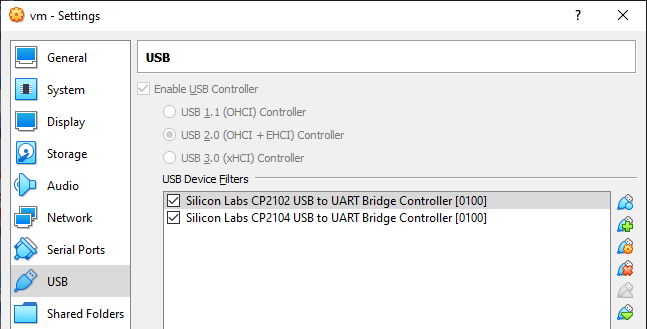
Figure 6: Two ESP32 devices with different USB UART chips permanently saved in VirtualBox
When the ESP32 is connected, the SharkSSL ESP32 IDE's LED switches from red to green.
The VM is unable to get an IP address using DHCP if no IP address is shown in the VM's console window. Note that it may take some time before you can navigate to the IP address. Please try again if it fails. Something is wrong with the VM's network adapter settings if you are unable to navigate to the IP address after some time.
Some ESP32s require that you keep a boot button pressed when clicking the Run button in the SharkSSL ESP32 IDE. The button must be kept pressed until you see the firmware being uploaded. This process is automatic if the ESP32 does not have a boot button.
With VirtualBox, we had problems with connecting the monitor after the firmware upload process for ESP32 devices with the CP2102 USB UART (See figure 6). We could simply not connect the monitor using VirtualBox. If using VirtualBox, make sure not to use an ESP32 with a CP2102 USB UART. The ESP32 with the CP2102 is the one with the boot button.
The following is listed in order of preference. See details below Figure 7.
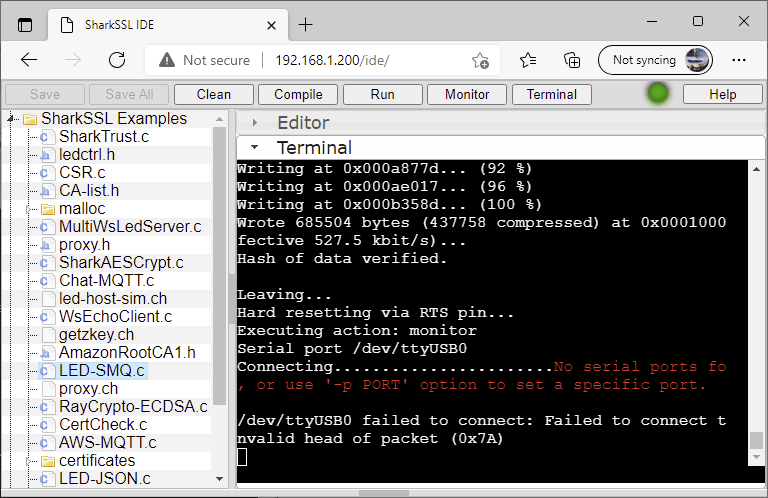
Figure 7: VirtualBox USB problems shown in the SharkSSL ESP32 IDE after firmware upload and when monitor tries to connect.
The ESP32 WROVER boards we tested have the CP2104 USB UART chip. These boards do not have the boot button. Uploading and connecting the monitor seems to be automatic with these devices. An additional benefit with the ESP32 WROVER is that you can also run the included Barracuda App Server.
When you see the error as shown in Figure 7, keep the boot button pressed on the ESP32 and then click the Monitor button in the IDE. You should, after a short time, see the following being printed in the console:
rst:0x1 (POWERON_RESET),boot:0x3 (DOWNLOAD_BOOT(UART0/UART1/SDIO_REI_REO_V2))
waiting for download
When you see the above text, click the ESP32's reset button. The ESP32 will reboot, and the terminal will keep the connection (no USB connection errors).
You can connect any serial terminal to the ESP32. When the ESP32 is connected, open the Device Manager and expand "Ports". You should see the COM port being used by the USB UART. Use a terminal such as putty and connect using serial. Enter 115200 as the serial speed and enter the COM port as seen in the Device Manager.

Figure 8: SMQ IoT example with a connected browser window and Putty used as terminal
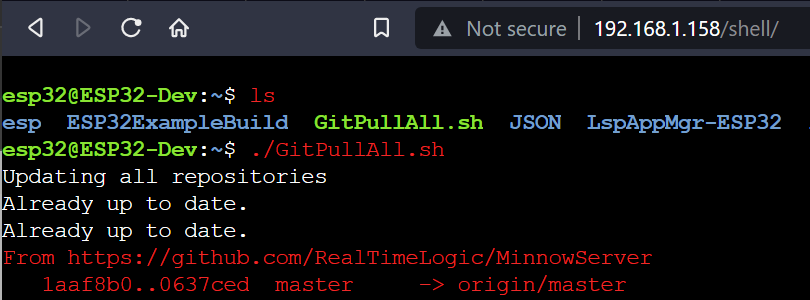
A Linux Web Shell can be accessed by navigating to http://ip-addr/shell/. You can also remote in using SSH. The username and password are esp32. In addition, a combined WebDAV and Web File Manager is available at http://ip-addr/fs/.
The ESP-IDF version included with the VM is 4.4.1. You may upgrade to a newer 4.x version as follows: