Getting Started
To start using Xedge32, you first need to install the firmware on a supported ESP32 board. The precompiled firmware targets:
Standard ESP32 boards with PSRAM, such as ESP32 WROVER, with at least 4 MB flash and 4 MB RAM.
ESP32-S3 boards, with at least 8 MB flash and 8 MB RAM.
If you are completely new to Xedge32, start with the precompiled firmware and the default onboarding workflow. More advanced build and upgrade paths are included later on this page.
Before flashing your first board, it can also help to read How Xedge32, Xedge, and Barracuda App Server Work Together. That article explains which parts are generic Xedge/BAS features and which parts are specific to ESP32 hardware.
First-Time Installers
For the easiest first installation, use the web installer on the Xedge32 installation page. That installer is the quickest route to a working device because it avoids manual flash addresses and command-line tools.
If you need more control over flashing, board selection, or firmware variants, continue with the manual instructions below.
OTA Upgrade
If Xedge32 is already installed on an ESP32-S3, you can upgrade it with the integrated Xedge32 OTA Upgrade Manager.
Typical OTA workflow:
Download the latest ESP32-S3 firmware ZIP file.
Extract the ZIP file.
Open the OTA Upgrade Manager.
Drag either
xedge.binorxedge-s0.binonto the upgrade page.
This upgrade path is especially convenient once a board is already deployed and reachable through the Xedge32 interface.
Advanced Installation and Upgrade
Two firmware delivery models are available:
Precompiled binary files that you can flash directly to the board.
Source code that you can build yourself with the Espressif ESP-IDF toolchain.
Important
The instructions on this page cover both ESP32 and ESP32-S3 hardware. Make sure you follow the command sequence and firmware layout that matches your specific chip.
Firmware Option 1: Use Precompiled Firmware
The precompiled firmware can be flashed from Windows, macOS, or Linux. We begin
with the Windows graphical workflow because it is the most approachable for
many first-time users, then show the esptool command-line workflow.
Windows Graphical Installer
How to Flash the Xedge32 Firmware
Download the ESPRESSIF Flash Tool and one of the following firmware packages:
ESP32-S3 Xedge firmware which includes two firmware variants. See ESP32-S3 Firmware Options.
After downloading, extract the flash tool archive and the firmware ZIP file.
Then follow these steps:
Connect the ESP32 board to your computer.
Identify the COM port in Windows Device Manager.
Start
flash_download_tool_3.9.4.exe.Select the correct chip type,
ESP32orESP32-S3, and click OK.On the
SPIDownloadpage, set the correct COM port and set the speed to115200.Click ERASE and wait for the erase operation to complete.
Use the browse buttons to select the firmware file or files.
Apply one of the following flash layouts.
Option 1: Merged Firmware File
Use this when flashing merged-xedge.bin:
Binary File |
Address |
|---|---|
|
|
Select the checkbox to the left of the file entry after adding it.
Option 2: Separate Firmware Files
Use this when flashing the individual binary components:
Binary File |
ESP32 Address |
ESP32-S3 Address |
|---|---|---|
|
|
|
|
|
|
|
|
|
Enable all three checkboxes after selecting the files.
Finish the Flash Process
Leave the remaining tool settings unchanged.
Click START and wait for the upload to finish.
Open a serial terminal such as PuTTY.
Watch the boot log.
When
LuaShell32 readyappears, continue with Configure the ESP32.
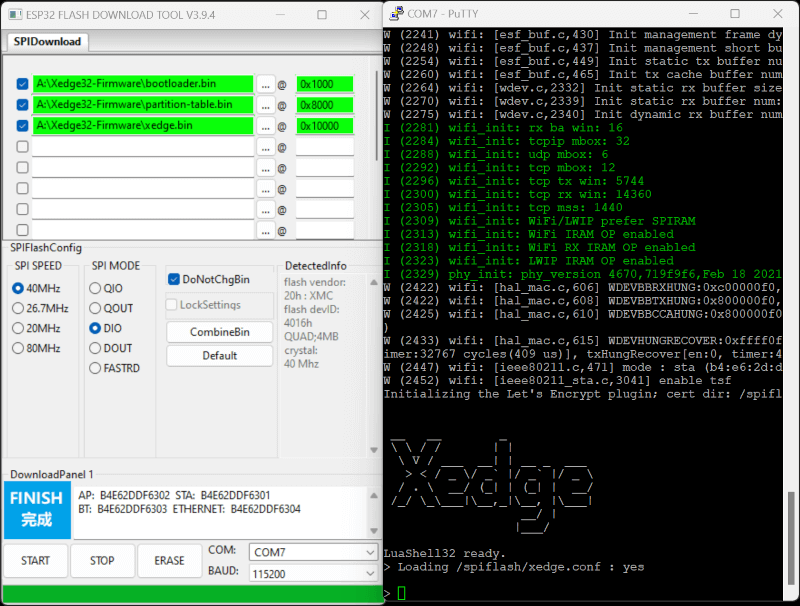
The screenshot above shows the flash tool on the left and a terminal window on the right. The merged firmware option is simpler because it packages the required firmware parts into a single file.
Common Flashing Issues
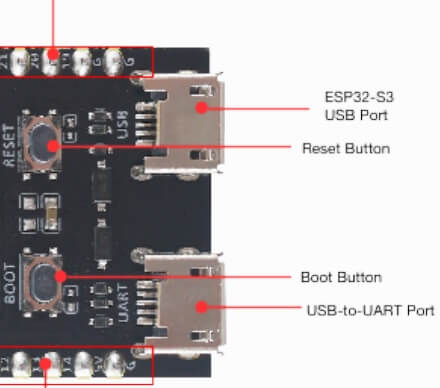
Some boards require you to hold the boot button while connecting USB. Once the board is detected, you can release the button.
On ESP32-S3 boards with both USB-OTG and USB-UART, use the USB-UART port for flashing. If needed, use the other port for the runtime console.
If PuTTY does not show LuaShell32, prepare the serial terminal first, then press the board’s reset button and immediately open the terminal connection.
Linux, macOS, and Windows with esptool
The following examples use Linux syntax, but the same esptool commands can
be adapted for macOS and Windows.
Install the required tool:
sudo apt install python3-pip
pip install esptool
Upload the ESP32 firmware:
wget https://realtimelogic.com/downloads/bas/Xedge32-Firmware.zip
unzip Xedge32-Firmware.zip
cd Xedge32-Firmware

# Use one of:

# python -m esptool --chip esp32 --before default_reset --after hard_reset write_flash --flash_mode dio --flash_size detect --flash_freq 40m 0x0 merged-xedge.bin

# python -m esptool --chip esp32 --before default_reset --after hard_reset write_flash --flash_mode dio --flash_size detect --flash_freq 40m 0x1000 bootloader.bin 0x8000 partition-table.bin 0x10000 xedge.bin
Upload the ESP32-S3 firmware:
wget https://realtimelogic.com/downloads/bas/Xedge32-S3-Firmware.zip
unzip Xedge32-S3-Firmware.zip
cd Xedge32-Firmware

# Use one of:

# python -m esptool --chip esp32s3 --before default_reset --after hard_reset write_flash --flash_mode dio --flash_size detect --flash_freq 80m 0x0 merged-xedge.bin

# python -m esptool --chip esp32s3 --before default_reset --after hard_reset write_flash --flash_mode dio --flash_size detect --flash_freq 80m 0x0 bootloader.bin 0x8000 partition-table.bin 0x20000 xedge.bin
ESP32-S3 Firmware Options
Two runtime variants are provided for ESP32-S3 boards:
- ``xedge.bin`` / ``merged-xedge.bin``
Best for boards such as the XIAO ESP32-S3 that expose a single USB port. This build provides LuaShell32 over that USB connection.
- ``xedge-s0.bin`` / ``merged-xedge-s0.bin``
Best for boards that use UART0 for flashing or console access through a USB-to-UART bridge such as CP210x or FTDI.
Note
If you flash xedge.bin over a USB-to-UART adapter on a two-port board,
you may need to move to the other USB port after flashing in order to access
the runtime console. If you use xedge-s0.bin, you can usually keep using
the same USB-to-UART connection.
Firmware Option 2: Compile the Code
If you need to customize the firmware itself, use the source tree and build instructions in the GitHub repository.
Compiling the firmware is the right approach when you need custom C extensions, build-time configuration changes, or tighter control over the final image.
Configure the ESP32
After flashing, reboot the ESP32. On first boot, Xedge32 starts in Access Point Mode. From there, you can either connect over serial or connect to the device’s Wi-Fi access point and use the web-based shell.
Relevant guides:
LuaShell32 for serial or web-shell access
Access Point Mode for browser-based onboarding
If you want the device to join your normal network instead of staying in Access Point Mode, open LuaShell32 and run one of the following commands.
Using Wi-Fi
esp32.netconnect("wifi", {ssid="your-Wi-Fi-SSID", pwd="password"})
Using Ethernet
esp32.netconnect("W5500", {spi-settings})
On a successful connection, the configuration is stored so the device can reconnect automatically after the next restart.
Next Step
Once Xedge32 is connected to your network, continue with Xedge32 to learn how to upload examples, create applications, and work with the IDE.
Firmware Upgrade Options
For ESP32-S3 boards, ongoing upgrades are usually simpler than the initial install. You can either:
Repeat the firmware flashing procedure and upload only
xedge.binorxedge-s0.bin.Use the drag-and-drop OTA workflow described earlier on this page.
Support and Discussions
If you run into issues, want to compare notes with other users, or need help choosing a board or workflow, visit the project’s discussion forum: