ESP32 Microcontroller Examples
The benefit of using the Xedge32 examples over the Mako Server examples is that these examples demonstrate how to connect an OPC UA server to real hardware. The LED and button OPCUA server example uses the Xedge32 Lua GPIO API to connect to real hardware.
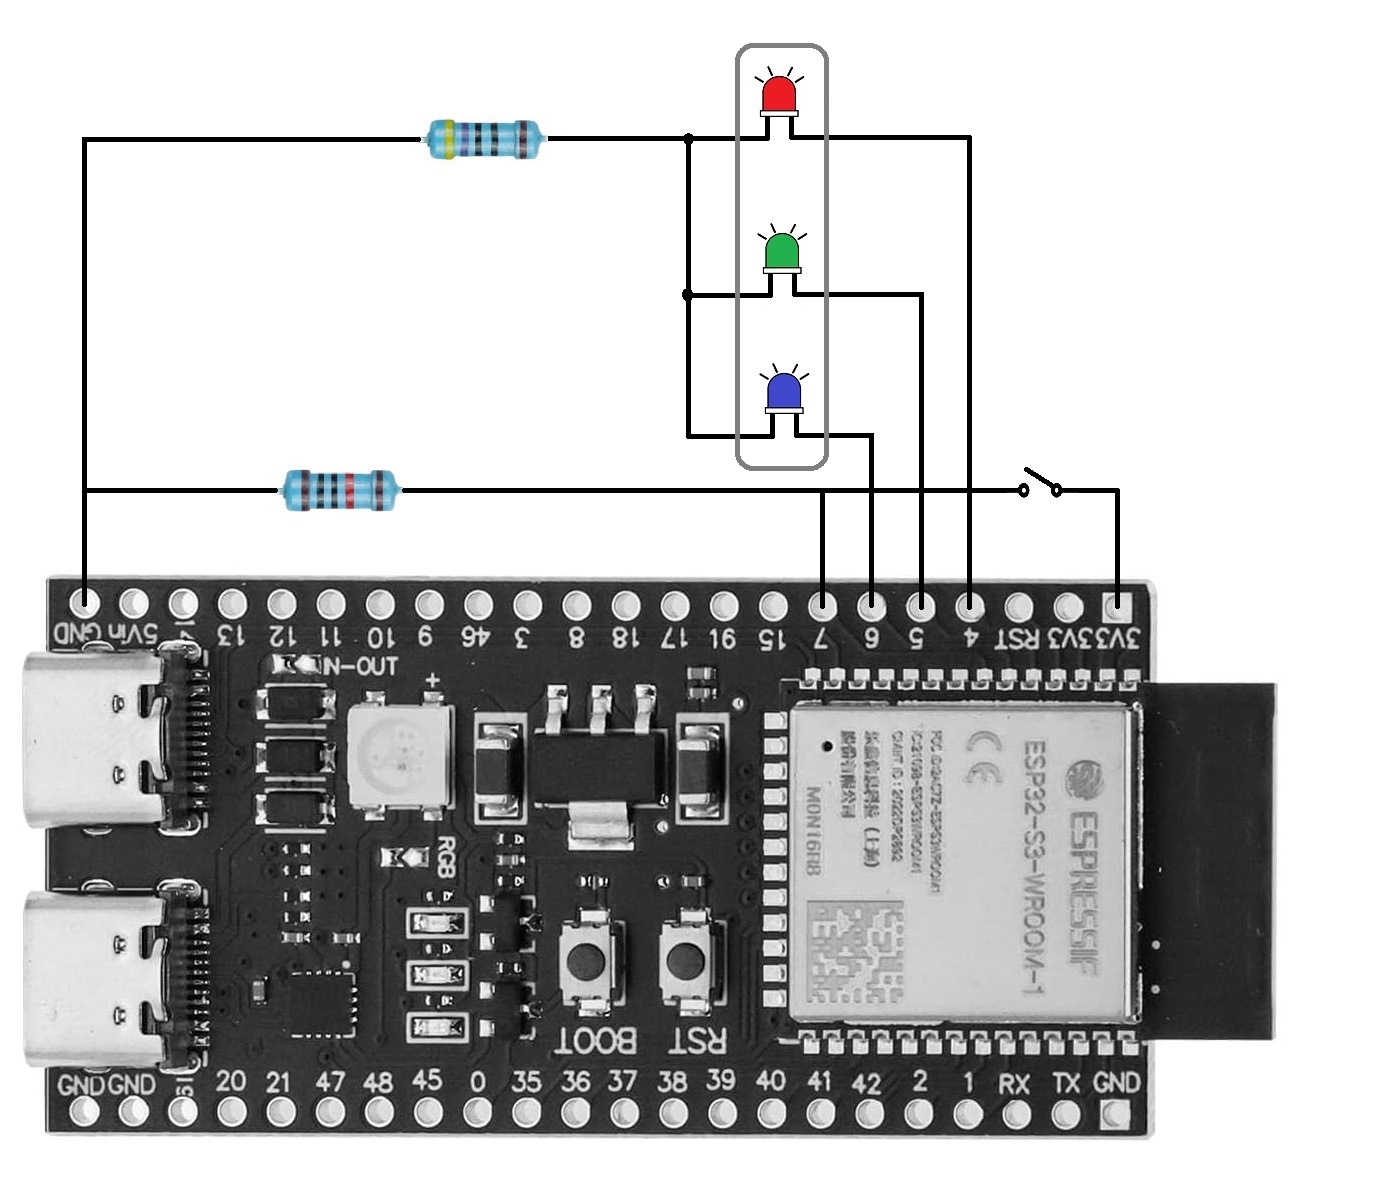
For this example, an ESP32-S3 is required as only the ready-to-run ESP32-S3 firmware includes the OPCUA stack. The Xedge32 installation page explains how to purchase an ESP32-S3. In addition to the ESP32-S3, you will need a breadboard, LEDs, and buttons, which are typically included in electronic starter kits. For more information on wiring the diagram shown below, see the tutorial Your First Xedge32 Project, which explains how to get an electronic starter kit and wire up the components.
In the following diagram, pulldown resistors are used, but they are often not required since most ESP32s include support for internal programmable pullup and pulldown resistors via the Lua GPIO API.
Components and GPIOs used:
GPIO4 Red LED
GPIO5 Green LED
GPIO6 Blue LED
GPIO7 Button

You may choose any GPIO available on the ESP32, but if you use other GPIO pins, make sure to change the ready-to-run OPCUA server program accordingly.
Ready-to-run OPC UA Server Example
Download the Ready-to-run OPC UA ESP32 Server Example from GitHub, create an Xedge32 application, and transfer the example to Xedge32. The tutorial Your First Xedge32 Project and the Xedge documentation both explain how to create an Xedge app.
In this example, the GPIO (hardware) state is accessible via the server’s OPC UA address space. Any OPC UA client can control the LEDs and read the button state. In the next sections, we will explain how to connect two OPCUA clients to the server’s address space.
Ignition SCADA
Ignition is a powerful SCADA (Supervisory Control and Data Acquisition) platform that enables users to design and deploy industrial automation solutions. It provides tools for building HMIs, SCADA systems, and IIoT applications, allowing seamless integration with various devices and systems.
The example project is a practical demonstration of a SCADA visualization system designed for the Ignition platform. This system effectively controls the LEDs, with the state of each LED displayed in Ignition. It also allows users to monitor the state of the button, indicating whether it is pressed or not.
To set up this project, you need to perform these steps:
Add an OPCUA server to Ignition.
Select the Red, Green, Blue, and Button tags and create a new polled group for these tags.
Import the visualization project.
Import images using Image Management.
Run the project.
Add the ESP32 OPCUA server to Ignition
To begin, add the ESP32 OPC UA server you should now have running into Ignition. Once the ESP32 is connected in Ignition, you can use tags within the visualization to retrieve data directly from the OPC UA server.
To add the OPC UA server, follow these steps:
Navigate to Config -> OPC Connections in the Ignition server interface.
Click on Create New OPC Connection….
Configure the connection settings to establish communication with the OPC UA server running on the ESP32. Use the address opc.tcp://ip-address:4841. Use the IP address and not the Xedge32 mDNS name xedge32.local. You can find the IP address by pinging xedge32.local in a console window, e.g., ping xedge32.local.
After adding an OPC UA server, ensure that the state transitions from ‘connecting’ to ‘connected’. During this connection phase, the Ignition platform retrieves all tags from the server, which may require some time.
Once the ESP32 OPC UA server has been successfully added to the Ignition server, you can proceed to the next step below.
Ready-to-use Ignition Visualization Project
We have developed the Ignition visualization project, led_and_button_ignition.zip, which can be imported into the Ignition server. To import it into Ignition, download the file, navigate to Projects on your Ignition server, select Import a new project, and import the zip file.
The following video shows all the steps plus how to enable the project.