In this hands on tutorial we will show how to set up a complete chain of trust by creating a Certificate Authority (CA) certificate and use the CA certificate for signing the web server's certificate. The IoT unit, acting as a TLS client and powered by SharkSSL, will then connect to the web server and validate the server's certificate. Setting up your own chain of trust is recommended for M2M solutions when you, as a developer, are in control of both the client (IoT unit) and the server. Optimizing certificate memory usage is easier when you are in full control as you will learn by reading this tutorial.
Note: this tutorial is designed for products acting as a TLS client, not as a TLS server. We recommend using SharkTrust if your product acts as a TLS server such as an HTTPS server. See the SharkTrust Example for details.
RAM Memory
SSL certificates can have a great impact on memory if you do not consider the type of certificate being used in IoT solutions. Using the wrong type of certificate may break the design of a memory constrained device. It is therefore crucial that you and any third party server/service provider use IoT friendly certificates. In this tutorial, we will explore the use of certificate management for memory constrained devices without having to resort to cumbersome methods such as using pre-shared keys (PSK).
An IoT device such as a sensor may send only very small messages, and it may be common to think that adding security to such a device will only have a small impact on the memory. However, certain certificates can have a huge impact on the memory consumption, thus the certificate type must be carefully selected. The SSL protocol is split into two parts: asymmetric encryption and symmetric encryption. It is the initial asymmetric encryption phase, where the client and server exchange certificates, that may have a significant memory impact if the certificates are not carefully chosen.
In our severe memory constrained reference platform, we managed to get all RAM memory usage for the device down to 13kBytes. This memory usage includes the memory used by device drivers, the TCP/IP stack, the SharkSSL stack, the SharkMQ stack, and the application. More information on this reference platform can be found on the SimpleMQ page. To keep the memory usage to a minimum, the SharkSSL server was compiled with settings that removed all ciphers, but TLS_ECDHE_ECDSA_WITH_CHACHA20_POLY1305_SHA256. Let's break down each component of this cipher combination:
- ECDHE: Elliptic curve Diffie-Hellman Ephemeral. Ephemeral means that the asymmetric encryption scheme connected using Perfect Forward Secrecy.
- ECDSA: Elliptic Curve Digital Signature Algorithm.
- CHACHA20: An extremely compact and fast stream based symmetric cipher.
- POLY1305: Poly1305 is a complementary hash.
The above mentioned cipher combination is the best solution for memory and CPU constrained devices because it cuts down on memory and CPU usage.
The combination of ChaCha20 and Poly1305 is particularly well suited for securing small embedded devices that need to preserve memory, footprint, and maintain performance with the least amount of encumbrance, by cutting down on the amount of time spent encrypting and decrypting data. We also provide assembler optimized versions for both algorithms.
Elliptic Curve Cryptography (ECC) Certificates
The cipher combination we selected above requires that we use Elliptic Curve Cryptography (ECC) Certificates. ECC is an asymmetric encryption replacement for the much older RSA asymmetric encryption. The benefit with ECC certificates for devices is the small certificate size. As an example, a 224 bit ECC certificate is equally as strong as a 2048 bit RSA certificate. The ECC certificate helps us preserve precious memory in a device.
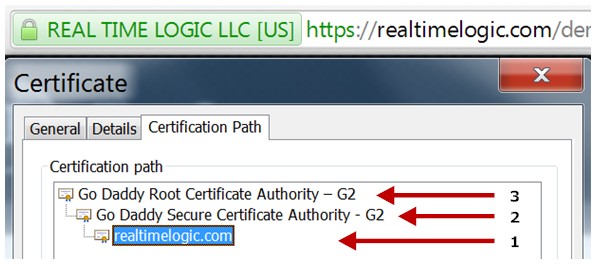
When a device connects to a server, the server sends the complete certificate including the chain, if any, to the device. This certificate must be stored in RAM memory during the initial SSL handshaking. Unfortunately, many online servers use large chained RSA certificates, including many IoT cloud service providers. Purchasing an SSL certificate can be expensive, and although chained certificates are easier to obtain at a lower cost, they require a large amount of RAM.. For example, Real Time Logic's Extended Validation (EV) certificate is an RSA certificate with two chains as shown in the following figure:
The SSL protocol is a client/server protocol. An SSL server must have a certificate, but the certificate is optional for the client. A certificate enables the device/server to authenticate the peer side. As we explained in our online Certificate Management for Embedded Systems tutorial, the SSL protocol uses the concept of a well known trusted third party during the authentication process. The third party, known as the Certificate Authority (CA), enables the peers to establish trust and to authenticate each other.
In short:
- A server certificate (required) enables a device to authenticate the server by using a trusted third party (the CA).
- A client certificate (optional) enables a server to optionally authenticate the client by using a trusted third party.
RSA certificates are still the most common form of certificates and are preferred for non IoT solutions such as when a browser connects to an online server. However, an ECC certificate should be selected for the server when it is designed to interoperate with memory constrained devices. In this tutorial, we will show you how to setup a dual certificate server, where browsers are served an RSA certificate and devices are served an ECC certificate.
A dual certificate server provides great flexibility as it allows the use of small certificates for devices and RSA certificates for browsers. The RSA certificates can be signed by you or by an online paid for service. The ECC certificates are preferably signed by your own CA certificate.
The process of creating and signing certificates is the same, whether you become your own certificate authority or use one of the online certificate signing providers (paid for service). If using an online paid for service, you use their CA certificate to sign the certificates you create. If you operate as your own CA, you sign your own certificates using your own CA (root) certificate. As we explained in the introduction to our easy to use certificate management tool and contrary to popular belief, being your own certificate authority will in most cases be more secure than using a paid for service. Being your own certificate authority is also the preferred solution if you are setting up an IoT infrastructure, where you are in control of the device side and the server side.
The root certificate must be pre-installed (embedded) in the device firmware. All devices will have the exact same root certificate stored. A root certificate typically has a very long life span. You can set the expiration time for a root certificate to thirty years or more.
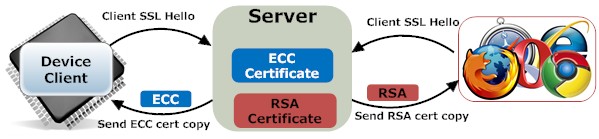
In figure 5, we illustrate how a device authenticates a server. The client sends the SSL hello handshake message to the server and the server responds by sending a copy of the public part of the certificate to the client. The client then checks that the certificate is signed by a trusted third party. The trusted third party is the public component of the root certificate created in Figure 4 and this component is embedded in the firmware. A client can have a pool of trusted third parties (root certificates). However, an IoT device typically only requires one root certificate as long as this root certificate is used for signing the certificates for all servers the device may connect to. In addition to validating the certificate, the client also verifies that the name in the certificate sent by the server corresponds to the name (domain name) used when connecting to the server. Verifying the name is required for preventing man in the middle attacks when the certificate is signed by a third party paid for CA service.
In addition to creating server certificates, which is required, you can also optionally create certificates for all devices. A device certificate enables the server to authenticate the client, thus enabling mutual client/server authentication. However, using client certificates creates some additional work, typically during manufacturing, since each device must have its own unique certificate.
Creating and Managing Certificates
To follow this tutorial, you must have all of the following:
- Either a copy of the SharkSSL Standalone source code or the SharkSSL evaluation package.
- The certificate management tool.
- The Mako Server, which will be used as a test platform for our dual certificate server.
The Mako Server tutorials are automatically downloaded if you select this option when installing the Mako Server. The Mako Server tutorials include the certificate management tool; thus you should not download this tool separately. However, you may want to read the online certificate management tutorial prior to continuing.
Downloading and installing the Mako Server:
- Download the Mako Server for your platform.
- Follow the installation instructions
- Make sure you select the option that lets you download the tutorials
- Use the included script that starts the Mako Server and that loads all tutorials.
After starting the Mako Server by running the script for downloading and loading the examples, after some time you should see the following text being printed in the console window:
Loading certmgr.zip as certmgr
Starting the Certificate Authority Manager (certmgr)
The above indicates that the Mako Server has loaded the Certificate Management tool.
Creating the server certificates
Open a browser and navigate to the certificate manager by entering http://localhost/certmgr/ in the browser. You should see a web page with the following content:
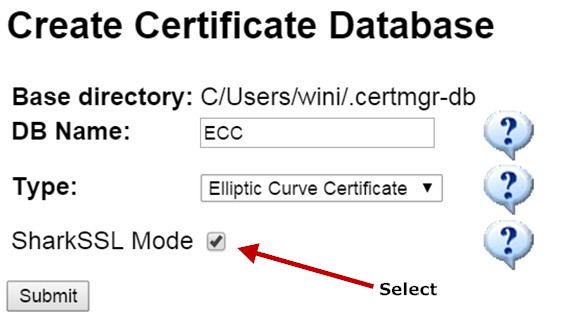
The SharkSSL Mode makes the certificate manager create both binary X.509 certificates in addition to standard X.509 certificates. The certificate manager also creates a C header file with the binary certificate data, and this header file can be included in your C code. SharkSSL can be compiled without the X.509 parsing code for reduced ROM and RAM usage. The binary certificates enable the use of X.509 certificates in resource constrained devices without the need for the costly X.509 parsing code. Note: by enabling the binary mode, the certificate manager implicitly runs the SharkSSLParseCAList and the SharkSslParseCert tools after creating the standard X.509 CA certificate and after creating and signing X.509 certificates signed with the CA certificate.
Enter the information as shown above to create an ECC CA certificate, and click the Submit button.
On the next page, fill in the CA certificate information. For your CA test certificate, you may leave all fields blank except for the "Common Name". The Common Name does not have to be a domain name for the CA certificate; it can be your company name. Click Submit to complete the creation of the CA Certificate.
Now that we have the ECC CA certificate, we will use this certificate when we create and sign the ECC server certificate. To create the ECC server certificate, click on the "Create Certificate" menu to the left in the certificate manager, and enter the "Common Name" localhost. Click the "Create Key and Certificate" button. The name "localhost" will later be used when we modify and connect the SharkSSL client to the server.
We have now created an ECC certificate with the name "localhost" and signed this certificate using the ECC CA certificate. The next step is to create a new certificate database. We need to create a new database for RSA certificates. Click on the "CA Databases" menu to the left in the certificate manager, and then click the "Create new CA certificate DB" link. You should see the same interface as in figure 6. Enter RSA for database name, select "RSA Certificate", and click the SharkSSL Mode checkbox. Click the Submit button to create the RSA CA certificate and to initialize the RSA database.
The next step is to create an RSA server certificate. The procedure is the same as the one we used for creating the ECC certificate above. To create the RSA server certificate, click on the "Create Certificate" menu to the left in the certificate manager and enter the "Common Name" localhost. Click the "Create Key and Certificate" button to create and sign the RSA certificate. The localhost certificate is signed using our own RSA CA certificate. However, you can at this point select to sign the certificate using a paid for service. The certificate manager saves intermediate steps in the HOME/.certmgr-db/tmp directory. If you look in this directory, you should see a file by the name "csr-localhost.req". This file is a so called Certificate Signing Request (CSR). A certificate authority (CA) will use a CSR to sign your SSL certificate. However, you will not find any online paid for service that will sign a CSR with the name "localhost". A CA requires a standard domain name and it needs proof that you own the domain name. For this tutorial, you have to be your own CA for the RSA certificates; thus you must install the CA root certificate in the browser as explained in the certificate manager to remove the browser warning. You can later, after completing this tutorial, use the certificate manager to create RSA CSRs for multiple domain names you own and use an online paid for CA service to sign these certificates.
Installing the Server Certificates
We have now created two certificates with the common name "localhost": one ECC certificate that devices will use when authenticating the server and one RSA certificate browsers will use when authenticating the server. It's now time to install the two certificates in the Mako Server and turn the Mako Server into a dual certificate server. You will find the two private keys and the two certificates in the following directories: .certmgr-db/ECC/keys-and-certs/ and .certmgr-db/RSA/keys-and-certs/. Copy the four files to the directory where the Mako Server executable is stored. You must rename the files since the ECC and RSA certificates have the same name. After copying and renaming the files, you should have the following files in the Mako Server executable directory:
- ECC.localhost.pem - ECC certificate
- ECC.localhost.key - ECC private key
- RSA.localhost.pem - RSA certificate
- RSA.localhost.key - RSA private key
To instruct the Mako Server to load the above certificates, create a new configuration file in the Mako Server executable directory and name it "mako.conf". Use a text editor and enter the following information in the configuration file:
certfile={"ECC.localhost.pem", "RSA.localhost.pem"}
keyfile={"ECC.localhost.key", "RSA.localhost.key"}
favorRSA=true
Figure 7 shows the Mako Server configuration file for dual certificate operation
Save the configuration file and restart the Mako Server (restart the Mako Server tutorial startup script). You should see the following information being printed in the console:
Loading certificate "ECC.localhost.pem"
Loading certificate "RSA.localhost.pem"
Favor RSA certificate
An SSL enabled server can have multiple certificates installed. You may have clients with different capabilities and the server learns about the clients' capabilities during the SSL handshaking. The server then selects the strongest certificate/cipher combination the client can manage. The certificate selected by the server will be the ECC certificate for all clients that include Elliptic Curve Cryptography (ECC) technology. Many browsers today include ECC technology; thus the browser will get the ECC certificate unless we can force the server to send the RSA certificate to the browser. Recall that you will get a browser certificate warning if the certificate sent to the browser is signed with a CA unknown to the browser. You do not want to serve the browser with certificates signed with your own CA (unless you install the CA in all browsers being used). The idea is that we use an online paid for CA service for RSA certificates, which satisfies the browsers without having to install our own root CA in the browsers. We use the ECC certificates for our own IoT solutions and for devices only. Setting the attribute favorRSA in the configuration file (Figure 7) to true makes the SSL server favor RSA over ECC certificates; thus a client that supports both RSA and ECC will receive the RSA certificate.
When an SSL enabled client connects to a server, it sends a list of all ciphers the client can manage. We can force the SharkSSL client to only send one cipher combination to the server, thus forcing the server to select the ECC certificate for the devices. The favorRSA attribute will have no effect since the client tells the server that it can only handshake using ECC, thus forcing the server to use the ECC certificate.
#if SHARKSSL_ENABLE_SELECT_CIPHERSUITE == 1
   SharkSslCon_selectCiphersuite(scon, TLS_ECDHE_ECDSA_WITH_CHACHA20_POLY1305_SHA256);
#endif
Figure 8 shows how to select a specific cipher combination in a device
SharkSSL has many compile time options. The ifdef in figure 8 checks if the selectCiphersuite is enabled/included in the SharkSSL library. A full SharkSSL library includes many cipher combinations which can, in most cases, be removed for IoT solutions when you know the server capabilities. By removing all ciphers except for ECC and ChaCha20/Poly1305, it is possible to get the SharkSSL code base below 20kBytes. This option also excludes the selectCiphersuite function, hence the ifdef in Figure 8.
At this point we are done with the server configuration. You can navigate to the server using a secure connection; you will then get a warning since you are using your own CA which is unknown to the browser. You can remove the warning by installing the RSA CA certificate in the browser as explained in the certificate manager tool.
SharkSSL Example Modification
- M2M LED SharkMQ: IoT example that uses the secure SMQ library SharkMQ for connecting to our SMQ cluster. The example lets you control LEDs in a device in realtime via a browser. See the Browser to Device LED Control using SMQ tutorial for details. See also the SharkMQ API documentation.
- M2M LED JSON: IoT example that shows how to send and receive JSON IoT messages over a raw SSL encrypted socket connection. See the JSON documentation for more information on using JSON for IoT communication. The example requires that you have installed our free JSON library in the root path.
The Mako Server example bundle includes server side code for all three SharkSSL IoT examples, and you can modify any of these examples and make them connect to your own "localhost" server. For this tutorial, the example programs must run on the same computer as the server since we used the domain name "localhost" in the certificates we created. The name in the certificate must match the name of the server the client connects to; otherwise the client will complain that it connects to a non trusted server. You can download our SharkSSL library and examples for Windows if you run the server on Windows.
Open the source code file examples/LED-SMQ.c in an editor. Search for the macro SIMPLEMQ_DOMAIN and change the macro to "https://localhost". This construction makes the example program connect to the SMQ broker enabled by the Mako Server tutorial bundle.
Search for:
#include "certificates/CA_RTL_EC_256.h"
Replace the above line with:
#include "certificates/ECC-ca-pem.h"
The file ECC-ca-pem.h was generated when you created the ECC CA certificate. Copy this file from the .certmgr-db/ECC/ directory to the SharkSSL examples/certificates directory. The data in this header file is the data from the ECC CA certificate converted to an optimized format used by SharkSSL. SharkSSL includes code for directly loading the X.509 certificate, but this requires extra code and memory in the device. The optimized format greatly reduces the memory requirements. The ECC CA certificate will be used during the SSL handshake and enables the server to verify the identity of the server.
Search for the line:
SharkSsl_setCAList(&sharkSsl, sharkSslCAList);
Replace the above line with:
SharkSsl_setCAList(&sharkSsl, sharkSSL_ECC_CA);
The sharkSSL_ECC_CA variable is from the ECC-ca-pem.h header file. The above construction installs the CA (root) certificate in SharkSSL, thus enabling SharkSSL to verify the identity of any peer we connect to with a certificate signed by the ECC CA certificate.
Compile and run the code. The code should successfully connect to the server "localhost" without complaining about any certificate issues.
Troubleshooting
Cannot connect
Make sure you are connecting to the correct IP address and port number. The Mako Server may not be listening on the default ports 80 (non secure) and 443 (secure). You must set the port number in the C client program to the port number printed in the Mako Server console. The following code snippet shows how to set the SharkMQ LED example to port 9443, a port number that is automatically selected by the server if port 443 is blocked.
#define SIMPLEMQ_DOMAIN "https://localhost:9443"
SSL handshake error
You get an SSL handshake error if you have not installed an ECC certificate in the server. The IoT client examples are configured to only connect using the cipher combination TLS_ECDHE_ECDSA_WITH_CHACHA20_POLY1305_SHA256. The server will be unable to select this cipher combination if an ECC certificate is not installed in the server and this leads to an SSL handshake error.
You also get a handshake error if you mix secure and non secure connections. For example, an SSL client connecting to the HTTP (non secure) listening port leads to an SSL handshake error. You will also get a handshake error if you connect a non secure client to the HTTPS (secure) listening port on the server.