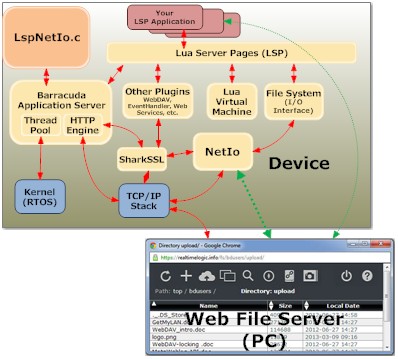
The LspNetIo example provides a fast and efficient way to set up an LSP development environment for embedded systems. It uses our proprietary Network File System (NetIo), which typically connects back to your host computer (PC) during development. You can use the Mako Server as a Web File Server running on your PC as the file server for the NetIo client on your device. For those who prefer using Lua without the Xedge IDE, this setup offers a straightforward alternative.
In this example, the NetIo code is initialized in the C code but it can also be initialized using Lua. For a high-level demonstration of how to use the NetIo with Lua, refer to the tutorial Using the NetIO Client on an Embedded Device.
Instructions:
Import the source code into your build process:
Include BAROOT/amalgamation/BAS.c in your build. See the readme file in the amalgamation directory for details.
The "LspNetIo/lsp" sub-directory contains a few Lua and LSP example scripts. The embedded system will fetch this code via the NetIo so this code must be made easily available to the embedded system. We suggest that you do the following:
Windows host environment: copy the files including the sub-directory from the LspNetIo 'lsp' directory to c:\lsp
Linux host environment: create a symbolic link from /lsp/ to BAROOT/examples/LspNetIo/lsp
Start the Mako Server configured as a Web File Server on your PC or host Linux system.
Start a browser, preferably Chrome, and navigate to http://pc-ip-address. Do not use 'localhost'; use the IP address of your PC. You should see the WFS integrated default page.
Enter the URL http://pc-ip-address/fs/ to navigate to the Web File Manager enabled Mako Server.
Use the Web File Manager presented in your browser and navigate to the directory where you have the Lua and LSP resources from (1) above. Make sure you see the ".config" file and the "www" subdirectory in the Web File Manager.
Copy the URL to this directory from your browser to the computer's clipboard.
Open src/LspNetIo.c in an editor and locate the NETIO_URL macro. Replace the default value with the URL in your computer's clipboard. This URL is used by the NetIo client when connecting via the WFS server to the Lua and LSP resource directory on your PC.
Set the required macros for BAROOT/amalgamation/BAS.c and adjust it for your platform. The source code in BAS.c includes all C code from the Barracuda Application Server C source code library so you do not need to compile and link with the standard libraries when using the LspNetIo example.
Add the two C source code files src/LspNetIo.c and BAROOT/amalgamation/BAS.c to your IDE.
Create an RTOS thread and have this thread call function "void barracuda(void)" in src/LspNetIo.c. This function does not return. The function sets up the web server environment and enters the Barracuda Server socket dispatcher SoDisp.
Add the following paths to your build env: BAROOT/inc and BAROOT/inc/arch/xxx, where xxx is one or several directories. You can find these directories by searching for /inc/ in the Target.mk platform makefile for your target environment. See the BAROOT/builds/ directory for more information.
The src/LspNetIo.c code prints status information to the trace, thus you must enable the Barracuda trace and redirect the trace to a console. You must also install an error handler. See examples/misc/standalone/HostInit.c for example code.
Compile and link the code.
Start your embedded device and look for trace printouts in the console (12 above).
Use a browser and enter the url http://your-device-ip-address.
LspNetIo Options
The code can be compiled with the below options (using compiler macros). See the source code LspNetIo.c for details on how the macros are used for configuring the server.
Development or release mode:
BAIO_NET: Development mode (using NetIo). This option is selected by default (if one of the two following options are not set).
BAIO_EZIP: Release mode (using embedded ZIP file). Use the included batch file CreateLSP-ZIP.bat to ZIP the lsp directory and to produce a C file that contains the ZIP file. You must include the produced C file (obj/LspZip.c) in your build.
BAIO_ZIP: Release mode (using external ZIP file). This option requires a file system or you must design a driver (easy) for reading data directly from flash memory. You must include the file BAROOT/examples/FileReader/FileZipReader.c in your build. The file FileZipReader.c may require modifications for non standard file systems (easy).
LspDiskIo (for RTOS with file system)
The LspDiskIo, also designed for rapid development, uses the DiskIo instead of the NetIo; thus a file system is required in the device and a DiskIo implementation must be used for your file system. See the BAROOT/xrc/DiskIo/ directory if a DiskIo implementation is available for your file system. Note that the LspDiskIo example does not provide the options found in LspNetIo such as the develop/release modes. The LspDiskIo is designed for development mode only and does not include the optional resource files found in the LspDiskIo example.
Rapid development in the LspDiskIo is facilitated by enabling you to map/mount your device as a network drive from your host computer. The LspDiskIo example includes a WebDAV network drive that makes it possible to directly edit LSP files stored on the embedded file system in the device. The video to the right shows how to map a WebDAV network drive from Windows and how to mount a drive from Mac OS X. Note: the included WebDAV network drive is configured for rapid setup and it does not include authentication. Anyone with access to your network can mount the file system in the embedded device.
Instructions:
Set the required macros for BAROOT/amalgamation/BAS.c and adjust it for your platform. The source code in BAS.c includes all C code from the Barracuda Application Server C source code library so you do not need to compile and link with the standard libraries when using the LspDiskIo example.
Add the two C source code files src/LspDiskIo.c and BAROOT/amalgamation/BAS.c to your IDE.
Add the DiskIo implementation for your file system to your IDE. The DiskIo implementations can be found in the directory BAROOT/xrc/DiskIo/.
Create an RTOS thread and have this thread call function "void barracuda(void)" in src/LspDiskIo.c. This function does not return. The function sets up the web server environment and enters the Barracuda Server socket dispatcher SoDisp.
Add the following paths to your build env: BAROOT/inc and BAROOT/inc/arch/xxx, where xxx is one or several directories. You can find these directories by searching for /inc/ in the Target.mk platform makefile for your target environment. See the BAROOT/builds/ directory for more information.
The src/LspDiskIo.c code prints status information to the trace, thus you must enable the Barracuda trace and redirect the trace to a console. You must also install an error handler. See examples/misc/standalone/HostInit.c for example code.
Compile and link the code.
Start your embedded device and look for trace printouts in the console (6 above).
Map/mount the following WebDAV URL: http://your-device-ip-address/fs/
Copy the files including the sub-directory from the LspNetIo 'lsp' directory to the mapped network drive.
Restart your embedded device (this is necessary since we need to execute the Lua code in the .config file we copied to the file system on the embedded device).
Use a browser and enter the url http://your-device-ip-address. You should see the content of the index.lsp page.
You can now use any editor and directly edit/create LSP files in the 'www' directory on the mounted network drive.