Welcome to the Getting Started guide for the Barracuda App Server (BAS) and the Barracuda Web Server (BWS) libraries. This guide helps Lua, C, and C++ developers understand how the libraries are assembled into an embedded application.
If you plan on using BAS with Lua, you can skip reading the following document if your integration is based on the Mako Server or Xedge.
If you do not want to use Lua, check out the C++ WebSocket example in the examples folder. The documentation for this example is available on GitHub. Otherwise, use any of the other C code examples.
This section covers assembling a server with C components, comparing C/C++ Server Pages (CSP) with Lua Server Pages (LSP), and creating interfaces between Lua and C code. The final part introduces the Virtual File System (VFS) for C coders.
The Barracuda App/Web Server libraries are designed in ANSI C. The public headers also include C++ wrappers, so you can use the default C API from C projects or the C++ wrapper API when compiling with a C++ compiler. BAS can also expose many server features to Lua when Lua support is enabled.
The Barracuda Web and App Server Setup Video is a helpful resource that guides firmware engineers through the process of integrating the library into an embedded application. In the video, you will find step-by-step instructions on setting up the Barracuda server.
During the setup process, you have the flexibility to choose your preferred development approach. You can opt to develop everything using C/C++, and if desired, you can include CSP in your build. Additionally, you have the option to incorporate Lua into your project.
If you decide to use Lua, it is crucial to design the south bridge API. This API enables Lua to access your low-level APIs and hardware, ensuring seamless communication between Lua scripts and the underlying system.
By following the Barracuda Web and App Server Setup Video, you will gain a clear understanding of the integration process and the available options for your development. It is a valuable resource to get you up and running with the Barracuda server effectively.
Creating a Barracuda Web Server involves creating a number of objects. These objects are assembled into a web server specifically designed for your application.
The Barracuda App/Web Server library uses an object-oriented ANSI C design. Objects are C structs, and functions act as methods by taking the object pointer as the first argument. The C++ wrappers in the headers provide constructors, destructors, and inline methods around the same C objects. The following example uses the C++ wrapper API. Most ready-to-run examples, such as Xedge, use the C API instead.
int main(int argc, char* argv[])
{
   ThreadMutex m; // Create the mutex protecting the dispatcher and server.
   SoDisp dispatcher(&m); // Create the socket dispatcher object.
   // Create the Web-Server object and bind it to the dispatcher
   HttpServer server(&dispatcher);
   // Create a listen object that listens on port 80
   HttpServCon servCon(&server, &dispatcher);
   // Create a secure listen object that listens on port 443
   HttpSharkSslServCon sslServCon(&server, &dispatcher, cert);
   dispatcher.run(); // Never returns.
}
The objects created above are explained in the C/C++ reference manual. The above code creates a platform-independent mutex that protects the server in a multi-thread-enabled Barracuda configuration. The SoDisp is a platform-independent socket dispatcher. This object dispatches socket events to the registered objects. For example, the servCon object and the sslServCon object are triggered when a client connects to port 80 and port 443. The HttpServCon object is the standard server listen object. This object typically listens for new client connections on port 80. The sslServCon object listens for connections on port 443 -- that is, it listens for secure HTTP connections. Argument cert is a pointer to an SSL certificate generated by using the command-line tool SharkParseCert, which is explained in the C/C++ section.
We are using default arguments for the constructors above. You have many optional arguments that can be passed to these constructors. For example, you can configure the HttpServCon object to listen on a non-standard HTTP port, or you can configure the server to create N threads -- i.e., you can enable threading in the server.
This example creates two listen objects. The server permits you to create any number of listen objects. You can, for example, create another HttpServCon object listening for connections on port 80 using IPv6.
The above code shows how to assemble a standalone web server. An application embedding Barracuda should replace the main function with a thread dedicated to the server.
The above assembled web server will return the message "404 page not found" since no resources are so far installed in the Virtual File System. The Virtual File System must at a minimum contain one resource before a client can access the server.
Resources can be installed into the Virtual File System as Lua objects, C/C++ objects, or both. Objects created by C code can be manipulated by Lua code.
The following C code fragment is the minimum of what it takes to enable Lua for a Barracuda server. It assumes that we have already created the HttpServer and IoIntfs (IO interface).
lua_State* L;                           /* pointer to a Lua virtual machine */
struct BaLua_param blp = {0};           /* configuration parameters */

blp.vmio   = pvmio;                     /* The required VM io. Pointer to an IoIntf */
blp.server = pserver;                   /* pointer to a HttpServer */
L = balua_create(&blp);                 /* create the Lua state */
The above configuration parameters are the only parameters required to enable Lua. There are additional parameters that you can optionally configure. For example, a timer object is installed as follows:
BaTimer timer(&m,8000);
blp.timer = &timer;
The timer is very useful as it enables the server to trigger timer events. Many web application frameworks such as PHP must rely on external cron scripts to run maintenance services. Barracuda includes a timer object that permits Lua code to run at regular intervals.
For detailed explanation refer to the Barracuda Lua C interface.
Note: Without enabling Lua, you will only have access to the C HTTPS client library and the C WebSocket Server, while the other protocols listed in the Protocols section will be unavailable.
Lua Server Pages, or LSP for short, and C/C++ Server Pages, or CSP for short, are technologies that enable you to make dynamic and interactive web pages.
What are LSP and CSP?
An LSP file normally contains HTML tags, just like an HTML file. However, an LSP file can also contain Lua scripts, normally surrounded by the delimiters <?lsp and ?>. Lua server scripts are executed on the server and can contain any valid Lua expressions, statements, functions, etc.
A CSP file is similar to an LSP page; however, a CSP file contains C or C++ code normally surrounded by the delimiters <% and %>, which are also known as CSP tags. The CSP compiler supports a number of tags specifically designed for C and C++ code.
LSP pages and CSP pages are provided with some predefined objects. The request object is used to get information from the client, and the response object is used to send output to the client from the server.
The following two examples show an LSP and a CSP web page hit counter. The examples execute code on the server and dynamically produce an HTML page:
LSP example:
<?lsp
   page.count = (page.count or 0) + 1
?>
<html>
  <body>
    <p>
      You are visitor <?lsp=page.count?>.
    </p>
  </body>
</html>
CSP example:
<%! int count; %>
<%!! count = 0; %>
<html>
  <body>
    <p>
      You are visitor <%="%d" ++count%>.
    </p>
  </body>
</html>
These examples use expression tags: <?lsp= ?> for LSP and <%="format flag" %> for CSP. The result of an expression is emitted as HTML/XML.
Let's say we have the two following C functions that directly interact with the hardware. The first function enables us to set an LED on or off. The second function returns the LED state, which is 1 for on and 0 for off.
void setLed(int on);
int getLed(void);
To control the LED from a CSP and LSP page, we start by making a simple web page template with one HTML form.
<html>
  <body>
    <form method="post">
      Set LED: <input type="checkbox" name="LED" >
      <br>
      <input type="submit" value="Submit">
    </form>
  </body>
</html>
When using CSP, we inject C or C++ code into an HTML page. Since we use C code, we can directly call the two LED functions setLed and getLed. The following example shows the template converted to a fully functional CSP page using C code, not C++.
<%g #include "LED.h" %>
<%
if(HttpMethod_Post == HttpRequest_getMethodType(request))
{
   /* Fetch 'POST' data: param 'LED' (from HTML form) */
   const char* led = HttpRequest_getParameter(request, "LED");
   setLed(led ? 1 : 0);
}
%>
<html>
  <body>
    <form method="post">
      Set LED:
       <input type="checkbox" name="LED" <%= getLed() ? "checked" : "" %>>
      <br>
      <input type="submit" value="Submit">
    </form>
  </body>
</html>
In this CSP page, we check whether the HTTP method is POST. If it is, we set the LED either on or off. The on/off state is fetched from the HTTP parameter "LED", i.e., from the browser's POST data sent from the "LED" checkbox in the HTML code.
On line 14, in the LED checkbox, we must dynamically set the attribute "checked" if the LED is set to "on". The "checked" attribute makes the browser automatically check the checkbox element.
When using LSP, we cannot directly call C functions from within an LSP page since a Lua script cannot directly call a C function. What we need is Lua bindings for the two LED functions. The bindings, when registered in the Lua VM, enable Lua scripts to call C functions via the bindings.
For an easy introduction to Lua bindings, see the following:
Creating Lua bindings can be done automatically or manually. We will first look into how to do it automatically and then how to do it manually.
Create a new text file, name it "functions.txt", and copy the two LED function prototypes to this file such that the file contains:
void setLed(int on);
int getLed(void);
Navigate to https://realtimelogic.info/swig/, enter the name LED, and click "continue". Drag and drop the text file "functions.txt" onto the online binding generator's web page. The online web application generates the Lua bindings, and the file should automatically download. Include the generated C file in your build, and follow the instructions provided by the online Lua bindings generator. In particular, you must initialize the bindings by calling luaopen_LED(L) from your C startup code.
After compiling the new Lua bindings (C code) and after modifying the C startup code, compile and run the server. Create the following LSP file in the LSP directory (where you have configured the server to read LSP pages):
<?lsp
if "POST" == request:method() then
   local led = request:data("LED") -- Fetch 'POST' data: param 'LED'
   LED.setLed(led and true or false) -- Call auto-generated C binding
end
?>
<html>
  <body>
    <form method="post">
      Set LED:
       <input type="checkbox" name="LED"
          <?lsp= LED.getLed() and "checked" or "" ?>>
      <br>
      <input type="submit" value="Submit">
    </form>
  </body>
</html>
In this example, LED.setLed expects an integer that is either one or zero, and LED.getLed returns either one or zero. Although this works, it is better to change the C prototypes so they use Lua boolean values. This tutorial does not cover that change; consult the online SWIG documentation and make the bindings use boolean values.
Start by creating two function prototypes as follows:
static int LED_setLed(lua_State* L);
static int LED_getLed(lua_State* L);
As shown above, the two functions take a Lua state as an argument and return an integer. Lua uses a virtual stack to pass values to and from C. We will not go into this in detail here, but you should consult the Lua book, which describes this in detail. An older version of this book is available online.
static int LED_setLed(lua_State* L)
{
   /* Fetch value at stack position 1 */
   int on = lua_toboolean(L, 1);
   /* Call the LED function that is interfacing the hardware */
   setLed(on);
   return 0; /* No Lua return value */
}

static int LED_getLed(lua_State* L)
{
   /* Call the LED function that gets the LED state from the hardware */
   int on = getLed();
   /* Push the on/off state onto the Lua stack */
   lua_pushboolean(L, on);
   return 1; /* Inform Lua that we have one return value */
}
The above two functions must be registered in the Lua state that was created by the C startup code. The following code creates a Lua table by the name "LED" and attaches the two C functions to this table.
static int LED_register(lua_State* L)
{
   static const luaL_Reg reg[] = {
      {"setLed", LED_setLed},
      {"getLed", LED_getLed},
      {NULL, NULL}
   };
   luaL_newlib(L, reg);
   return 1;
} /* End */


int luaopen_LED(lua_State* L)
{
   luaL_requiref(L, "LED", LED_register, TRUE);
   return 1;
}
A detailed explanation of how the two functions above work is provided in the advanced Lua bindings tutorial. Notice that we use the same name for registering the Lua bindings as we used in the bindings that were automatically generated. The C startup code must call luaopen_LED(L) in order to register the Lua bindings.
The LSP page we used for the automatically generated bindings must now be changed slightly since the setLed function now expects a boolean value and the getLed function returns a boolean value. The following shows what must be changed:
Original: LED.setLed(led and 1 or 0)
New code: LED.setLed(led and true or false)

Original: <?lsp= LED.getLed() == 1 and "checked" or "" ?>
New code: <?lsp= LED.getLed() and "checked" or "" ?>
The Barracuda Virtual File System (VFS) abstracts file system operations, allowing seamless integration into embedded environments with non-standard storage. In C, the server delegates HTTP requests to the VFS, which locates and processes requested resources. The server returns a 404 Not Found error if no resource is found.
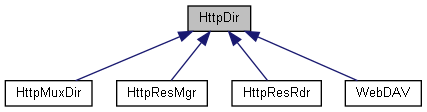
Unlike traditional web servers that map resources directly to physical files, the Barracuda VFS supports dynamic resources, such as CSP (C Server Pages) and custom resource handlers such as HttpDir.
Barracuda VFS supports dynamic resources, such as:
The following figure shows the C++ inheritance diagram for directories.