Web File Server (WFS) Documentation
(and video tutorials)
The WFS is designed as a Web File Manager Server and can be used by any browser. The WFS also includes a WebDAV server that can be used by WebDAV clients. WebDAV functions like a Web-disk and can be mounted/mapped as a drive by WebDAV clients. For example Mac OS X and Microsoft Windows include WebDAV clients in their operating system.
Navigating your file system using the WFS
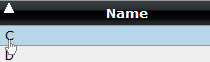
The Web File Manager makes it easy to navigate into directories. Click the directory/disk when the bar is blue. Note, the FuguHub Windows version lists all available disks when the URI is /fs/. Click on the disk you want to explore. See our accessing network shares tutorial if you do not see all of your Windows drives.
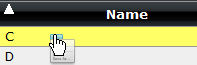
You cannot navigate into a directory when the bar is yellow. Clicking the yellow bar brings up the context menu which is described below.
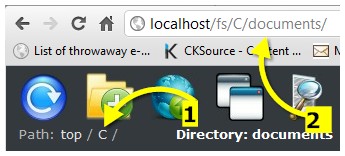
You can navigate from a subdirectory to a parent directory by clicking one of the navigation links (1) or by deleting the subdirectory from the browser URL (2). You can copy the URL and send it in, for example, an email to another user that has access to this directory. You can also type in the path directly if you know the exact path to the directory you want to visit. Smart browsers remember the URL you have visited in the Web file Manager and will automatically give you suggestions if you start typing in the URL in your browser.
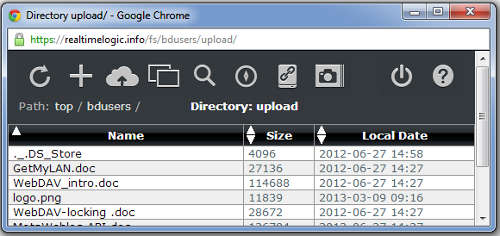
WFS Buttons
Buttons from left to right:
Refresh the WFS window. Most operations can be cancelled by pressing the refresh button.
Create a new directory (folder).
Upload one or several files to the server. Press the button one time for each file you would like to upload. The file(s) are uploaded to the directory you see in the browser. You can cancel the upload by pressing the refresh button.
Note: You can also upload files by dragging and dropping files into the browser windows if you use a modern browser that supports drag and drop upload. Chrome and Firefox support drag and drop upload.
Open a separate WFS window without the browser navigation buttons.
Search for files and/or directories on the server. Pressing this button opens an inline window that makes it possible to easily find resources on the server. Pressing a file in the search field makes the WFS navigate to the resource.
Navigate to your Web File Server folder list.
Use the optional WebDAV session URL if you are:
not using your own computer, laptop, iPhone, etc.
using an older Windows version such as XP.
Use the URL in the browser's address field for all other client computers and/or client devises. You can optionally make the WebDAV connection persistent across computer restarts -- i.e. a set it and forget it configuration. See the video tutorials at the end of this help file for more information.
WebDAV server (network file server) session URL.
Provides instructions for Mapping/Mounting the current directory using a WebDAV session URL. A WebDAV session URL is a special URL that makes the WebDAV client use the browser's session.
Using a session URL is an alternative to using a regular URL. Simply copy the regular browser URL and use the URL with the WebDAV client if you do not want to use a session URL. The WebDAV client will then ask you to login.
Mapping/Mounting a drive with the browser's session is safer if you use the server from a computer that is not your own computer. Logging out from a WebDAV connected drive is typically not possible unless you reboot the computer. A session URL inherits the browser's login session and you can therefore logout the WebDAV client by using the browser. A session automatically expires after a specific idle time. The idle time is automatically reset every time you access the drive. You can no longer use the drive if the session expires. You must disconnect the drive and reconnect using a new session.
The "Photo Album" button is added to the WFS menu when visiting a directory with images. See the Photo Album Slide Show for more information.
Press this button to logout from the WFS and the server.
Open the help window for the WFS documentation.
The directories and files listed by the WFS
The columns can be sorted by clicking on the column header. Click again to sort in descending order.
Name: The name of the directory or file. Clicking a directory navigates into the directory. Clicking a file either opens the file in the browser or downloads the file. Click the download button () in the context menu if you want to force the file to be downloaded and not opened by the browser. The MP3 player button is shown for each listed MP3 file. The button starts the inline player.
Size: This column shows the file size or shows the name "DIR" if the resource is a directory.
Date: The date is translated to your current location's time zone if your browser supports JavaScript.
The Context Menu
The context menu is shown when clicking on a row in the Web File Manager when the row is yellow. The context menu lists the additional action that can be performed on the clicked item. In addition, a range of items can be clicked by clicking the first item and then shift-clicking the last item in the range. You can also Ctrl-click to select/unselect items. Selecting several items can be used with the email and delete action.
Actions:
Download the resource.
Copy the full WebDAV URL for the resource to your computer's clipboard. This URL can be used to open a WebDAV resource by another tool. For example, clicking a Microsoft Word document copies the link for this document to the clipboard. You can then directly load and edit the document by pressing File -> Open in Microsoft Word and paste the WebDAV URL into the "File Name:". Word connects to the WebDAV server and opens the document. You can now directly edit the document on your server using Microsoft Word. See the Edit Remote Documents Using Microsoft Word tutorial for more information.
You can navigate the remote drive(s) by using the WFS. You can descend into a directory by:
Clicking on the directory name in the WFS "Name" column.
Directly typing in the name in the browser's address field (if not a popup window as shown below).
Clicking on one of the search results in the "search" window. You open the search window by pressing the search button.
Photo Preview
Move your mouse over the link name for any JPEG image listed by the Web File Manager and a preview of the photo is generated by the server. The server is queried in real time and the image is scaled by the server to a small image that is returned to the browser where it is shown in an inline frame.
Photo Slide Show
The "Photo Album" button is added to the WFS menu when visiting a directory with images.
Clicking this button opens the integrated WFS Photo Slide Show Engine. The engine loads all images in the background. You can start navigating the loaded photos as soon as the first photo is loaded. The engine automatically resizes your photo as you resize the window. Click the window's "Maximize" button to take advantage of viewing large quality images.
The engine shows its loading progress and estimated time to completion of all photos. The loading time can be brutal if you are loading unprocessed photos, for example, directly from the camera. Online photo albums typically process your photos, but reduce the image size and quality. Raw images from digital cameras can be huge in size. For example, a 2.1Mbyte camera takes photos that are 1600x1200 in size. Your screen resolution needs to be larger than 1600x1200 in order to see the full image. It is for this reason suggested that you make a copy of your photos using an image tool that can reduce the size to limit loading time.
The browser starts eating memory when loading huge images. The browsers memory consumption may be too much for your computer if you load many large images. Also, some browsers are unable to release the memory unless you shut down the browser. Note, the memory consumption is on the client side and does not affect the server.
The WebDAV Lock Mechanism
The lock mechanism defined in WebDAV has been designed to prevent resource overwriting -- i.e. to prevent the infamous "lost update problem". Locking is requested by a client by using the operations lock and unlock. For example, when opening a document using Microsoft Word, the file is automatically locked on the server by Word's integrated WebDAV client. The lock managed by the server prevents another client from modifying the document while the first client is editing the document. The lock is automatically released when you close the document. Locking and unlocking are automatically managed by many WebDAV clients.
Files that are locked are shown with a lock icon in the Web File Manager. A tooltip is shown if you move the mouse over the lock icon. The tooltip gives information on the lock owner and expiration time.
You can also use the Web File Manager to set your own locks on a file. Setting a manually controlled lock is useful if you, for example, need to work on a document when you are offline. You can lock the file to prevent other users from modifying the file on the server while you work on the document offline. Locks can be set and removed via the context menu.
WebDAV locks require an expiration time. The lock is automatically removed by the server when the time expires. WebDAV clients such as Microsoft Word automatically update the lock time if the document is kept open for a prolonged time. You cannot update the lock time with manually controlled locks. You must make sure you set a lock time that is sufficiently long enough for you to work on the document offline.
Note: In FuguHub any user with sufficient access control can unlock a locked file. The purpose with the lock is to prevent human errors, not to prevent users from modifying a file. Security and access control must be managed by using the constraints editor.
FuguHub WFS Video Tutorials
How to connect a Windows and Mac computer to a WebDAV server:
How to use the Web File Manager to upload and download files:
How to use drag and drop to upload files using a browser:

 ) in the
  is shown for each listed MP3 file. The button starts the inline player.
 Copy the full WebDAV URL for the resource to your computer's clipboard. This URL can be used to open a WebDAV resource by another tool. For example, clicking a Microsoft Word document copies the link for this document to the clipboard. You can then directly load and edit the document by pressing File -> Open in Microsoft Word and paste the WebDAV URL into the "File Name:". Word connects to the WebDAV server and opens the document. You can now directly edit the document on your server using Microsoft Word. See the
  Email the selected resource(s). See the

 Delete the selected resource(s).