The auxiliary Lua APIs add BAS features that are useful in many products but are not required in every build. They include client-side protocol libraries such as HTTP(S), SMTP, and sockets, as well as supporting modules for crypto, certificate handling, process control, and related infrastructure.
These APIs are optional from a build perspective: a custom BAS integration can omit them, while standard products and examples such as Mako Server and Xedge usually include them. The source code for these libraries is found in the xrc directory. Use this page when you need BAS client functionality or higher-level optional services that sit on top of the core API documented in lua.html.
Universal Binary JSON
The UBJSON API mirrors the core JSON API, but uses Universal Binary JSON instead of textual JSON. Use it when you want the same table-oriented programming model as ba.json, but with a compact binary representation for storage or transport.
integer namelen - max expected 'key' length, default: 255
integer offset - start parsing at offset, default: 0
-- Prints ["Hello World"]
print(ba.json.encode(ba.ubjson.decode(ba.rndbs(5)..ba.ubjson.encode{"Hello World"},1,0,5)))
ByteArray
ByteArray is a mutable companion to Lua's immutable string type and is included with the socket library. It is useful when you need to build or modify binary data in place, reuse buffers, or avoid unnecessary copying before calling APIs such as socket:write(). The object automatically converts to a string when needed and supports the meta-methods __index, __newindex, __tostring, and __len.
ba.bytearray.create(size)
ba.bytearray.create(string)
Create a ByteArray with the specified size, or initialize a ByteArray from an existing string. The string form is convenient when you want a mutable view of data that will later be modified, appended to, or passed to binary-oriented APIs.
ba.bytearray.copy(to-array, n, string|array [, i [, j]])
Copy a string or bytearray that optionally starts at i and continues until j to to-array (argument 1) at position n. The arguments i and j can be negative. If i is absent, it is assumed to be equal to 1. If j is absent, it is assumed to be equal to -1 (which is the same as the array length). The source string or source bytearray can be larger than what can fit in to-array. Only the amount that fits in to-array is copied. The function returns the number of bytes that were not copied (the overflow amount).
Note that a string or bytearray can also be copied by using indices, e.g., mybytearray[5] = "hello". However, using indices throws an exception if the source data cannot fit in to-array.
ba.bytearray.h2n(array, n, size, number)
Host (integer) to network (big endian data stream) conversion.
n - Array offset position; 1 to length - size. size - number of bytes to convert from the number -- e.g., 2 converts a 16-bit number and 4 converts a 32-bit number. number - the number to convert.
The function stores the converted data in the bytearray at position 'n'.
ba.bytearray.n2h(array, n, size)
Network (big endian data stream) to host (integer) conversion.
n - Array offset position; 1 to length - size. size - the byte size to read and convert -- e.g., 2 converts a 16-bit number and 4 converts a 32-bit number.
The function returns the converted data as a number in host endian format.
ba.bytearray.setsize(array, i [, j])
Changes the array's start and optionally, the end marker. Changing the start and end markers makes it possible to (temporarily) shrink the array to a smaller size. All meta-methods are affected by calling this function. The start and end markers i and j can be negative. If j is absent, then it is assumed to be equal to -1.
ba.bytearray.size(array)
Returns three values: the array's real size, the start marker position, and the end marker position. If ba.bytearray.setsize() has not been called, the start marker is one and the end marker is the allocated array size.
ba.bytearray.tostring(array, [, i [, j]])
Returns a (sub)string representation of the array that optionally starts at i and continues until j; i and j can be negative. If i is absent, then it is assumed to be equal to 1, If j is absent, then it is assumed to be equal to -1 (which is the same as the array length).
Examples
In the following examples, the __tostring metamethod is triggered when the array is printed.
local array = ba.bytearray.create(23)
for i=1,20 do array[i]=64+i end

print(#array) -- 23
ba.bytearray.setsize(array,1,20)
print(#array) -- 20
print(ba.bytearray.size(array)) -- 23	1	20
print(array) -- ABCDEFGHIJKLMNOPQRST

local t={}
 -- #array length is 20
for i=1,#array do table.insert(t,array[i]) end
ba.bytearray.setsize(array) -- same as: (array,1,-1); length is now 23

array[1]="abcdefghijklmnopqrstuvz"
print(array) -- abcdefghijklmnopqrstuvz

array[4]=t -- Copy table into ByteArray starting at position 4
print(array) -- abcABCDEFGHIJKLMNOPQRST

ba.bytearray.setsize(array,-3) -- Same as (array,-3,-1)
print(#array,array) -- 3	RST

ba.bytearray.setsize(array) -- Restore normal size
for i=1,#array do array[i]='*' end -- Fill with '*'

ba.bytearray.setsize(array,4)
array[1]=t -- Copy table
print(array) -- ABCDEFGHIJKLMNOPQRST
ba.bytearray.setsize(array,1,-4)
print(array) -- ***ABCDEFGHIJKLMNOPQ
Crypto Library
The auxiliary crypto library provides higher-level primitives for hashing, symmetric encryption, asymmetric cryptography, JWT handling, and key/certificate processing. These APIs are typically used when BAS Lua code must authenticate peers, protect stored data, verify signatures, or participate in secure client/server protocols.
ba.crypto.hash([algorithm [, algorithm, key]])
Creates and returns an incremental hash object represented as a Lua function. You can feed data into the function in one or more calls and then finalize it to obtain the digest. The default algorithm is sha1. Valid values for the first argument are md5, sha1, sha256, sha384, sha512, and hmac. When using hmac, the second argument selects the underlying hash algorithm and the third argument is the secret key.
The returned function accepts the following arguments:
f(string): Append string to selected hash algorithm.
f([true,encoding]): Calculate and return the hash of all appended strings. The encoding defaults to binary. Valid options for "encoding" are one of the following strings: binary, hex, and b64.
The following example shows how to calculate B64(MD5(username password)):
local hfunc = ba.crypto.hash"md5"
hfunc(username)
hfunc(password)
local data = hfunc(true,"b64")
The hash function returns a copy of itself when being fed data, thus making it possible to chain the functions. The following example produces the same result as the above example:
local data = ba.crypto.hash"md5"(username)(password)(true,"b64")
The following example shows how to create an MD5 HMAC for the username and password by using the secret key "qwerty".
local data = ba.crypto.hash("hmac","md5","qwerty")(username)(password)(true,"b64")
PBKDF2 derives a cryptographic key from a password and salt by repeatedly applying HMAC. Use it when a password must be turned into a fixed-length key for encryption or authentication. The repeated iteration count makes brute-force and dictionary attacks more expensive than directly hashing the password once.
String - PRF is a pseudorandom function and must be set to one of: "md5", "sha1", "sha256", "sha384", or "sha512".
String - Password is the master password from which a derived key is generated
String - Salt is a sequence of bits, known as a cryptographic salt
Integer - c is the number of iterations desired
Integer - dkLen is the desired bit-length of the derived key
Return value: String - DK is the generated derived key
Asymmetric Encryption
This API provides the BAS Lua interface for asymmetric cryptography using RSA and ECC keys and X.509 certificates. Use it when Lua code must encrypt small payloads, sign data, verify signatures, or inspect key material that already exists in certificate or PEM form.
RSA: Supports encryption, decryption, signing, and verification using X.509 keys and certificates
ECC: Supports signing and verification using X.509 keys and certificates
Returns two values: the key size of the private key and "RSA" or "ECC". The optional op argument may include the password option for password-protected keys. Throws an error on incorrect arguments.
ba.crypto.encrypt(plaintext, cert [,op])
Encrypts the plaintext using the public key. Returns the ciphertext.
ba.crypto.decrypt(ciphertext, key [,op])
Decrypts the ciphertext using the private key. Returns the plaintext on success or nil,error on failure.
ba.crypto.sign(hash, key [,op])
Signs the hash using the private key. Returns the digital signature. The hash type can be one of: "sha1", "sha256", "sha384", and "sha512". See also ba.tpm.sign().
ba.crypto.verify(signature [,cert], hash [,op])
Verifies whether the signature matches the provided hash using the public key. Returns true if valid, otherwise false.
Function Arguments:
string: plaintext - The data to be encrypted. The length must not exceed key-size - 11 unless the nopadding option is used, in which case it must be exactly key-size.
string: ciphertext - The encrypted data to be decrypted. Must be exactly key-size in length.
string: signature - The signature for verification.
string: key - An X.509 ECC or RSA private key. If the key is password-protected, the password option is required.
string: cert - An X.509 ECC or RSA certificate or public key.
string: hash - The hash to be signed or verified. Defaults to "sha256". To use a different algorithm, set the hashid option.
table: op - Optional parameters:
string: password - Required for password-protected X.509 keys.
string: hashid - Hash function to use with OAEP padding, default value is "sha1".
string: n and string: e - RSA public key modulus and exponent, used if cert is not provided for verify.
string: x and string: y - ECC public key coordinates, used if cert is not provided for verify.
Limitations:
Encryption and decryption support RSA only, with padding options "oaep", "pkcs1", or "none".
Signing and verification support both RSA and ECC. RSA with padding options "pkcs1" or "none".
Symmetric Encryption
ba.crypto.symmetric(algorithm, key, IV [, mode])
Encrypt or decrypt data using a symmetric cipher.
Arguments:
string algorithm: Algorithm type: "GCM", "CCM", or "CBC".
string key: a 16 or 32 byte long encrypt/decrypt key for encrypting/decrypting in 128 or 256 bit mode.
string IV the Input Vector. The vector length must be 16 for CBC and 12 for GCM and CCM.
string mode the mode is required for CBC and must be "encrypt" or "decrypt".
Returns an object with the following methods:
s:setauth(auth)
Set the optional Additional Authenticated Data (AAD) for GCM and CCM.
s:encrypt(data [,"PKCS7"])
Encrypt data. The function returns the encrypted data and a 16 byte tag (hash) when using the cipher GCM and CCM. Max data size is 0xFFF0. Larger data sets must be encrypted in chunks. The argument "PKCS7" must be set for the last encrypted chunk when using CBC or CCM.
s:decrypt(encdata [,tag [,"PKCS7"]])
Decrypt data. The tag (hash) is required when using the cipher GCM and CCM. Max data size is 0xFFF0.
Mode Behavior:
GCM and CCM are AEAD modes and use authentication tags.
CBC and CCM are a block mode cipher and may require PKCS7 padding on the final chunk.
AES block size is 16 bytes (relevant for CBC/CCM padding rules).
Padding:
AES-GCM does not use PKCS7 block padding. For CCM/CBC-style chunked encryption, PKCS7 is used on the final chunk to pad/unpad plaintext.
Examples:
AES- GCM, CCM, and CBC examples:
local key = "0123456789ABCDEF" -- Preferably use ba.rndbs(16) or ba.rndbs(32)
local iv = "0123456789AB" -- Preferably use ba.rndbs(12)
local message="Hello World!"

local gcmEnc = ba.crypto.symmetric("GCM", key, iv)
local gcmDec = ba.crypto.symmetric("GCM", key, iv)
local cipher,tag = gcmEnc:encrypt(message)
local data=gcmDec:decrypt(cipher,tag)
trace("GCM",#data,data)

local ccmEnc = ba.crypto.symmetric("CCM", key, iv)
local ccmDec = ba.crypto.symmetric("CCM", key, iv)
cipher,tag = ccmEnc:encrypt(message,"PKCS7")
data=ccmDec:decrypt(cipher,tag,"PKCS7")
trace("CCM",#data,data)

iv = "0123456789ABcdef" -- 16 bytes
local cbcEnc = ba.crypto.symmetric("CBC", key, iv, "encrypt")
local cbcDec = ba.crypto.symmetric("CBC", key, iv, "decrypt")
cipher = cbcEnc:encrypt(message,"PKCS7")
data=cbcDec:decrypt(cipher,"PKCS7")
trace("CBC",#data,data)
Fernet (AES-CBC) Decrypt Example:
Fernet is common in the Python world and provides a simple method for encrypting and decrypting a message. The following article shows how to use it from Python as well as providing a good introduction to the format: pythoninformer.com.
local function decodeFernet(key,token)
   key,token=ba.b64decode(key),ba.b64decode(token)
   if key and token and token:byte(1) == 0x80 then
      local signingKey,encryptionKey=key:sub(1,16),key:sub(17)
      local iv,cipher,hmac = token:sub(10,25),token:sub(26,-33),token:sub(-32)
      if hmac ~= ba.crypto.hash("hmac","sha256",signingKey)(token:sub(1,-33))() then
         return nil, "Invalid HMAC"
      end
      local datetime = ba.datetime(ba.socket.n2h(8,token,2))
      local plain=ba.crypto.symmetric(
         "CBC",encryptionKey,iv,"decrypt"):decrypt(cipher,"PKCS7")
      return plain,datetime
   end
   return nil, "Invalid key or token"
end

local key="M516vNeYFaEauWp_C7Dovyms7ZF1xNyizKPFZ4ucBS0="
local token=[[
gAAAAABftfpRGg8HwvomaO8Uj71gJgplLDJH05-
OcprsFgw2aAYt1b7ngdUv7vsfPGNdxr-WjpaFY8
gx9Gf-j8qiJrpFaVg3BQ==
]]

local text,datetime = decodeFernet(key,token)
if text then
   print("Text:",text)
   print("DateTime:",datetime)
else
   print("Error:",datetime) -- datetime is now error
end
Cryptographic Parameters
The following functions enable extraction of cryptographic parameters used with JSON Web Tokens and JSON Web Signatures.
ba.crypto.keyparams(key [, password])
Extracts and returns the public key parameters from an X.509 PEM-encoded private or public key, such as the key generated by ba.create.key().
If the key is password-protected, provide the optional password argument.
For ECC keys, it returns the public (x, y) coordinates.
For RSA keys, it returns the public modulus (n) and exponent (e).
ba.crypto.sigparams(signature)
Extracts and returns the signature parameters from a DER-encoded binary string, such as the return value from ba.crypto.sign. See the jwt.lua module for how to use this function.
JSON Web Token (JWT) Library
This API provides functions for signing and verifying JSON Web Tokens (JWTs) using HMAC (HSxxx), RSA (RSxxx), and ECDSA (ESxxx) algorithms.
Generates a signed JWT using the specified algorithm. See also ba.tpm.jwtsign().
Parameters
payload(table or string) - The data to encode in the JWT payload.
secret(string) - The secret key (for HMAC) or private key (for RSA/ECDSA).
options(table, optional) - Configuration options for signing:
alg(string, default: "HS256")
Defines the signing algorithm. Supported values:
"HS256", "HS384", "HS512" (HMAC with SHA-256/384/512)
"RS256", "RS384", "RS512" (RSA with SHA-256/384/512)
"ES256", "ES384", "ES512" (ECDSA with SHA-256/384/512)
kid(string, optional) - Key identifier for key management.
Returns
On success:string, table
string - The JWT string in the format: hh.pp.ss where ss is the header, pp is the payload and ss is the signature.
table - A Lua table representing the JWT in the JSON Web Signature (JWS) JSON Serialization format, suitable for use with application/jose+json content type. This table includes the following fields:
protected ( string ): Base64Url-encoded JSON string of the protected header.
payload ( string ): Base64Url-encoded JSON string of the payload.
On failure:nil, error-message - where error-message is unsupported/unknown algorithm.
jwt.verify(jwt, secret [,kid])
Decodes and validates a JWT.
Parameters
jwt(string) - The JWT to verify.
secret(string) - The secret key (for HMAC) or public key (for RSA/ECDSA). The secret can also be a table with the public RSA (n,e) component and the public ECC (x,y) component. See function ba.crypto.keyparams() and the JWT example code for details. When kid mode is enabled: the secret must be a table where each key is a kid (Key ID) and each value is a public key or a table with (n,e) or (x,y).
kid(boolean true) - enable kid (Key ID) mode, allowing JWTs signed with different keys to be verified dynamically (key rotation). The JWT header must include a kid, which is extracted and used for table lookup in the secret table. See the ms-sso.lua module for how to use this mode.
Returns
true, header, payload - If verification is successful, returns true and the decoded header and payload.
false, header, payload - If verification fails, returns false and the decoded header and payload.
nil, error-message - if decoding fails, returns nil and an error message.
EventEmitter Library
This library provides event-driven functionalities for Lua.
Example:
local EventEmitter = require"EventEmitter"

-- Create an instance
local emitter = EventEmitter.create()

-- Register a listener
emitter:on("myEvent", function(msg) print("Received:", msg) end)

-- Emit an event
emitter:emit("myEvent", "Hello World")

-- Emit and retain an event
emitter:emit({name = "myEvent", retain = true}, "Retained Message")

-- Register a new listener, which immediately receives the retained message
emitter:on("myEvent", function(msg) print("New listener received:", msg) end)
EventEmitter API
Constructor
require"EventEmitter".create([self])
Creates a new instance of the EventEmitter.
Parameters:
self (table, optional): An existing table to initialize as an EventEmitter. If not provided, a new table is created.
Returns: A new EventEmitter instance with initialized event and retained message storage.
Methods
E:on(event, cb)
Registers a callback ( cb ) for a specified event.
Parameters:
event (string): The name of the event to listen for.
cb (function): The callback function to be invoked when the event is emitted.
Behavior: If there is a retained message for the event, the callback is immediately invoked with that message.
E:emit(event, ...)
Emits an event, triggering all callbacks registered for that event. Optionally retains the message if specified.
Parameters:
event (string or table): The name of the event to emit. If a table, it should have the format {name = "event name", retain = true/false}
...: Additional arguments to pass to the callbacks.
Behavior: If the retain flag is set in the event table, the message is stored internally. All registered callbacks for the event are invoked with the provided arguments.
Returns: true if the event exists and has listeners, false otherwise.
E:removeListener(event, cb2rem)
Removes a listener (callback) from a specific event.
Parameters:
event (string): The name of the event.
cb2rem (function, optional): The specific callback to remove. If not provided, all listeners for the event are removed.
Behavior: Removes the specified listener or all listeners for the event. Does not affect retained messages.
Returns: true if a listener was removed, false otherwise.
forkpty
The forkpty library provides a combined fork, exec, and child process pseudo-terminal. The code is available for Linux, Mac, and QNX. Windows users may use the simpler io.popen library. For simpler tasks, use ba.exec.
The code can be used for executing and managing Linux executables such as "ls", "kill", etc. The forkpty library provides advanced child process management.
Blocking Read Example
local pty,err = ba.forkpty("/bin/sh")
pty:write"ls -l\n"
local data,err = pty:read(500)
while(data) do
   print("data:",data)
   data,err = pty:read(500)
end
pty:terminate()
Download: the Web Shell, a fully working web-based terminal (alternative to using SSH), which is using the forkpty library for the shell process management and communication. The CGI plugin is also using the forkpty library for process management.
pty,err=ba.forkpty([X,] prog [, args...])
Arguments:
function | table X - options:
function - asynchronous callback function. See details below.
table - options:
function: async - asynchronous callback function. See details below.
string: arg0 - argument zero is by default set to the 'prog' name. You may optionally set the name to something else.
string: stty - defaults to 'raw' mode. You may optionally set this to 'sane' mode.
string: prog - the program to execute; such as "/bin/bash", "/bin/login", etc.
string: args - Provide the optional 'prog' arguments, if any. You must provide each argument separately.
Starts program prog in a separate process and returns a process object that is used for child process management. The pty process object support full duplex read and write operations.
On success, the function returns a pty child process communication object with 4 methods:
pty:read: Read child's stdout.
pty:write: Write to child's stdin.
pty:pause: Pause or resume child process.
pty:winsize: Set the child's terminal screen size.
pty:close: Gracefull kill.
pty:terminate: Immediate kill.
The external process can be managed in two modes, polling, or asynchronous read. Polling the pty is typically used when designing web-clients that use AJAX for polling the child process for new data. Asynchronous read is typically used together with SMQ, where a web-client is using a persistent asynchronous communication channel with the server. The optional "function" must be supplied for asynchronous read operation. The default mode is designed for polling mode. The examples below assume that you do not provide a function. Asynchronous mode is explained later.
PTY Methods
pty:read([bool|number])
Read stdout,stderr from the child process.
pty:read(number) blocks for a maximum of 'number' milliseconds.
pty:read() is a short hand for pty:read(0). In other words, poll for data with a zero timeout.
pty:read(true) blocks indefinitely, until data is available.
Note: when operating in asynchronous mode, pty:read() always blocks and the arguments are ignored.
Return values:
string, bool - (data, stderr): text or binary data from child's stdout or stderr, the second return value is true if the data originates from stderr.
nil - timeout.
nil, string - (nil, error): returns nil followed by an error code when the child process exits or if any error occurred. You must use method pty:close or pty:terminate to cleanup and to get the child's exit code. The error code is "terminated" if the process exited, otherwise the error indicates an error with the pty.
Example:
local data,err = pty:read()
if data then
 -- manage data
elseif err then
  if err = "terminated" then
    -- Terminated
  else
    -- pty error
  end
end
ok,err = pty:write(string)
Send data to the child process's stdin.
ok is nil on error. See pty:read for how to manage the error code.
pty:pause(true|false)
Pause or resume a paused child process.
ok,err=pty:winsize(lines, cols)
Set the child's terminal screen size.
local status [, WIFEXITED, WIFSIGNALED, WTERMSIG] = pty:close([true])
Return the exit code for the <defunc> child process or gracefully kill the active child process.
The function returns immediately unless the optional parameter is set to true. The function waits for the child to terminate if the optional parameter is set to true.
status is the child process exit code.
Status codes:
status < 0 The process has not terminated.
status = 0 The process exited with status code 0.
status > 0 The process exited with a non-zero status code (i.e., an error code). When status > 0, the following extra return values can be used: WIFEXITED, WIFSIGNALED, and WTERMSIG as defined by the Linux waitpid function.
If status is nil, the second parameter is the error message. The child process is immediately killed if any errors are detected.
Example:
local status, WIFEXITED, WIFSIGNALED, WTERMSIG = pty:close()
if status == nil then
   print("Failed, msg:", WIFEXITED)
elseif status < 0 then
   print("Running")
elseif status == 0 then
   print("Exited");
else
   print("Exited with error code:", status , WIFEXITED, WIFSIGNALED, WTERMSIG);
end
Note: pty:close() is designed to be called repeatedly until the child terminates, i.e., until it returns a value that is not less than zero.
local ok, status [, WIFEXITED, WIFSIGNALED, WTERMSIG] = pty:terminate()
Close the connection to the <defunc> child process or immediately kill the active child process.
Asynchronous PTY Mode
The PTY object is self-referencing in asynchonous mode. Normally, a reference must be kept to the pty objected returned by ba.forkpty to prevent garbage collection (GC). When in asynchronous mode, a reference is automatically created by ba.forkpty to prevent GC. This reference is valid as long as the coroutine executes.
The following example shows how to use asynchronous mode:
-- The asynchronous receive function keeps reading until the process terminates
function recData(pty)
   while true do
      local d,e = pty:read() -- Read data. Arguments to pty:read are ignored.
      if not d then -- Child process terminated
         break
      end
      trace(d,e)
   end
   trace("\nexit coroutine", e and e or "OK")
   -- coroutine automatically cleans up on exit, but we are allowed to call:
   -- local ok, status [, WIFEXITED, WIFSIGNALED, WTERMSIG] = pty:terminate()
end

local pty,err -- Local variables i.e. we do not need a reference to prevent GC
pty,err = ba.forkpty(recData, "/bin/ls", "-l") -- Execute ls -l
trace(pty,err)
In asynchronous mode, a function must be provided as the first argument to ba.forkpty. This function is executed as a Lua coroutine and is automatically yielded by read when no data is available. The function is resumed when there is data available or if the child process terminates.
All pty:xxx functions operate as normal, except for read when called from within the coroutine.
HTTP(S) Client Libraries
The Barracuda HTTP(S) client library, which is implemented in C code, can be accessed from Lua by using the Lua bindings for the HTTP implementation. The Lua bindings are found in xrc/lua/lhttp.c.
In addition to the low level C implementation, two additional HTTP libraries implemented in Lua are provided. The additional libraries wrap around the low level library and simplify the use of the low level implementation.
The libraries are loaded as follows:
require"httpc" -- Returns the low level C implementation.
require"http" -- Loads and returns the Lua version that extends the low level C version.
require "httpm" -- Loads and returns the managed HTTP library that extends the "http" library and simplifies common tasks.
The HTTP(S) Client Libraries implementation conforms to the HTTP/1.1 standard, RFC 2616.
The HTTP client libraries use blocking socket calls and should therefore run in the context of the Server's Thread Pool such as an LSP page or the Lua Thread Library. See Thread Mapping for more information.
local http = require"httpc".create()
ba.thread.run(function()
    http:request{url="https://x.com"}
    trace(http:read"*a")
end)
The following example shows how to send JSON data as part of the HTTP body to a JSON echo service. The service responds with the original data and additional JSON data. Note that many JSON services are designed to accept POST data as URL encoded data and not directly as JSON as used in the following example. The method http:json() has been specifically designed to post JSON using URL encoded key/value pairs.
local rdata -- rec data
local sdata={ -- data to send
   hello = "world",
   vector = { i=10, j=15 }
}

local http = require"httpc".create()

local ok,err=http:request{
   url="https://postman-echo.com/post",
   method="POST",
   header={["Content-Type"]="application/json; charset=utf-8"}
}
if ok then
   ok,err=http:write(ba.json.encode(sdata))
   if ok then
      rdata,err=http:read"*a"
   end
end
if rdata then
   print("Rec Data:", rdata)
   print("Valid JSON: ", ba.json.decode(rdata) and "yes" or "no")
else
   print("Err:",err)
end
The "httpc" library
The httpc library is the low-level HTTP client interface. It gives you explicit control over connection setup, request submission, response inspection, and streaming reads/writes. Use it when you need full control over the request/response exchange. For higher-level convenience methods such as managed redirects, uploads, downloads, and JSON helpers, see the "http" library further below.
The library is loaded and an HTTP instance is created as follows:
local http = require"httpc".create([op])
The HTTP Option Table:
The optional table passed to create() configures how the client instance connects to servers. These settings become the defaults for requests made through that instance.
The option table:
shark = SharkSSL object -- Required for HTTPS. If not provided, the client falls back to the object returned by ba.sharkclient().
persistent=bool -- Enable or disable persistent HTTP/1.1 connections. Persistent connections are enabled by default.
intf = string -- Bind the client to a specific interface name or IP address. The default is to bind to any interface.
ipv6 = bool -- Enable IPv6 address translation. This requires BAS to be compiled with IPv6 support.
proxy = string -- Use an HTTPS proxy or SOCKS5 proxy identified by IP address or domain name.
proxyport = number -- Proxy port number. Defaults to 8080 for HTTPS proxy and 1080 for SOCKS5 proxy.
socks = bool -- Set to true when the proxy is a SOCKS5 proxy. The default is HTTPS proxy via HTTP CONNECT.
proxyuser = string -- Proxy username.
proxypass = string -- Proxy password.
proxycon = bool -- Open the proxy connection without yet sending protocol data to the target server. This is useful when httpc is used only to establish the proxied socket. If successful, http:request() returns the special error code "prxready". See the MQTT proxy example for details.
Methods:
The methods associated with the object returned by require"httpc".create()
http:timeout(milliseconds)
Set the number of milliseconds before connect, read, and write time out. The default is 20000, i.e., 20 seconds. A value of zero waits indefinitely. The maximum value is 3,240,000.
http:request(op)
Starts a request and returns true when the request was successfully sent and a response is ready to be inspected through the http: methods below. On error, the function returns nil followed by an error code. If a proxy is in use, it may instead return an HTTP status code from the proxy itself, for example 407 Proxy Authentication Required.
The option table:
Required attributes:
url = string -- URL to the server resource.
method = string -- Valid values: DELETE, GET, HEAD, PATCH, POST, and PUT.
Optional attributes:
header = table -- A table with key value pairs. Include additional HTTP headers.
query = table -- A table with key value pairs. Include url encoded data in the query component of the request URL. Example: query={key1="a", key2={"b1", "b2", "b3"}}
user = string -- Authenticate using username.
password = string -- Authenticate using password.
size = number -- Size is an optional length when sending data to a server using POST or PUT. The client sends data using chunked transfer encoding if no size is specified.
trusted = bool -- Force method http:request to accept only trusted connections when connecting to a server. This option requires that you have a SharkSSL object with an installed Certificate Authority Store. The connection is closed and the function returns nil,"nottrusted" if the certificate is not trusted, expired, or if the domain name does not match the domain name in the certificate. See also http:trusted.
http:status()
Returns the HTTP server response code.
http:header()
Returns a table with the HTTP header key/value pairs.
http:headerpairs()
Returns an iterator that will traverse all the HTTP header key/value pairs.
http:cookie()
Returns an iterator that will extract and traverse all cookies sent by the server.
The server may send multiple "Set-Cookie" headers:
The iterator returns the cookie name, value, and an optional table. The table is returned if the cookie returned by the server contains more than just the cookie name. The table provides {key, value} pairs, where the keys can be one of the following: expires, path, domain, and secure.
local http = require"httpc".create()
local ok,err=http:request{url="https://www.google.com/"}
if ok then
   for name,value,t in http:cookie() do
      print("cookie name:", name, ",value", value)
      if t then
         for k,v in pairs(t) do
            print(k,v)
         end
      end
   end
end
http:read(size)
Read size bytes.
size is one of:
"a" for all data.
Number(n) for reading n bytes.
Not provided. Makes the read function silently consume and discard response data.
http:write(n)
Write n bytes.
Returns true on success.
On error: returns nil followed by an error code or a number. The error code is provided if some kind of socket error occurred. The number is the HTTP response code. For example, if uploading data fails and the server sends an HTTP response code while the client is uploading, the upload is aborted immediately and the HTTP response code is returned to the caller.
The caller can set a "Expect: 100-continue" header prior to uploading data, but this is not necessary since the write function asynchronously detects if the server denied the upload. Any 100 continue messages sent by the server are silently consumed by the write function.
Returns the peer's certificate chain as a table if the connection is secure and the peer sent a certificate. A second return value is set to true if the certificate is valid, i.e., if it was validated by the certificate store.
http:cipher()
Returns the cipher suite and SSL protocol version being used if the connection is secure. See socket:cipher() for more information on the return values.
http:trusted()
Returns the peer's "trust" status.
Returns true if the server's SSL certificate is trusted and the subject's common name matches the host name of the URL.
Returns nil,"cn" if the subject's common name matches the host name of the URL, but the certificate is not trusted.
Returns nil,"cert" if the SSL certificate is trusted but the subject's common name does not matches the host name of the URL.
Returns nil,"none" if the SSL certificate is not trusted and the subject's common name does not matches the host name of the URL.
Returns nil,"notssl" if this is not a secure connection.
http:peername()
Returns a string of the client name/IP address, the connected port number, and a boolean value set to true for IPv6 and false for IPv4.
http:sockname()
Returns a string of the server name/IP address, the connected port number, and a boolean value set to true for IPv6 and false for IPv4.
http:close()
Close the connection.
The "http" library
The "http" library extends the httpc library and simplifies the use of the low level implementation when HTTP redirect management is required.
The library is loaded and an HTTP instance is created as follows:
Many server applications may send a 302 temporary redirect request or a 301 permanent redirect request when accessing resources. The server resource may for example redirect to the same resource, but request the client to add or change URL encoded data when accessing the server. The "http" library automatically manages 301 and 302 requests. The client library computes the new URL and sends a new request. This sequence continues until the server returns a non 301/302 response or the redirect counter detects an infinite redirect loop. The extra http:url() method provided by the "http" library returns the computed URL and query data the server may have requested the client to perform.
Default http:request() options:
One of the benefits of the Lua implemented wrapper is that it simplifies the use of the option table. Options that are required on method http:request() can be set when creating the HTTP client instance. The following example illustrates this:
local http=require"http"

-- Set default options
local op={
   url="https://realtimelogic.com/products/",
   method="GET" -- Not needed since it is the default
}
local h=http.create(op)

 -- Use default options: method "GET" and url https://realtimelogic.com/products/"
h:request()
-- Prints nil since response is generated by LSP and is chunk encoded
print("GET: Content-Length",h:header()["Content-Length"])
print("Calculated length", #h:read"a")

h:request{method="HEAD"} -- Override default "GET" method
-- This works.
print("HEAD: Content-Length",h:header()["Content-Length"])

h:request() -- We are using "GET".
-- prints nil
print("GET: Content-Length",h:header()["Content-Length"])
h:close() -- We are done
An instance of the "httpc" library would have thrown an exception when calling h:request(), but the Lua version remembers the extra options added when we created the object.
You can optionally provide an option table and override any of the default settings. The HEAD request above illustrates this.
Methods:
The "http" library provides, in addition to the httpc methods, the following method:
http:url()
Returns the url and query data as a table for the current connection. The url and query data may be different on server response than the values set when connecting since the server can send redirect responses. The redirect response is internally managed by the "http" library.
The "httpm" library
The "httpm" (HTTP Managed) library extends the http library and simplifies common tasks such as uploading and downloading data, sending HTTP POST requests, and communicating with a server using JSON.
The library is loaded and an HTTP instance is created as follows:
The "httpm" library provides, in addition to the httpc and http methods, the following methods:
http:stat(url [,op])
Returns a table of attributes for the named url -- the resource . If the resource does not exist, 'nil' followed by an error code is returned. The fields of the table are named as follows:
mtime - Last modified time is set if the server sends a Last-Modified response header field.
size - The size of the resource (in bytes) is set if the server sends a Content-Length response header field.
This function is by default using the HTTP method "HEAD". You can change the HTTP method by setting op={method="method-type"}
Examples:
local http = require"httpm"
local h=http.create()
-- Dynamic resource
local st,err=h:stat("https://realtimelogic.com/")
-- prints val,nil
if st then print("A:",st.size,st.mtime) end
-- Static resource
st,err=h:stat("https://realtimelogic.com/downloads/docs/IoT-Security-Solutions.pdf")
-- prints val,val
if st then print("B:",st.size,st.mtime) end
-- Dynamic resource using HTTP GET
st,err=h:stat("https://realtimelogic.com/",
              { method="GET", query={foo="bar"}})
-- prints nil,nil
if st then print("C:",st.size,st.mtime) end
h:close()
-- Static resource using HTTP GET
st,err=h:stat("https://realtimelogic.com/downloads/docs/IoT-Security-Solutions.pdf",
              { method="GET"})
-- prints val,val
if st then print("D:",st.size,st.mtime) end
http:post(url,tab [,op])
Send an HTTP POST request to a server. This function emulates an HTML form submission in a browser.
url - The resource to where the POST request is submitted.
tab - A lua table with key value pairs. The table is encoded as url encoded data and placed in the body of the message.
op - Set or override the option table set when you called http.create().
The method returns http-status,response-body on success and nil,error-msg on error. Note: the method fails if posting to a server that sends either 301 or 302 redirect. The post method returns 'nil, status' and http:status() returns 'nil, status, url', where status is 301 or 302 and url is the redirect URL.
The following example is sending url encoded data in the query component of the URL and in the body of the message.
local http = require"httpm".create()
local ok,data=http:post("https://postman-echo.com/post",
                    {formKey1="formVal1",formKey2="formVal2"},
                    {query={queryK1="queryVal1",queryK2="queryVal2"}})
print(ok) -- HTTP 200
print("JSON resp:",data)
 -- Postman Echo returns everything packaged as json
data=ba.json.decode(data)
print"\nArgs (query):"
for k,v in pairs(data.args) do print("",k,v) end
print"\nForm (POST body):"
for k,v in pairs(data.form) do print("",k,v) end
http:upload(conf [,op])
Upload a file to a server. This function is by default using the HTTP method "PUT". You can change the HTTP method by setting op={method="POST"}
Argument conf is a table with the following attributes: ( ((fp, [size]) or (name, io)) and url ) [,func].
Argument op - optionally set or override the option table set when you called http.create(op).
The method returns ture on success and nil,error-msg on error. Note: the upload method fails if uploading to a server that sends either 301 or 302 redirect. The upload method returns true for success, but http:status() returns 'nil, status, url', where status is 301 or 302 and url is the redirect URL.
The function can be used in two modes:
Mode 1: Provide a Barracuda I/O interface (io) and the path+name (name) to the file in the I/O.
  local http = require"httpm":create()
  local ok,err=http:upload{
     io=ba.openio"home",
     name="mako.conf",
     url="https://tutorial.realtimelogic.com/fs/tmp/mako-conf-copy1.txt"}
  print(http:status()) -- prints 201 (Created)
Mode 2: Open the file and provide the file pointer (fp) and optionally the size. The file is uploaded using chunk-encoding if the size parameter is not provided. Not all servers support chunk-encoding, and uploading using chunk-encoding is also a fraction slower than standard upload. The file pointer is automatically closed when the upload completes.
  local http = require"httpm":create()
  local fp = ba.openio"home":open"mako.conf"
  local ok,err=http:upload{
     fp=fp,
     url="https://tutorial.realtimelogic.com/fs/tmp/mako-conf-copy2.txt"
  }
  print(http:status())
url - Must be to a location in the server that accept uploads.
func - An optional function callback that receives two parameters as argument, the file size and the current uploaded size.
The HTTP library is monitoring response data from the server while the upload is in progress. The upload is automatically terminated if the server sends an error response. It is for this reason not necessary to do the typical one byte test upload prior to uploading the actual data to test if the server accepts the upload. HTTP 100-continue messages sent from the server are silently consumed.
http:download(conf [,op])
Argument conf is a table with the following attributes: ( (fp or (name, io)) and url ) [,func].
Argument op - optionally set or override the option table set when you called http.create(op).
Download a file from a server and save the file. The function can be used in two modes:
Mode 1: Provide a Barracuda I/O interface (io) and the path+name (name) to where you want to save the file.
  local http = require"httpm":create()
  local ok,err=http:download{
     io=ba.openio"disk",
     name="/tmp/Baby-Beach.jpg",
     url="https://bit.ly/3GqGWoT"}
  print(http:status(),ok,err)
Mode 2: Open the file in write mode and provide the file pointer (fp).
  local http = require"httpm":create()
  local fp = ba.openio"disk":open("/tmp/Dana-Point-Headlands-Beach.jpg", "w")
  local ok,err=http:download{fp=fp, url="https://bit.ly/3XdJtcW"}
  print(http:status(),ok,err)
  -- fp closed by http:download
url - The URL to the resource you want to download.
op - Optionally set or override the option table set when you called http.create().
func - An optional function callback that receives two parameters as argument, the file size and the current uploaded size.
http:json(url, data [,op])
url - A string containing the URL to which the request is sent.
data - A table with key/value pairs (query data). This table is required, but can be empty.
op - Optionally set or override the option table set when you called http.create(). Method http:json() takes an additional option op.jnull, which defaults to false. This option is passed on to ba.json.decode().
Load JSON-encoded data from the server using an HTTP GET request. This function, which is designed for server-side Lua code, is similar in functionality to the jQuery.getJSON() function in the jQuery JavaScript library.
Example 1:
local http=require"httpm".create()
local data={} -- Empty, no key/value pairs
local t,err=http:json("http://ip.jsontest.com/",data)
if t then -- If we got a Lua table (decoded JSON string)
   print("IP address:",t.ip)
end
Example 2:
local http=require"httpm".create()
local data={lat=33.466972,lng=-117.698105} -- Dana Point, CA
local t,err=http:json("http://api.sunrise-sunset.org/json",data)
if t then
   print(require"serpent".block(t,{comment=false}))
end
Example 3:
local http=require"httpm".create()
-- Connect to a Web-File-Manager in a Barracuda server
-- and request a JSON directory listing.
local data={cmd="lj"}
local t,err = http:json("https://tutorial.realtimelogic.com/fs/home/mako", data)
if t then
   for _,r in ipairs(t) do -- Iterate all resources
      response:write("name=",r.n,", size=",r.s < 0 and "DIR" or r.s,
                     ", date=",os.date("%c",r.t),"<br>")
   end
else
   response:write(err)
end
The Lua debug module dbgmon implements the Debug Adapter Protocol and can be used by any debugger implementing this protocol. Module dbgmon is implemented in C code and interfaces to the Lua debug API.
See the how to use the debugger example on GitHub for more information on how to use this module.
Load the module as follows:
local dbgmon = require"dbgmon"
The returned value dbgmon is a table with the following functions:
dbgmon.connect(op)
The function establishes a persistent TCP connection with a debugger. The function can be configured to operate as a TCP client or TCP server. The function operates as a TCP client and attempts to connect to "localhost:4711" if called without arguments. The function does not return until a debugger TCP connection is established or a TCP error occurs. The argument 'op' is an optional configuration table that takes the following values:
Integer port - the port number to connect to or to bind to if operating as a server. The default value is 4711.
Boolean reconnect - force a disconnect if a connection is already established. The function returns the error code "Already connected" and does nothing if this option is not set to true.
Boolean stop - will cause the debugger to break at the first line after dbgmon.connect() and provides the same feature as the Visual Studio Code's launch.json stopOnEntry setting.
Boolean client - set to false to operate as a TCP server. The default is to operate as a TCP client (value is implicitly set to true). The function attempts to bind to 'port' number and listens for TCP connections on this port when operating as a TCP server.
String intf - you may bind to a specific interface when operating as a TCP server.
String host - the function attempts to connect to the name/ip-address when operating as a TCP client. The default value is 'localhost'.
Integer retry - how many connection attempts the function should try when operating as a TCP client. The default value is INT_MAX.
dbgmon.close()
Close any active TCP debugger connection and resume normal operation.
dbgmon.pause()
Pause the debug session and resume normal operation without closing the TCP debugger connection.
dbgmon.resume()
Resume a paused debug session.
LuaIo
The LuaIo module maps the Barracuda I/O interface into Lua, making it possible to implement an I/O provider entirely in Lua code.
Use LuaIo when you want BAS components that expect an I/O object to work against something other than a normal filesystem. Common patterns include wrapping an existing I/O object with filtering logic, exposing remote or virtual storage as an I/O tree, or presenting data from a database or service as files and directories. For example, a SQL-backed LuaIo can be used to expose WebDAV access to database content.
Ready-to-run Examples:
GitHub IO - a filesystem driver that makes a GitHub repository look and behave like a filesystem. In practice, this means you can mount a GitHub repo as if it were a local filesystem in BAS.
Crypto IO - a Lua module that wraps a Barracuda IO with transparent AES-GCM file encryption so applications can keep normal file I/O APIs while storing data encrypted at rest.
Error handling:
LuaIo functions follow the same style as the native Barracuda I/O APIs. Functions that normally return an object or table return nil on error, while functions that return status information return false on error. In addition to nil/false, the functions may return one of the following error codes:
enoent
exist
invalidname
noaccess
nospace
notempty
notfound
-- Open resource in read or write mode. mode ="r" or "w"
local function open(name, mode)
   -- open resource, return nil on error.
   -- Resource management functions
   local function read(maxsize)
      -- Return data
   end
   local function write(data)
      -- Return true or false
   end
   local function seek(offset)
      -- Return true or false
   end
   local function flush()
      -- Return true or false
   end
   local function close()
      -- Return true or false
   end
   local res={
      read=read,
      write=write,
      seek=seek,
      flush=flush,
      close=close
   }
   return res -- Table with functions: read,write,seek,flush,close
end

-- Directory iterator
local function files(name)
   -- Find resource, return nil if not found.
   local function read()
      -- Iterate to first/next resource, return true if more files or false
      -- if no more files.
   end
   local function name()
      -- return resource name
   end
   local function stat()
      -- return table with mtime,size, and isdir (true/false)
   end
   return {read=read,name=name,stat=stat} -- Return table with functions
end

-- Return resource information
local function stat(name)
   -- return table with mtime,size, and isdir (true/false) if found or
   -- nil if not found
end

-- Create directory
local function mkdir(name)
   -- Return true on success and false on error
end

-- Remove directory
local function rmdir(name)
   -- Return true on success and false on error
end

-- Remove file
local function remove(name)
   -- Return true on success and false on error
end

-- Table with the Lua I/O callback functions
local iofuncs = {
   open=open,
   files=files,
   stat=stat,
   mkdir=mkdir,
   rmdir=rmdir,
   remove=remove
}

-- Create a Lua I/O instance
local io=ba.create.luaio(iofuncs)

-- Install the Lua I/O in any Barracuda resource that takes an I/O
-- interface as argument.
Mail (SMTP) Client Library
The SMTP library provides client-side functionality for sending e-mail messages from Lua applications running inside the Barracuda App Server (BAS).
The implementation follows the Simple Mail Transfer Protocol (SMTP) as specified in RFC 5321 and supports common SMTP extensions such as authentication (AUTH). The library can send mail over both plaintext SMTP (where permitted) and encrypted SMTP using TLS.
Relationship to LuaSocket
The BAS SMTP library is based on the LuaSocket SMTP module, but it is enhanced and integrated with the BAS's socket API. Key enhancements include:
Support for TLS using SharkSSL
Support for STARTTLS
Integration with the Barracuda socket layer, targeting embedded and appliance-style deployments
Most SMTP servers today require encryption. The SMTP client supports two secure modes:
Implicit TLS (SMTPS): TLS is negotiated immediately after the TCP connection is established (commonly on port 465).
STARTTLS: The connection begins in plaintext and is upgraded to TLS during the SMTP handshake via the STARTTLS command (commonly port 587).
STARTTLS behavior
When starttls = true, the library negotiates TLS using STARTTLS. In this mode, the library treats the connection as secure and will use TLS. If the shark field is not explicitly set, the library uses the value returned by ba.sharkclient().
Implicit TLS behavior (SMTPS)
When using implicit TLS (direct TLS from connect), you must explicitly provide a SharkSSL object in the shark field. If the shark field is not set, the library treats the connection as non-secure, and the server typically rejects the session.
Blocking Behavior and Threading Requirements
The SMTP library uses blocking sockets and therefore:
It cannot be used with the Barracuda asynchronous socket API.
It should not be run in any context where blocking would stall the main server or event loop.
If you are calling the SMTP library from outside an LSP request context (for example, from cosocket), run the SMTP logic in the context of the Lua Thread Library to isolate blocking I/O. See the Thread Library documentation for details.
Simplified SMTP Client Library
We provide a wrapper library that simplifies use of the LuaSocket SMTP library. You can choose to use the LuaSocket SMTP library directly or use the simplified SMTP library provided by Real Time Logic. The simplified SMTP client library does not require detailed knowledge of MIME encoding or of how to use LTN12 filters, sources, and sinks. The following documentation covers the simplified SMTP library. See the LuaSocket SMTP documentation if you prefer to use the more technical API.
The simplified SMTP client library, called mail, makes it easy to send text and HTML emails. The library also makes it easy to embed images in HTML messages and add file attachments. The following example shows how to send an email using a standard SMTP server.
Notice that require is used slightly differently in the example below when loading the SMTP library and the LuaSocket compatibility layer. In standard Lua usage, require loads a module and returns it. However, in this case, the module initializes itself and registers socket.mail in the global namespace instead of returning a module table. Thus, calling require has the side effect of creating the global socket.mail function rather than returning a value that must be assigned. This behavior is intentional and aligns with the LuaSocket compatibility API included with BAS.
require "socket.mail" -- Load mail lib (create the global 'socket.mail')

local mail=socket.mail{server="smtp.example.com", shark=ba.sharkclient()} -- Create a mail object

-- Send one email
local ok,err=mail:send{
   subject="Hello",
   from='Bob <bob@example.com>',
   to='Alice <alice@example.com>',
   body=[[
     Hello Alice,
     This is a test.
   ]]
}
Creates a simplified SMTP client object. The socket.mail function takes a table as argument with the following required and optional attributes:
server: The SMTP server's domain name (string) or a socket connection object. Using an already established socket connection is useful, for example, when sending emails via a proxy. See the Sending E-Mails Via a Proxy example for more information.
port: The SMTP server's port number defaults to 25 for standard connections, including STARTTLS connections and 465 for secure connections.
user and password: Provide a username and password if the SMTP server requires authentication.
shark: The SharkSSL object must be set if the SMTP server requires a secure connection.
starttls:STARTTLS is a method for upgrading a non-secure connection to a secure connection. If the starttls attribute is set to true and a SharkSSL object is provided, the connection is upgraded if the server also supports STARTTLS. It is safe to provide a SharkSSL object together with starttls because the communication is upgraded only if the server supports STARTTLS. Notice that communication starts immediately in secure mode if a SharkSSL object is provided and starttls is not set.
In the above, string|fp means either a string with text/binary data or a file pointer. A file pointer can be from opening a file using the standard Lua I/O function or from a Barracuda I/O. Examples: fp=io.open("/path/img.gif"), fp=ba.openio("disk"):open("/path/img.gif").
subject: The message subject (required)
from: From email address (required)
replyto, to, cc, bcc: Email addresses as set in a mail program. The attributes to, cc, and bcc can be a string if only one email address is required or an array with multiple addresses.
txtbody: Plain text for text emails.
htmlbody: HTML data for HTML emails.
htmlimg: A list of Images for HTML emails with embedded images. Attribute htmlimg is one table or an array of tables with the following attributes:
source = string|fp, a string with text/binary data or a file pointer to an image.
name=string, the image file name with or without the path.
id=string, the image ID referenced in the HTML text.
attach: A list of files that should be sent as an attachment. Attribute attach is one table or an array of tables with the following attributes:
source = string|fp, a string with text/binary data or a file pointer to an opened file.
name=string, the filename and extension with or without the path.
content=string, the Content-Type is optional and is derived from "name", the filename extension, if not provided.
description=string, an optional description that may be displayed by some mail readers.
encoding: The encoding, which defaults to Quoted-printable, specifies the email content-transfer-encoding. All encoding types, except for NONE, filter the output by using the ltn12 filters, then normalize and wrap. The 8BIT and NONE encoding only works with SMTP servers that support the 8BITMIME SMTP extension.
text: sends a plain text email and is the simplest way to verify SMTP connectivity and credentials.
html: sends an HTML email with a plain text fallback and an inline image referenced by content ID.
eml: parses a stored .eml file, updates delivery fields, and sends the result as a reusable email template.
log: related logging example that emails crash and log output through mako.log() using the same mail settings.
Creating the mail object
The following example configures and creates a mail object for the secure Google SMTP server:
local mail=socket.mail{
   shark=ba.sharkclient(), -- Use TLS
   server="smtp.gmail.com",
   user="YOUR GOOGLE EMAIL ADDRESS",
   password="YOUR GOOGLE PASSWORD",
}
Notice that we use the SharkSSL object returned by ba.sharkclient() in the above example.
The following example configures and creates a mail object for the STARTTLS version of the hotmail SMTP server:
local mail=socket.mail{
   shark=ba.sharkclient(), -- Use TLS
   starttls=true, -- Start as a normal socket and then later upgrade to TLS
   server="smtp.live.com",
   user="YOUR HOTMAIL EMAIL ADDRESS",
   password="YOUR HOTMAIL PASSWORD",
   port="587",
}
Sending emails
The following example sends an HTML email to Alice by opening and reading the file "emails/alice.html":
local ok,err=mail:send{
   from='Bob <bob@example.com>',
   to='Alice <alice@example.com>',
   subject="Hello",
   htmlbody=io:open"emails/alice.html"
}
It is good practice to embed a plain text version of the HTML email. The following example sends a combined text and HTML email:
local ok,err=mail:send{
   from='Bob <bob@example.com>',
   to='Alice <alice@example.com>',
   subject="Hello",
   txtbody="This is the text body",
   htmlbody=[[
        <html>
          <body>
            <h1>This is the html body</h1>
          </body>
        </html>
   ]]
}
The following email shows how to send a combined text and HTML image. The HTML includes an embedded image. The email also includes one attachment:
local ok,err=mail:send{
   from='Bob <bob@example.com>',
   to='Alice <alice@example.com>',
   subject="Hello",
   txtbody="This is the text body",
   htmlbody=[[
        <html>
          <body>
            <h1>This is the html body</h1>
            <img src="cid:the-unique-id" alt="Text shown by text only clients">
          </body>
        </html>
   ]],
   htmlimg = {
      id="the-unique-id",
      name="logo.svg",
      source=io:open"logo.svg"
   },
   attach={
      description="A document",
      name="my-document.pdf",
      source=io:open"my-document.pdf"
   }
}
Notice how the image source attribute is set to a unique ID. You must create a special HTML file where each embedded image has its own unique ID.
Sending E-Mails Via a Proxy
The SMTP server's domain name can be a name (string) or an already established socket connection. Using a socket connection is useful when the SMTP client requires connecting to the Internet via a proxy. The following example shows how to send an email using Google Mail and how to establish the connection via a local proxy by using the HTTP client library and the "proxycon" setting.
require "socket.mail" -- Load mail lib

local http = require"httpc".create{
      proxy="localhost", -- Using local proxy
      socks=true, -- Enable SOCK5
      proxycon=true, -- Use the HTTP lib for opening a proxy connection
      proxyport=1080, -- SOCKS5 port number
}
-- Connect to google mail at port number 465
local ok,status = http:request{url="http://smtp.googlemail.com:465"}
if status == "prxready" then -- If proxy connection ready
   local mail=socket.mail{
      server=ba.socket.http2sock(http), -- Extract socket object
      shark=ba.sharkclient(), -- Implicit if not set
      user="john.doe@gmail.com",
      password="the-password",
   }
   -- Send email
   local ok,err=mail:send{
      subject="Hello",
      from='John Doe <john.doe@gmail.com>',
      to='Janie Doe <janie@doe.com>',
      body="Hi Janie"
   }
end
Pipe API
The pipe API is supported on POSIX operating systems including Linux and QNX.
ba.pipe.mkfifo(pathname [, mode])
This function maps directly to the POSIX C function mkfifo().
String pathname - the pathname
Number mode - file mode defaults to octal 700
ba.pipe.open(pathname [,cosocket [, args...]])
The function creates and returns a named pipe handle as a socket object. The socket object runs in cosocket mode and inherits the cosocket flow control mechanism. The pipe is opened in write only mode if no cosocket function is provided and in read/write mode if a cosocket (argument 2) is provided. Note that the function fails if opened in write only mode and if no other process is reading on the pipe.
String pathname - the pathname
Function cosocket - Open pipe in read/write mode and activate the function as a cosocket. The provided function is immediately resumed with the first parameter being the socket and subsequent parameters being the optional "args"
Any-type args - Optional cosocket argument(s)
Reverse Proxy
Ref Wikipidia:
A reverse proxy is a type of proxy server that retrieves resources on behalf of a client from one or more servers. These resources are then returned to the client as though they originated from the server itself.
The purpose with the reverse proxy is to make it possible to integrate existing web solutions with the Barracuda Application Server and/or provide a means to implement cross site scripting.
The reverse proxy behaves as a Barracuda Server directory object. One or several instances of the reverse proxy can be inserted into the Barracuda virtual file system. The reverse proxy can also implement authentication and authorization just like any other Barracuda directory object. One can for this reason provide security to less secure backend servers. The reverse proxy also offers SSL termination.
name - The Barracuda Virtual File System directory node name
domain - Domain name or IP address of the backend server
port - The backend server's port number, which is typically 80
baseuri - Append a base URI/offset to the redirect URL
priority - The directory node priority
ba.create.redirector(name[,priority])
Create a cross site scripting redirector. Parameters:
name - The Barracuda Virtual File System directory node name
priority - The directory node priority
Creating a standard reverse proxy:
The most common operation is to create a standard reverse proxy. The following example creates a reverse proxy for a backend server with IP address 127.0.0.1
The backend server 127.0.0.1 can now be access as: http://localserver/backend/ Use the baseuri if you only want to access a subset of the backend server:
The backend server URL http://127.0.0.1/subdir/ can now be accessed as: http://localserver/backend/
The basic proxy does not provide a rewrite module, thus absolute encoded URLs in web pages retrieved from a backend server such as images will not show up in the browser unless the reverse proxy is installed as a root directory.
  rproxy=ba.create.redirector(nil,"127.0.0.1",80,-1) -- Priority=-1
  rproxy:insert() -- Insert as root directory
The above is the most common case for inserting an existing web application into a barracuda server. The reverse proxy is inserted as a root directory with a priority that is less than the root directory for the existing application. This will make sure the Barracuda server first searches for the requested resource locally and then delegates the request to the reverse proxy only if the requested resource was not found in the Barracuda Server.
Any server and web page can now be accessed as http://localserver/gateway/domain-name/path.
Example: http://localserver/gateway/www.cnn.com
rwfile.lua
rwfile=require"rwfile"
A simple, but efficient and easy to use module for reading and writing files, especially configuration files. The module returns a table with the following two functions:
rwfile.json(io, name [, tab])
Read JSON and convert to a Lua table or write a table as JSON data.
String name - The JSON file's pathname relative to the IO object.
Table tab - The Lua table to serialize and save as JSON. Reads, converts JSON to Lua, and returns the table if this argument is not set. The function returns nil,err if the file is not found or cannot be converted from JSON to a Lua table.
Read or write a complete file. The file is read if the third argument is not provided and written to if the third argument is provided.
Barracuda Web Server Listen Object
ba.create.servcon(port|con [,op])
Create a Barracuda Web Server listen object and install it in the Socket Event Dispatcher. Web server listen object(s) are typically installed by the C startup code, but can optionally be installed by the server startup script (.config). The benefit of managing these objects in Lua is easier runtime configuration.
See the Lua web-server startup script examples/mako/lsp/.openports in the Barracuda Embedded Web Server SDK for an example showing how to dynamically detect free server port numbers and configure multiple secure and non-secure server connection objects.
For security reasons, objects created with this function are self referencing, which means they will not be collected by the garbage collector if you do not keep a reference to these objects. The Barracuda Socket Event Dispatcher cannot operate without at least one connection. If you close all listen objects, the Socket Event Dispatcher will eventually run out of active connections and malfunction. It is, for this reason, vital that you keep at least one listen object active at all times.
Parameters:
port | con - Port number or an existing server listening object.
port: integer -- the port number should be 80 for HTTP connections and 443 for HTTPS connections.
con: object -- This mode is designed specifically for setting new SSL certificates in a running server without having to stop the server. The option (op) table must include the "shark" attribute and the "con" argument must be an existing secure connection object. The new connection object inherits all settings from the "con" object, except for the "shark" attribute. The "con" object is unreferenced and allowed to garbage collect. Existing connections on the "con" object are left connected until they either close or the garbage collector collects the "con" object.
op - The option table:
intf: string -- Bind to interface-name/IP-address. The default is to bind to all interfaces.
ipv6: bool -- Create an IPv6 server object. Note, the server must have been compiled with IPv6 support.
You can open any number of server connection objects as long as the combination of all of the following is unique: port number, interface, and protocol version (IPv4/IPv6). This means that you can have many server connection objects listening on port 80 if you have more than one interface and/or protocol version.
Objects returned by ba.create.servcon() have the following methods associated with them:
servcon:setport(port [,op])
Change the port number and configuration options in an active server connection object. The parameters are identical to the parameters for function ba.create.servcon(), except for parameter shark, which is ignored if provided.
The function internally creates a new connection object. The original connection is closed if the new object is created successfully. This differs from closing an active connection and then creating a new object because any active "accepted" socket connections from the original server connection are left running.
servcon:close()
Close the active server listening object, remove the listening object from the Socket Event Dispatcher, and remove the self reference on the object.
The following example shows how to create a secure (SSL) listen object. You may download the complete example and run the example on your server.
-- Servers do not use a 'cert store' unless mutual authentication is required.
local shark=ba.create.sharkssl(nil, {server=true})
-- x509certData and x509KeyData are Lua strings containing cert and key.
local x509cert = ba.create.sharkcert(x509certData,x509KeyData)
shark:addcert(x509cert) -- Certificate required for servers.
ba.create.servcon(port, {shark=shark})
SharkSSL
(Secure SSL/TLS communication management)
SharkSSL is an extremely compact TLS stack. SharkSSL provides security for network communications, such as for securing HTTP and SMTP communication. The SharkSSL stack supports both client-side and server-side connections, enabling the client to confirm the server's identity and vice-versa.
When using secure communication such as secure sockets or the HTTP library in secure mode, a SharkSSL object is required. Various APIs such as the HTTP client library and the socket library take an option table as an argument. This table must have the attribute shark set to a SharkSSL instance when using secure communication.
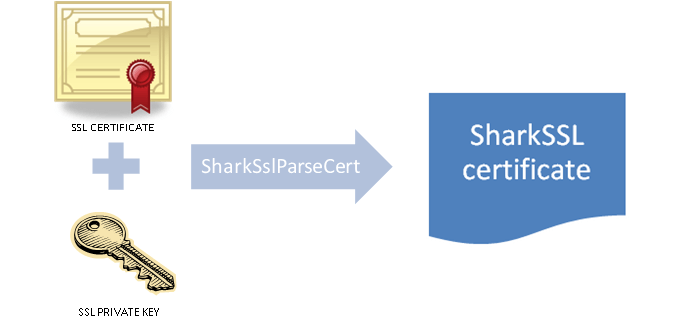
ba.create.sharkssl([certstore [,op]])
Create a SharkSSL object. Parameter certstore (the CA list) is an object created with ba.create.certstore(); parameter op is an optional configuration table. As an alternative to using a certstore object, you may also use the more compact SharkSslCAList object format. The documentation for ba.sharkclient() includes an example showing how to create a SharkSSL client object using a binary SharkSslCAList object.
Note: for client connections, you may consider using ba.sharkclient(), which returns a ready-to-use SharkSSL object initialized with the certificates in the file .certificate/cacert.shark.
The returned object has the following method:
sharkssl:addcert(sharkcert)
sharkcert, the certificate and key, is an object created with ba.create.sharkcert(). You can add multiple certificates such as RSA certificates and ECC certificates.
Typical use cases:
Create a client SharkSSL object that verifies the server using the supplied CA
clientObj=ba.create.sharkssl(certstore)
Create a client SharkSSL object that accepts any server, including self-signed certificates.
clientObj=ba.create.sharkssl()
Create a standard server object that does not require client certificates.
serverObj=ba.create.sharkssl(nil, {server=true}); serverObj:addcert(sharkcert)
The above 3 use cases show the typical web client and server configurations.
A client or server SharkSSL object without a CA does not require a peer certificate. This is the typical scenario for a web-server. A web-server using a SharkSSL object with a CA requires that the client provides a certificate and will abort the connection if the client does not provide a certificate or if the certificate is not signed by a CA in the CA store.
Client connections typically require a certificate signed by a known CA. If you are designing an application that should warn about unknown CAs such as self-signed certificates, two SharkSSL objects are required: one with a CA store and one without. Initially attempt a connection with the SharkSSL object that has a CA store. If the peer fails to validate, warn the user, and then use the SharkSSL object without the CA.
The option (op) table:
server=bool -- The SSL/TLS protocol is a client server protocol. You must select the correct protocol for client and server connections. The default is to create a client SSL object. Set server=true if the ssl object is used as an option when calling ba.create.servcon.
insize=number -- The internal SharkSSL start "read" buffer size. The size automatically grows if needed. The default value is 8192 bytes.
outsize=number -- The internal SharkSSL "write" buffer size. The default value is 8192 bytes.
cachesize=number -- The SSL session resumption cache size. The default 'cachesize' value for a SSL client object is 8. The default 'cachesize' value for a SSL server object is set to the web server's maximum number of connections. The server's maximum number of connections is set by the C startup code by calling HttpServerConfig::setNoOfHttpConnections().
ba.create.certstore()
Create a Certificate Authority Store. A Certificate Authority or CA for short is an entity that issues digital certificates for use by other parties. In layman's terminology, a CA is like a certified (government) passport issuer. A CA is typically used by a client SharkSSL object, but can also be used by a server SharkSSL object if the server requires client certificate validation.
The object returned by ba.create.certstore() has the following method:
addcert(io,name)
addcert(data)
This function adds a certificate in PEM or p7b format to the CA store. A convenient way to obtain CAs is to export certificates from a browser in PEM or p7b format. The p7b format is a container format that can contain many CAs.
The method can add certificates in two modes:
Mode 1: Provide a Barracuda I/O interface (io) and the path+name (name) to the location of the CA.
Mode 2: Load the file data manually and insert the data.
The following example is designed to demonstrate how to create a certificate store and use it to validate SSL certificates.
-- Checks if RTL's website certificate is valid.
-- Arg sharkObj: an object created using function ba.create.sharkssl()
-- Returns true if OK; otherwise, nil, "sslnottrusted" is returned.
local function checkRtlCert(sharkObj)
    local url="https://realtimelogic.com"
    local http = require"httpc".create()
    return http:request{trusted=true,url=url,method="HEAD",shark=sharkObj}
end

-- Downloads and returns the content from a given URL
local function downloadFile(url)
    local http=require"httpc".create()
    http:request{method="GET",url=url}
    local data,err=http:read"a"
    if not data then print("Download failed",err) end
    return data
end

print(checkRtlCert()) -- Implicit use of ba.sharkclient(); prints true
print(checkRtlCert(ba.sharkclient())) -- prints true
local store = ba.create.certstore()
-- Empty store
print(checkRtlCert(ba.create.sharkssl(store))) -- Prints nil,"sslnottrusted"

-- RTL's cert signed by Let's Encrypt
local rootCert=downloadFile"https://letsencrypt.org/certs/isrgrootx1.pem"
if rootCert then
    local store = ba.create.certstore()
    store:addcert(rootCert)
    print(checkRtlCert(ba.create.sharkssl(store))) -- Prints true
end

-- DigiCert is a well known CA
local rootCert=downloadFile"https://cacerts.digicert.com/DigiCertGlobalRootCA.crt.pem"
if rootCert then
    local store = ba.create.certstore()
    store:addcert(rootCert)
    -- RTL's cert is not signed by DigiCert
    print(checkRtlCert(ba.create.sharkssl(store))) -- Prints nil,"sslnottrusted"
end

-- Download the "CA Root Certificates bundle" maintained by CURL
local rootCertBundle=downloadFile"https://curl.se/ca/cacert.pem"
if rootCertBundle then
    local store = ba.create.certstore()
    print("Number of CA certs installed:",store:addcert(rootCertBundle))
    print(checkRtlCert(ba.create.sharkssl(store))) -- Prints true
end
A SharkSSL certificate is a combination of the certificate (the public part) and the certificate key (the private part).
The function can create a SharkSSL certificate in two modes:
Mode 1: Provide a Barracuda I/O interface (io), the path+name to the location of the certificate (certfile) , and the path+name to the location of the key (keyfile).
Mode 2: Load the certificate and key manually and provide the certdata and keydata.
The password is an optional argument that must be provided if the key is encrypted.
ba.create.key([{op}])
Create an ECC or RSA key. An ECC key is created if no options are provided. Note that creating RSA keys is extremely time consuming.
Parameters:
op: table -- Configuration options (optional)
key: string -- 'ecc' or 'rsa'. Create an ECC key or an RSA key.
bits: number -- The bit size for the RSA key. The default size is 2048 bits.
curve: string -- The curve type for the ECC key. The default is 'SECP256R1'. Curve options:
privkey: string | table -- the private key in pem format. A password protected key must be provided as a table with {key=,pwd=}.
dn: table
commonname: string -- The domain name (required).
organization: string -- The legal name of your organization.
unit: string -- The division of your organization.
locality: string -- The city where your organization is located.
province: string -- The state/region where your organization is located.
countryname: string -- The two-letter ISO code for the country where your organization is located.
email: string -- The organization contact, usually of the certificate administrator or IT department.
san: string -- Subject Alternative Names must include dn. SAN is set to dn if not provided. Multiple names and/or IP addresses can be specified by separating them using semicolons. The subject alternative name may include an IP address in the form "IP:IPv4"; example: "localhost;IP:127.0.0.1"
certtype: table -- options used to specify the "Netscape" certificate type. You may use all of the following options:
"SSL_CLIENT"
"SSL_SERVER"
"OBJECT_SIGNING"
"SSL_CA"
"OBJECT_SIGNING_CA"
keyusage: table -- options used to specify the key usage. You may use all of the following options:
"DIGITAL_SIGNATURE"
"NON_REPUDIATION"
"KEY_ENCIPHERMENT"
"DATA_ENCIPHERMENT"
"KEY_AGREEMENT"
"KEY_CERT_SIGN"
"CRL_SIGN"
hashid: string -- Type of digest function used in the CSR signature. Use one of the following: "sha256", "sha384", or "sha512".
The function returns the CSR in PEM format.
Example:
local privkey = ba.create.key()
local certtype = {"SSL_CLIENT", "SSL_SERVER"}
local keyusage = {
   "DIGITAL_SIGNATURE",
   "NON_REPUDIATION",
   "KEY_ENCIPHERMENT",
   "DATA_ENCIPHERMENT",
   "KEY_AGREEMENT",
   "KEY_CERT_SIGN",
   "CRL_SIGN"
}
local d = "realtimelogic.com"
local csr=ba.create.csr(
   privkey, {commonname=d} , d..";www."..d, certtype, keyusage)
print(csr)
ba.create.certificate(csr [, cert], privkey, validfrom, validto, serial [,hashid])
Parameters:
csr: string -- CSR in pem format.
cert: string -- Certificate Authority (CA) certificate in PEM format. The certificate will be self-signed if not provided.
privkey : string | table -- the private key in PEM format. A password-protected key must be provided as a table with {key=,pwd=}. If a CA certificate is used, the private key must be for the CA certificate. Otherwise, the key will be the one used for the self-signed certificate.
validfrom: table -- Certificate valid from date. The table may include the following integer types: year, month, day, hour, min, and sec. At a minimum, the table must have "year" and "month".
validto: table -- Certificate valid-to date. The table must be in the same format as validfrom.
serial: integer -- Each signed certificate signed with a CA certificate must have a unique serial number.
hashid: string -- Type of digest function used in the CSR signature. Use one of the following: "sha256", "sha384", or "sha512".
The function returns the certificate in PEM format.
Example:
local csr = ba.create.csr(.......) -- See example above
local validFrom=os.date"*t"
local validTo=os.date"*t"
validTo.year = validTo.year + 10
local cert = ba.create.certificate(
   csr, caCert, caKey, validFrom, validTo, 0x000001)
ba.parsecert(asn1)
Parses raw ASN.1 certificate data and returns a table.
Example:
local http = require"httpc".create()
local ok,err=http:request{
   url="https://letsencrypt.org/certs/lets-encrypt-e2.pem"}
if ok then
   local cert=http:read"a"
   local t = ba.parsecert(
      ba.b64decode(cert:match".-BEGIN.-\n%s*(.-)\n%s*%-%-"))
   if t then print("Cert info:", ba.json.encode(t)) end
end
ba.parsecerttime(string)
Parses certificate time string format YY[YY]MMDDHHMMSSZ to number of seconds since 1970-01-01 00:00:00 GMT. Returns zero if the time format cannot be parsed.
ba.sharkclient()
Trust is the single most important aspect when it comes to establishing an encrypted TLS connection. A TLS client such as HTTPS, SMTP, secure MQTT, etc, cannot establish trusted communication with the server unless the client trusts the server's certificate. Trust can only be established by keeping a copy of the signer of the server's certificate. See the tutorial Introduction to Public Key Infrastructure for details.
This function returns a SharkSSL client object initialized with the certificates in the file vmio/.certificate/cacert.shark.
The following example shows the internal ba.sharkclient() implementation:
-- This code is only executed one time,
-- when the function is initially called.
-- A cached copy is otherwise returned.
local f=ba.openio('vm'):open'.certificate/cacert.shark'
local c=f:read'a'
f:close()
return ba.create.sharkssl(c,{cachesize=40})
The function throws an exception if .certificate/cacert.shark is not found in the VM I/O or if the file is corrupt/invalid. The Barracuda App Server does not automatically include cacert.shark, and you may need to assemble the file yourself. The Mako Server's resource file mako.zip includes a ready-to-use cacert.shark assembled from curl CA certificates. The Mako Server's cacert.shark is large and not suitable for memory-constrained devices. The following example shows how to assemble a cacert.shark that trusts only certificates signed by Let's Encrypt:
The above command line example shows how to create a compact SharkSslCAList object (cacert.shark), which can be created by using the SharkSSLParseCAList command line tool. However, a SharkSSL client object can also be created by using a SharkSSL Certificate Authority Store (ba.create.certstore). The following example shows how to replace the original ba.sharkclient() with your own version.
do -- New scope
   local sharkClient -- closure
   -- replace ba.sharkclient
   function ba.sharkclient()
      if not sharkClient then
         -- Create when function is initially called
         local vmio = ba.openio("vm")
         local sn=".certificate/cacert.pem"
         if not vmio:stat(sn) then
            error("Cannot find "..sn)
         end
         local store = ba.create.certstore()
         store:addcert(vmio,sn)
         sharkClient=ba.create.sharkssl(store)
      end
      return sharkClient
   end
end
Socket API
The TCP and UDP socket API provide easy to use functions for creating client and server TCP connections and for working with UDP sockets. The TCP socket API is integrated with our own SSL stack SharkSSL™, thus making it very easy to create secure custom protocols. The TCP socket API enables interceptions of HTTP client and server connections at any point, making it possible to morph an HTTP(S) connection into an HTTP(S) tunnel, which can be used for (secure) custom protocols that can bypass proxies and firewalls.
Note that UDP socket is not supported on all embedded/RTOS platforms.
The socket API can be used in three modes:
Standard blocking sockets.
Asynchronous sockets, where receive is asynchronous and send is blocking.
Cosocket mode, where sending and receiving data is non-blocking.
The Barracuda socket API is not identical to the standard LuaSocket, but a compatibility layer is included that makes it possible to use code designed for the Lua socket API such as the mail (SMTP) client.
Functions
ba.socket.bind(port [,op])
Creates and returns a TCP server object bound to a local port, ready to accept client connections.
The option table:
intf = string -- Bind to interface-name/IP-address. The default is to bind to all interfaces.
ipv6 = bool -- Use IPv6 address translation for 'intf'. Note, the server must have been compiled with IPv6 support. One can typically open two connections on the same port and interface if one is an IPv4 address and the other is an IPv6 address.
timeout = number -- Set the maximum time to wait in milliseconds for connection establishment. The timeout value, which defaults to 1000, is supported for asynchronous connections and for synchronous (blocking connections) on platforms where the porting layer interfaces to a BSD socket API.
Examples:
The two examples below connect to Real Time Logic's web server on port 443 (HTTPS/TLS). The first example validates Real Time Logic's certificate using the list of Certificate Authority (CA) certificates that the SharkSSL object returned by ba.sharkclient() is initialized with. The second example creates a new SharkSSL object with an empty certificate store, so the example cannot validate the certificate. See sock:trusted() for more information on the return values.
local s = ba.socket.connect(
  "realtimelogic.com", 443, {shark=ba.sharkclient()})
print(s:trusted()) -- prints: true
print(s:trusted("sharkssl.com")) -- prints: nil	cert
s:close()

local s = ba.socket.connect(
  "realtimelogic.com", 443, {shark=ba.create.sharkssl()})
print(s:trusted()) -- prints: nil	cn
print(s:trusted("sharkssl.com")) -- prints nil	none
s:close()
A cosocket function (a function started with ba.socket.event) can call ba.socket.connect when the socket is unbound. The following example shows how two cosockets open a client connection, where cosocket2 is started from within cosocket1.
local function cosocket2(sock)
   if ba.socket.connect("google.com",80) then
      trace"cosocket2 connected"
   end
   trace("cosocket2", sock)
end

local function cosocket1(sock)
   -- 'sock' is in state 'not connected'
   local s = ba.socket.connect("google.com",80)
   if s then -- s == sock
      assert(s == sock) -- Will never fail
      -- The following fails since the socket is connected
      -- Prints: nil incorrectuse
      trace(ba.socket.connect("google.com",80))
   end
   trace("cosocket1", sock)
   -- Start cosocket2
   ba.socket.event(cosocket2)
end

-- Start cosocket1
ba.socket.event(cosocket1)
ba.socket.udpcon([address] [,port] [, op])
Creates and returns a connected or unconnected UDP object. The object is unconnected if address is not provided. See the udp example for more info on how to use this function.
The option table:
intf = string -- Bind to interface-name/IP-address.
port = number -- Bind to port number.
ipv6 = bool -- Create an IPv6 socket. Note, the server must have been compiled with IPv6 support.
ba.socket.req2sock(request)
Extracts the active socket connection from the request object. This function, which can only be called from an LSP page or a directory function, makes it possible to morph an HTTP(S) connection into an HTTP(S) tunnel, which can be used for (secure) custom protocols. This function can also upgrade a WebSocket request to a WebSocket connection. The LSP page response object cannot be used after this function is called. Thus if you want to send an HTTP response, the response must be flushed by calling response:flush prior to calling this function. Note: an HTTP response is sent automatically by this function when upgrading a WebSocket request to a WebSocket connection.
This function returns the socket object and any additional data the server received following the HTTP header when upgrading regular HTTP to a socket connection. The second return value is nil if no additional data is available.
This example shows how to convert an HTTP request into a persistent Server-Sent Events (SSE) response. The server-side code creates a timer that sends an event to the client every second. The timer keeps running until the browser closes the connection. To run this example, save the file as index.lsp.
See Socket Design: WebSockets for how to use this function for converting an HTTP request to a persistent WebSocket connection.
<?lsp
if request:header"Accept" == "text/event-stream" then
   trace"New stream event request"
   response:reset()
   response:setcontenttype"text/event-stream"
   response:flush()
   local s = ba.socket.req2sock(request)
   if s then
      local timer = ba.timer(function()
         local cnt=0
         local fmt=string.format
         while true do
            cnt = cnt + 1
            local msg = fmt("data: This is message #%d\n\n",cnt)
            trace(msg)
            if not s:write(msg) or cnt > 9 then
               s:write"data: We are done!\n\n"
               s:close() -- Browser auto reconnects if still on page
               break
            end
            coroutine.yield(true)
         end
      end)
      timer:set(1000)
      s:event(function()
         s:read() -- No data from browser; only socket close
         timer:cancel()
         trace"Event stream closed"
      end, "s")
   end
   response:abort()
end
?>
<html>
<script>
var source = new EventSource(location.href);
source.onmessage = function (event) {
  console.log(event.data);
  document.body.innerHTML=event.data;
};
</script>
<body></body>
</html>
ba.socket.http2sock(httpclient)
Extracts the active socket connection from an HTTP client object. The function is typically called after sending the request and calling http:status(). This function can also upgrade a WebSocket request to a WebSocket connection.
This function returns the socket object and any additional data the server received following the HTTP header when upgrading regular HTTP to a socket connection. The second return value is nil if no additional data is available.
The following example connects to a web server running on localhost:80, extracts the socket connection from the HTTP client object, and starts an asynchronous coroutine that reads data until end of stream. End of stream is assumed when the receive function receives no data for 2 seconds.
require"http"

local function recData(s)
   local data,err
   data=true
   while data do
      -- s:read returns nil when no data received for 2 seconds
      data,err = s:read(2000)
      trace(data) -- Print response data to trace.
   end
   if err then trace("Read failed", err) end
   -- Socket is closed on return
end

local c = require"httpc".create()
c:request{url="http://localhost",method="GET"}
local s,err=ba.socket.http2sock(c)
if s then
   s:event(recData, "s")
end
ba.socket.toip(address[,ipv6])
Looks up address by using DNS and translates address to an IP address. Forces the use of IPv6 address translation if the optional parameter is true. Note, the server must have been compiled with IPv6 support.
This function is useful when using asynchronous sockets since DNS lookup may take some time (DNS lookup is blocking). Lua code can be designed such that the address is resolved by code that is allowed to block. The address can be cached such that the non blocking coroutines can use the IP address when connecting to peers.
ba.socket.event(function [,args])
Runs a Lua callback function as a cosocket. The provided function (parameter one) is immediately resumed with the first parameter being the socket and subsequent parameters being the optional "args". The cosocket is resumed in the context of the native thread running the Socket Event Dispatcher when resuming from calling ba.socket.connect(), socket:receive(), or socket:write(). All socket operations performed in the function will appear to be blocking, but all socket methods are asynchronous behind the scene.
A cosocket typically opens a server connection, binds, and listens or opens a client connection. The function then enters a loop where it waits for data using socket:read(). The function must exit when the socket closes. A cosocket does not have to bind or connect a socket but can stay in the unconnected state; however, the cosocket can only yield by either calling socket:disable() or when blocking when calling socket:write() on another connected socket.
A cosocket can exit when in the unconnected state and must exit when going from state connected to state unconnected. A connected socket is automatically closed when the socket exits, thus calling socket:close() is not required.
function - the cosocket function. args - optional arguments passed into the cosocket. Note that the cosocket's first argument is the socket, which is in the socket state "notcon". The optional arguments start as parameter two. Returns - the socket object.
ba.socket.getsock()
Returns the socket object of the current Lua thread state if the current state is a cosocket. See also method socket:owner.
ba.socket.h2n(size,number)
Host (integer) to network (big endian data stream) conversion.
size - number of bytes to convert from the number -- e.g., 2 converts a 16-bit number and 4 converts a 32-bit number. number - the number to convert.
The function returns the converted number as a binary string, where the data is stored in network endian format.
ba.socket.fh2n(size,number)
Host (float) to network (big endian data stream) conversion.
size - number of bytes to convert from the number -- must be 4 for float and 8 for double precision. No other values are accepted. number - the number to convert.
The function returns the converted number as a binary string, where the data is stored in network endian format.
ba.socket.n2h(size,string [, start])
Network (big endian data stream) to host (integer) conversion.
size - the byte size to read and convert -- e.g., 2 converts a 16-bit number and 4 converts a 32-bit number. string - the binary data string start - defaults to 1 and is the offset position in the string.
The function returns the converted data as a number in host endian format.
ba.socket.fn2h(size,string [, start])
Network (big endian data stream) to host (float) conversion.
size - the byte size to read and convert must be 4 for float and 8 for double precision. No other values are accepted. string - the binary data string start - defaults to 1 and is the offset position in the string.
The function returns the converted data as a number in host endian format.
ba.socket.stat()
Returns the total number of socket objects and the number of active socket objects. An active connection may not necessarily be connected.
Socket Object Methods
Socket objects returned by ba.socket.bind(), ba.socket.connect(), ba.socket.req2sock(), and ba.socket.http2sock() have the following methods associated with them:
TCP: socket:read([timeout])
UDP: socket:read([timeout][,true])
Reads data from socket. The function blocks indefinitely if timeout (in milliseconds) is not provided. The function automatically yields if the caller is a cosocket and no data is available on the socket. The maximum timeout value for a synchronous connection is 3240,000.
UDP: the Lua binding uses recv() when the optional boolean is not set or is false. The Lua binding uses recvfrom() when the boolean value is set to true and the socket mode is either asynchronous or cosocket.
Limitations: a cosocket must call the socket:read() method from within its own cosocket (the cosocket loop) -- in other words, when in cosocket mode, method socket:read() cannot be called unless method socket:owner() returns true. An exception is thrown if the read method is called on a cosocket outside its own cosocket.
Non-connected socket: as a special case, a non-connected cosocket is allowed to call method read() on it's own socket if a time value is provided. The function will then sleep for the specified time and return nil,timeout when the timeout elapses. See cosocket flow controll for details.
Returns one of:
data: where data is a Lua string. This is the return value for standard socket connections.
nil, errcode: where errcode is one of standard error codes or "closed" if another thread/coroutine closed the socket.
data, true|false: where false indicates a WebSocket binary frame and true indicates a WebSocket UTF-8 frame.
data, true|false, bytesRead, frameLen: where bytesRead is the data read so far and frameLen is the size of the WebSocket frame. Variables bytesRead and frameLen are returned if this method returns a WebSocket frame fragment.
data, address, port: UDP only, when the optional boolean argument is set to true.
Receiving WebSocket frames:
When working with a WebSocket connection, you might encounter return values [3] and [4] as shown in the above list. The significance of these values is tied to the capacity of the socket:read() function's buffer. If the buffer can accommodate the incoming WebSocket frame, you will get a return as indicated by [3]. On the other hand, if the incoming frame's size surpasses the buffer's capacity, you will see a return, as indicated by [4]. When you receive a [4], it's essential to implement logic to assemble the complete frame. You can set a variable to true to check if a complete frame has been received. Here's how you can do it:
-- eof: end of frame (websocket frame)
local eof = not bytesRead or bytesRead == frameLen
unconnected:sendto(datagram, ip, port)
Sends a datagram to the specified IP address and port number.
Datagram is a string with the datagram contents. The maximum datagram size for UDP is 64K minus IP layer overhead. However, datagrams larger than the link layer packet size will be fragmented, which may deteriorate performance and/or reliability. Ip is the IP address of the recipient. Host names are not allowed for performance reasons.
If successful, the method returns true. In case of error, the method returns nil followed by an error message.
Note: In UDP, the send method never blocks, and the only way it can fail is if the underlying transport layer refuses to send a message to the specified address (i.e., no interface accepts the address).
socket:write(data [, i [, j]] [,utf8])
socket:write(data, utf8)
Send data over a TCP connection or connected UDP connection. A UDP connection has the same features and limitations as sendto. The optional arguments i and j work exactly as the standard string.sub Lua function to allow the selection of a substring to be sent.
Argument utf8 is a boolean value that can be set to true or false for WebSocket connections. WebSocket frames default to binary. Setting the utf8 argument to true sends a WebSocket text frame. See WebSocket frames for more information.
A blocking socket blocks if the TCP queue is full. A cosocket automatically yields if the TCP send queue is full. See cosockets flow control for more information.
Returns:
Boolean true: On success.
nil, errcode: where errcode is one of the standard error codes or "closed" if another thread/coroutine closed the socket.
Non cosocket calling method write on a cosocket:
true, number: where number is the number of bytes queued on a cosocket. See cosockets flow control for more information.
nil, number: The queue is full. The number returned will be close to the value returned by socket:queuelen.
Limitations: you cannot send empty (websocket) messages. The method returns false if the data length is zero.
socket:accept()
Waits for remote connections on the server socket object and returns a socket object representing that connection. This method can only be called by a coroutine in accept mode, a mode enabled by ba.socket.bind.
socket:disable()
Disable an asynchronous Coroutine Socket or a cosocket. The function is typically called by the coroutine itself when your design requires the coroutine to stop receiving socket events. The TCP IP stack will then buffer the incoming messages until its sliding window queue is full. The peer will then stop sending messages.
The function can also be called by code outside of the coroutine, but this construction requires that the coroutine has yielded in socket:read and not in socket:write. The call fails if the coroutine is currently suspended in socket:write.
The coroutine is immediately suspended when called from within the coroutine. The function will not resume until another coroutine or other code running in the context of a native thread calls method socket:enable. Any parameters provided to socket:enable is then returned as arguments when socket:disable returns.
Note: A cosocket can always call socket:disable() regardless of connection state. A non-connected socket can yield by calling this method. Do not call socket:disable() from a non-connected socket unless you have code that re-enables it elsewhere. A non-connected socket can only be resumed by another cosocket/LSP page/timer/thread by calling socket:enable(). A connected socket that called socket:disable() can also be resumed when the socket is closed either by other code calling socket:close() or if the socket is closed by the peer. A socket that goes from state connected to state closed cannot call socket:disable(). The following LSP page, which prints out "Resuming cosocket" followed by "Socket closed", illustrates how this can be used.
<?lsp
response:setstatus(204)
local sock=ba.socket.event(function(sock)
   -- We assume the connection is successful, thus the return should
   -- be the socket object
   assert(sock == ba.socket.connect("google.com",80))
   while true do
      sock:disable()
      local state,connected = sock:state()
      if not connected then
         trace"Socket closed"
         -- on close housekeeping
         return
      end
      trace"Resuming cosocket"
   end
end)

ba.sleep(2000)
sock:enable()
sock:close()
?>
The Lua socket proxy example shows how to use methods socket:disable and socket:enable.
socket:enable([args])
Enable a cosocket in state 'disabled'. The optional arguments are provided as return values to socket:disable(); however, this requires that the coroutine was suspended in socket:disable(). The optional arguments are ignored if the coroutine was disabled by another coroutine, i.e., if the coroutine is currently suspended in socket:read(). The Lua socket proxy example shows how to use socket:disable() and socket:enable().
The provided function (parameter one) is immediately resumed, with the first parameter being the socket and subsequent parameters being the optional "args". The Lua callback function is resumed in the context of the thread running the Socket Event Dispatcher as soon as the Lua callback function calls the first socket function.
The provided Lua function can run as coroutine in two modes:
Parameter two is "r": Asynchronous sockets, where receive is asynchronous and send is blocking. This is also the default mode if no parameter is provided.
Parameter two is "s": cosocket mode, where sending and receiving data is non-blocking.
Parameter two must be "r" for listen sockets, i.e., sockets returned by ba.socket.bind. A listen socket can only receive "accept" events.
socket:maxsize(size)
Set the maximum TLS frame size (in bytes) for a secure TCP connection. Setting the max TLS frame size for a connection is useful when communicating with small devices/microcontrollers. The maximum value and the default value is 8K.
socket:queuelen([len])
Set or get the socket queue length. The queue length specifies how many bytes that can be buffered internally when a non cosocket caller calls socket:write on a cosocket. The default length is 16K. See cosockets flow control for more information.
socket:owner()
Returns true if the current Lua thread state is the cosocket that owns the socket connection. See also function ba.socket.getsock.
socket:peername()
Returns a string of the client name/IP address, the connected port number, and a boolean value set to true for IPv6 and false for IPv4.
socket:sockname()
Returns information about the local side of the TCP connection. Returns a string with the local IP address, the connected port number, and a boolean value set to true for IPv6 and false for IPv4.
socket:websocket()
Returns true if the socket is a WebSocket connection, otherwise false is returned.
socket:ping([data])
Send a WebSocket ping message. The method throws an exception if the connection is not a WebSocket connection.
socket:setoption(option [, value])
Sets an option for the TCP or UDP object. The first argument 'option' is a string with the option name, and value depends on the option being set:
TCP:
'tcp-nodelay': Setting this option to true disables the Nagle's algorithm for the connection.
'keepalive': Setting this option to true enables the periodic transmission of messages on a connected socket. Should the connected party fail to respond to these messages, the connection is considered broken, and processes using the socket are notified. The keepalive parameter accepts two additional parameters (keepidle and keepintv), but these two parameters are only supported on some platforms. sock:setoption('keepalive', true [, keepidle, keepintv]), where keepidle is the time (in seconds) the connection needs to remain idle before TCP starts sending keepalive probes, and keepintv is the time (in seconds) between individual keepalive probes. The default keepalive time for most TCP/IP stacks before sending the first packet is 7200 seconds (2 hours). This default keepalive time is too long for preventing disconnect due to network inactivity when communicating over, for example, a NAT router. See the online document TCP Keepalive HOWTO for an introduction to using keepalives.
UDP:
'dontroute': Indicates that outgoing messages should bypass the standard routing facilities. Receives a boolean value;
'broadcast': Requests permission to send broadcast datagrams on the socket. Receives a boolean value;
'ip-membership': Join or leave the multicast group specified. socket:setoption('ip-membership', enable, address [,interface]), where enable is a boolean value, and address and interface are strings.
The function returns true on success and nil,error if the operation failed.
Error codes for 'keepalive':
'noimplementation' is returned when supplying the two additional parameters, keepidle and keepintv, and when these two parameters are not supported on your platform. You should then call method setoption again, but without providing these two parameters. Consult your platform's TCP/IP guide for how to manually tune these parameters on a global level.
'noimplementation' is returned when the keepalive option is not supported at all on your platform (when keepidle and keepintv are not provided).
'failed' is returned if the keepalive operation failed.
socket:state()
Returns the socket state and socket connection status (true/false):
notcon
Created but not connected; a just created WebSocket connection also shows this state
The following prints: exec false. The cosocket is executing thus the state is 'exec', however the socket is not connected thus the second return value is false.
Upgrade a standard socket to a secure socket. The method is typically used by protocols that connect in non-secure mode and then later upgrade to secure communication. STARTTLS is an example of a protocol that upgrades to SSL/TLS.
  local s=ba.socket.connect(myaddress, myport)
  -- Send handshake data
  s:upgrade(ba.sharkclient())
socket:isresumed()
Returns true if the connection is secure and resumed using a TLS session ticket.
socket:certificate()
Returns the peer's certificate chain as a table if the connection is secure and the peer sent a certificate. A second return value is set to true if the certificate's chain of trust is validated by the certificate store. However, a 'true' value does not provide complete verification since the domain name and certificate expiration time are not checked. For full validation, use sock:trusted().
socket:cipher()
Returns the cipher suite used if the connection is secure.
Cipher suites:
AES_128_GCM_SHA256
AES_256_GCM_SHA384
CHACHA20_POLY1305_SHA256
DHE_RSA_WITH_AES_128_GCM_SHA256
DHE_RSA_WITH_AES_256_GCM_SHA384
DHE_RSA_WITH_CHACHA20_POLY1305_SHA256
ECDHE_ECDSA_WITH_AES_128_GCM_SHA256
ECDHE_ECDSA_WITH_AES_256_GCM_SHA384
ECDHE_ECDSA_WITH_CHACHA20_POLY1305_SHA256
ECDHE_RSA_WITH_AES_128_GCM_SHA256
ECDHE_RSA_WITH_AES_256_GCM_SHA384
ECDHE_RSA_WITH_CHACHA20_POLY1305_SHA256
socket:trusted([host-name])
Returns the peer's "trust" status.
If the argument host-name is not provided, the certificate's common name is compared with the address provided when the connect function was called. Server connections must provide the host-name argument.
Returns true if the server's SSL certificate is trusted and the subject's common name matches the host name of the URL and the certifcate has not expired.
Returns nil,"certcn" if the subject's common name matches the host name of the URL and the certificate is validated by the CA store, but the certifcate has expired.
Returns nil,"cn" if the subject's common name matches the host name of the URL, but the certificate is not trusted.
Returns nil,"cert" if the SSL certificate is trusted but the subject's common name does not matches the host name of the URL.
Returns nil,"none" if the SSL certificate is not trusted and the subject's common name does not matches the host name of the URL or if the connection is not a TLS connection.
The Lua Thread Library allows Lua code to schedule work on native threads when a task may block for a long time in C code. Its main purpose is to protect the BAS socket dispatcher and the rest of the Lua event system from being stalled by long-running blocking operations.
Using native threads here does not make Lua itself preemptive. BAS still serializes Lua execution through its Lua mutex, and bindings must be written so they release that mutex while performing lengthy native work. All BAS bindings that are expected to block for some time, including the SQLite bindings and blocking socket calls, are designed for this model. When possible, prefer cosockets, which often remove the need for a native thread entirely.
The Lua Thread Library is shown in the bottom-right corner of the diagram above. The thread library is typically used when running Lua code that is not part of a typical web-server request/response. For example, you can design code to run at regular intervals using a timer and trigger a function that runs for a prolonged time using the thread library.
ba.thread.run(function) thread:run(function)
Delegate execution of a function to one of the threads in the Lua thread library. Execution is queued if no threads are available, i.e., if the threads are busy executing other functions. The function remains in a FIFO queue until a thread becomes ready.
There are no time limits on the execution time for the provided function. The thread executing the function becomes ready when the function returns (terminates).
Set or get the maximum number of allowed threads in the thread library. The default value is one. Threads never terminate, thus setting a higher value followed by a lower value does not reduce the thread library size. Threads are not created unless there are no available threads when function ba.thread.run() is called.
ba.thread.create()
Dynamically create a new thread. The function returns an object with two methods: thread:run and thread:dbg. The thread is activated by calling the run method on the returned object. Method thread:run works similarly to ba.thread.run, except that this method uses a dedicated native thread and not a potential pool of threads. This means that queued jobs are all executed by the same native thread, one job after the other.
Example:
local function myThreadFunc()
   for i=1,10 do
      print("Hello")
      ba.sleep(1000)
   end
end

local thread=ba.thread.create()
thread:run(myThreadFunc)
Garbage Collection: Lua uses a mechanism known as garbage collection to automatically manage memory. When there are no references pointing to an object, such as a thread object, Lua's garbage collector identifies it as "garbage" and frees the memory it occupies. Therefore, if a reference is not maintained for the returned thread object, it becomes eligible for garbage collection. When the garbage collector runs, there is a risk that it may dispose of this thread object before it has had an opportunity to run its queued job(s). To prevent this, keep a reference to the thread object for as long as the thread needs to be active.
ba.thread.dbg() thread:dbg()
The function allows Lua code to inspect the stack of running threads. It's important to note that Lua is not a preemptive language, so it's crucial to have a good understanding of how threading works before using this function. This function returns a list of all running threads.
Example:
local function mysleep() ba.sleep(500) end
ba.thread.run(function() mysleep() end)
ba.sleep(2) -- Yield and start above thread
for _,thread in ipairs(ba.thread.dbg()) do
    print(debug.traceback(thread))
end
To test the code provided, follow these steps:
Put the code in an LSP page
Run the code
The code will print out information that looks similar to this:
stack traceback:
	[C]: in function 'ba.sleep'
	t1.lsp:3: in upvalue 'mysleep'
	t1.lsp:4: in function
Software Implemented Trusted Platform Module API
The Software Implemented Trusted Platform Module (softTPM) API provides BAS Lua with a protected key-management layer for ECC/X.509 operations, persistent symmetric keys, and TPM-protected user databases.
The main purpose of the softTPM is to prevent device cloning and protect secrets at rest. Instead of exposing private keys and sensitive password material directly to the application, the TPM API keeps the key material inside a protected software boundary and exposes handles that Lua code can use to request operations such as signing, CSR creation, or key derivation.
The API is available in products such as standalone Xedge and Mako Server. For initialization details and deployment guidance, see How the TPM Works.
A TPM handle is a string name that refers to a key without revealing the key itself. This means BAS Lua code can ask the TPM to use a key without extracting that key into normal Lua memory. That is the central security difference between the TPM API and the non-TPM crypto APIs. The protection is aimed at resisting firmware or filesystem cloning; it does not prevent trusted Lua code on the same device from requesting operations that use the handle.
Another important behavior is that TPM keys are recreated by name after restart rather than restored from an exported private-key blob. Calling ba.tpm.createkey() for the same handle recreates the same protected key material, which lets an application re-establish its identity after reboot without ever storing the private key in plaintext. The following example shows the typical pattern used before calling the other TPM APIs.
if not ba.tpm.haskey"mykey" then
    ba.tpm.createkey"mykey"
end
The above code checks if the key named "mykey" exists. If it doesn't, the key is created using ba.tpm.createkey. This process ensures that your application always has access to the necessary keys, while maintaining the high security standards provided by TPM.
TPM Examples
The Light Dashboard shows how to use the TPM-protected user database.
Signs the hash using the private key. Returns the digital signature. The hash type can be "sha256", "sha384", or "sha512". Non-TPM counterpart: ba.crypto.sign().
ba.tpm.jwtsign(keyname, payload [, header])
Signs payload and returns a table with the values protected, payload, signature.
These functions generate a persistent key associated with the provided key name.
The globalkey function generates a key that is the same across all devices or computers where the function is called with the same keyname. This means that the global key will be identical regardless of the device, as long as the same keyname is used.
The uniquekey function generates a key that is unique to each device or computer where it is called, even if the same keyname is used. This means that uniquekey produces different keys on different devices, even with the same keyname.
See the Keyname Security Note in the CryptoIO documentation for how to manage the keyname.
Parameters:
keyname (string): A handle or identifier for the key. This name is used to retrieve or reference the key in future operations. It should be unique to avoid key collisions.
keylen (integer): The desired length of the key in bytes. The actual length will not be shorter than:
64 bytes if the server has been compiled with SHA-512 support.
32 bytes if the server has not been compiled with SHA-512 support.
The functions will automatically adjust the length to meet the minimum requirement.
Returns:
The functions return a string with the requested length. Note that the strings include binary data and are not printable.
Example: The globalkey and uniquekey() functions are commonly used for symmetric encryption. The example below, taken from the CryptoIO module, demonstrates how a device-specific key can be used for AES-GCM file encryption of stored data. A hash function is applied to normalize the key length to 32 bytes, as required by ba.crypto.symmetric().
local keyname="qwerty"
local key = ba.crypto.hash("sha256")(ba.tpm.uniquekey(keyname, 32))(true)
local s = ba.crypto.symmetric("GCM", key, iv)
ba.tpm.jsonuser(keyname, global)
TPM protected user database: This function returns a TPM-protected wrapper around the object created by ba.create.jsonuser(). Use it when you want the convenience of the JSON user-database API, but do not want the resulting database to be stored as plaintext or with an application-managed encryption key.
Arguments:
keyname (string): A unique identifier for the protected user database. This ID is incorporated into the encryption key calculation, ensuring that the symmetric encryption key is unique to the database.
global (boolean):
When true, the key is the same across all devices or computers. This allows the encrypted database to be copied and used on other devices.
When false, the key is unique to each device or computer, ensuring the database cannot be copied or accessed on another machine.
Returns:
A table (object) with the following functions:
setuser(name, pwd): Adds, updates, or deletes a user in the TPM-managed database.
If a string is provided, it is automatically converted to the following table: {pwd = pwd, roles = {}}.
If pwd is omitted or set to nil, the user is removed from the database.
Returns: The updated encrypted database.
Error Handling: Throws an error if pwd is provided as a table but is incorrectly formatted.
setdb(encrypteddb): Imports a previously encrypted database into the TPM-protected authenticator user database object.
encrypteddb: The encrypted database to set.
Returns: true on success or nil, error on decryption failure.
getauth(): Retrieves the authenticator user database object created by ba.create.jsonuser() and maintained by the TPM-protected wrapper.
users(): Returns a table array containing all usernames present in the database.
Example:
local io = ba.openio"home" or ba.openio"disk" -- mako or xedge
local rw=require"rwfile"

-- Read/write encrypted db. Write if 'encdb' provided
local function rwdb(encdb)
   trace(encdb and "Writing" or "Reading","userdb.encrypted")
   return rw.file(io,"userdb.encrypted",encdb)
end

-- Create the wrapper and make the encrypted DB global
local tju=ba.tpm.jsonuser("myhandle",true)
local encdb=rwdb() -- Load the encrypted DB, if any
if not encdb then
   trace"No DB, creating and saving 3 test users"
   tju.setuser("john",{pwd="qwerty",roles={}})
   -- Example using HA1 hashed pwd
   tju.setuser("alice",{pwd={ba.crypto.hash"md5"("alice")":"(realm)":"(password)(true,"hex")}},roles={}})
   -- Add the last user and persistently save the database by sending the return value to rwdb()
   rwdb(tju.setuser("bob","123456"))
else
   -- Set the DB
   local ok,err=tju.setdb(encdb)
   if not ok then trace("User DB error:",err) end
end

-- A dir we will attach an authenticator to
local privdir=ba.create.dir"private"
-- Create the authenticator and use the user DB provided by the wrapper
local authenticator=ba.create.authenticator(tju.getauth(),{type="basic"})
privdir:setauth(authenticator)
-- 'dir' is a Barracuda Resource Reader created for LSP apps by Mako and Xedge
dir:insertprolog(privdir,true) -- Protects anything in the sub-dir private/
trace("Authenticator installed @ "..dir:baseuri().."private/")
The example starts by creating an IO object for storing the encrypted user database. When using the Mako Server, the current directory is used; for Xedge, "disk" is used.
The rwdb function reads from or writes to an encrypted database using the rwfile module. If no database is found, the example creates a test user database. In a real-world scenario, user management would typically be handled through a web interface, with the authenticator installed only if a user database is available. The Light Dashboard Example provides a web interface for managing a TPM-protected user database.
The example then creates a privdir instance, installs the authenticator on this directory, and links it to the main directory of the LSP application. This setup demonstrates protecting only a subset of the web application, leaving room for a public and a protected section, which is a common pattern in web applications.
You can test the above example using either the Mako Server or Xedge. To do so, create an application and add a .preload file in the app root directory. Insert the provided code into the .preload script, then run the application.
TraceLogger
TraceLogger is a browser-based viewer for the BAS trace buffer. It lets you decide what the trace buffer records and then watch the resulting output in real time from a web page. The default web interface URI is /rtl/tracelogger/, where the client-side JavaScript opens a persistent connection to ../tracelogger.service/. Output from trace() and _G.print() also flows into this buffer. TraceLogger is optional and must be installed by the C startup code; the Mako Server includes it by default.
Tutorial:
The tutorial Logging for Testing and Production Mode includes recommendations for using the TraceLogger, including an option that enables a more permanent option for receiving and saving TraceLogger data. When using the Mako Server, the TraceLogger data is saved in mako.log (Linux: /var/log/mako.log).
API:
local dir=ba.create.tracelogger()
Create a TraceLogger directory object. The returned object exposes the TraceLogger web service used by the browser client in index.html.
Example code: study the Mako Server's .config script.
Note: the TraceLogger directory object keeps an internal self-reference and will not be garbage collected until dir:close() is called. Because it is wired to the global trace buffer, only one TraceLogger instance can exist at a time.
The created directory object adds the following TraceLogger-specific method:
dir:configure([op])
Set and/or get the server's trace buffer settings.
The option (op) table:
request=bool (default false) -- Trace the HTTP method type and URL for each request.
requestheaders=bool (default false) -- Trace the HTTP headers for each request.
responseheaders=bool (default false) -- Trace all HTTP response headers.
responsebody=bool (default false) -- Trace all response data created by dynamic pages such as LSP and CSP.
http11state=bool (default false) -- Trace the server's internal HTTP 1.1 state machine.
priority=number (default 5) -- Set the trace priority.
dir:onclient(callback)
Install a callback that gets called when the TraceLogger client connects and disconnects. The callback receives a number set to zero if no client is connected and one if a client is connected. The client also gets the session number as a second argument if the first argument is one and the client is authenticated. The session object can be retrieved by calling ba.session(second-argument).
dir:close()
Shuts down all active connections, removes the directory from the virtual file system (if installed), and releases the reference so the garbage collector can remove the directory object.